Zum Hauptinhalt wechseln

Asus Eee PC 1201N Cooling fan replacement

Was du brauchst

  1. Asus Eee PC 1201N Cooling fan replacement, Battery: Schritt 1, Bild 1 von 1
    • Flip the netbook over.

    • Be sure to unplug the netbook and power off the device while working.

  2. Asus Eee PC 1201N Cooling fan replacement: Schritt 2, Bild 1 von 1
    • Push open both tabs on either side of the battery.

    • The tab on the left will click open and stay in place until you close it.

  3. Asus Eee PC 1201N Cooling fan replacement: Schritt 3, Bild 1 von 1
    • Pull the tab on the right open, while you remove battery with your other hand.

    • Pull the battery straight out ensuring that you don't damage any connectors.

  4. Asus Eee PC 1201N Cooling fan replacement, Keyboard: Schritt 4, Bild 1 von 2 Asus Eee PC 1201N Cooling fan replacement, Keyboard: Schritt 4, Bild 2 von 2
    • Open the netbook to find the four small grooves along the top of the keyboard.

    • Pry the keyboard up using the plastic opening tool.

  5. Asus Eee PC 1201N Cooling fan replacement: Schritt 5, Bild 1 von 2 Asus Eee PC 1201N Cooling fan replacement: Schritt 5, Bild 2 von 2
    • Tilt the keyboard away from you to access the connector. Gently push the lock toward the screen to unlock it and slide the ribbon out.

    • Remove the keyboard.

  6. Asus Eee PC 1201N Cooling fan replacement, Cooling fan: Schritt 6, Bild 1 von 1
    • Remove the eight 6.5mm screws using the J0 Phillips head screwdriver from back of the netbook.

  7. Asus Eee PC 1201N Cooling fan replacement: Schritt 7, Bild 1 von 2 Asus Eee PC 1201N Cooling fan replacement: Schritt 7, Bild 2 von 2
    • Remove the ten 4.5 mm screws from cover plate using the J0 Phillips head screwdriver.

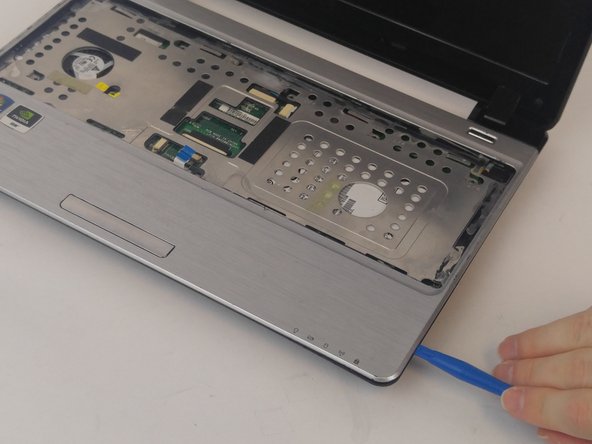
    • Remove the cover plate by sliding the plastic opening tool around the entire edge of the plate.

  8. Asus Eee PC 1201N Cooling fan replacement: Schritt 8, Bild 1 von 1
    • Pull the blue tab for the touchpad connector before removing the cover plate completely.

  9. Asus Eee PC 1201N Cooling fan replacement: Schritt 9, Bild 1 von 1
    • Remove the two 4.6 mm screws from the cover plate using the J0 Phillips head screwdriver.

  10. Asus Eee PC 1201N Cooling fan replacement: Schritt 10, Bild 1 von 1
    • Unplug the connector.

  11. Asus Eee PC 1201N Cooling fan replacement: Schritt 11, Bild 1 von 1
    • Lift up and remove the fan.

Abschluss

To reassemble your device, follow these instructions in reverse order.

Ein:e weitere:r Nutzer:in hat diese Anleitung absolviert.

Team

USF Tampa, Team 2-3, Nance Fall 2016 Mitglied von USF Tampa, Team 2-3, Nance Fall 2016

USFT-NANCE-F16S2G3

4 Mitglieder

12 Anleitungen geschrieben

0 Kommentare

Kommentar hinzufügen

Seitenaufrufe:

Letzte 24 Stunden: 0

Letzte 7 Tage: 0

Letzte 30 Tage: 4

Insgesamt: 916