Zum Hauptinhalt wechseln

Asus Eee PC T101MT RAM Replacement

Was du brauchst

  1. Asus Eee PC T101MT RAM Replacement, Battery: Schritt 1, Bild 1 von 1
    • Before you begin, make sure your device is powered off and not connected to the power supply.

    • Turn the tablet over and position it so it matches the picture.

  2. Asus Eee PC T101MT RAM Replacement: Schritt 2, Bild 1 von 1
    • Locate the sliding tab on the right and slide it to the left in order to unlock the battery.

  3. Asus Eee PC T101MT RAM Replacement: Schritt 3, Bild 1 von 1
    • Use a plastic opening tool to lift the battery up as you slide the tab on the left to the right.

  4. Asus Eee PC T101MT RAM Replacement: Schritt 4, Bild 1 von 1
    • Lift the battery out of the device.

  5. Asus Eee PC T101MT RAM Replacement, RAM: Schritt 5, Bild 1 von 1
    • Locate the compartment where the RAM is stored.

  6. Asus Eee PC T101MT RAM Replacement: Schritt 6, Bild 1 von 2 Asus Eee PC T101MT RAM Replacement: Schritt 6, Bild 2 von 2
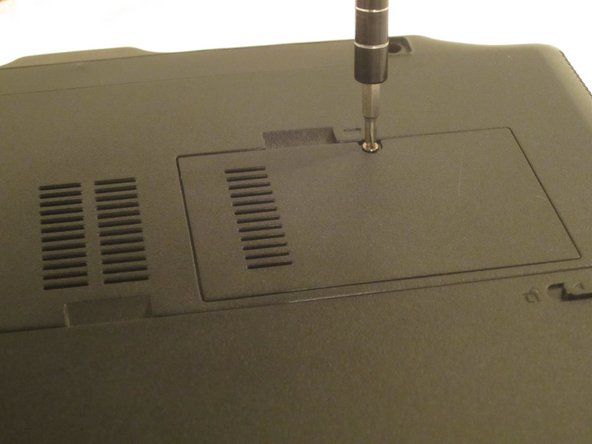
    • Grab a drive adapter and a PH0 phillips head bit and use the screwdriver to remove the 5mm screw from the cover of the compartment.

  7. Asus Eee PC T101MT RAM Replacement: Schritt 7, Bild 1 von 2 Asus Eee PC T101MT RAM Replacement: Schritt 7, Bild 2 von 2
    • Use a plastic opening tool to remove the cover.

  8. Asus Eee PC T101MT RAM Replacement: Schritt 8, Bild 1 von 3 Asus Eee PC T101MT RAM Replacement: Schritt 8, Bild 2 von 3 Asus Eee PC T101MT RAM Replacement: Schritt 8, Bild 3 von 3
    • In order to release the RAM module, you will need to move the metal tabs on both sides at the same time. This can be accomplished by using plastic opening tools or your fingers.

  9. Asus Eee PC T101MT RAM Replacement: Schritt 9, Bild 1 von 2 Asus Eee PC T101MT RAM Replacement: Schritt 9, Bild 2 von 2
    • Once you move the tabs, the RAM module will pop up and you can remove it with your fingers so you can put in a replacement.

Abschluss

To reassemble your device, follow these instructions in reverse order.

2 weitere Nutzer:innen haben diese Anleitung absolviert.

Team

Gateway, Team 1-1, Kuhn Fall 2015 Mitglied von Gateway, Team 1-1, Kuhn Fall 2015

GCC-KUHN-F15S1G1

1 Mitglied

10 Anleitungen geschrieben

0 Kommentare

Kommentar hinzufügen

Seitenaufrufe:

Letzte 24 Stunden: 1

Letzte 7 Tage: 3

Letzte 30 Tage: 3

Insgesamt: 489