Zum Hauptinhalt wechseln

Asus Eee PC T101MT Wireless Network Interface Card Replacement

Was du brauchst

  1. Asus Eee PC T101MT Wireless Network Interface Card Replacement, Battery: Schritt 1, Bild 1 von 1
    • Before you begin, make sure your device is powered off and not connected to the power supply.

    • Turn the tablet over and position it so it matches the picture.

  2. Asus Eee PC T101MT Wireless Network Interface Card Replacement: Schritt 2, Bild 1 von 1
    • Locate the sliding tab on the right and slide it to the left in order to unlock the battery.

  3. Asus Eee PC T101MT Wireless Network Interface Card Replacement: Schritt 3, Bild 1 von 1
    • Use a plastic opening tool to lift the battery up as you slide the tab on the left to the right.

  4. Asus Eee PC T101MT Wireless Network Interface Card Replacement: Schritt 4, Bild 1 von 1
    • Lift the battery out of the device.

  5. Asus Eee PC T101MT Wireless Network Interface Card Replacement, Keyboard: Schritt 5, Bild 1 von 3 Asus Eee PC T101MT Wireless Network Interface Card Replacement, Keyboard: Schritt 5, Bild 2 von 3 Asus Eee PC T101MT Wireless Network Interface Card Replacement, Keyboard: Schritt 5, Bild 3 von 3
    • Turn the tablet over and open it up. Insert a nylon spudger into the slots above F1, F6, F10 to pry up the keyboard.

  6. Asus Eee PC T101MT Wireless Network Interface Card Replacement: Schritt 6, Bild 1 von 1
    • Once you have the keyboard out, use the nylon spudger to remove the connection. You can now replace the keyboard.

  7. Asus Eee PC T101MT Wireless Network Interface Card Replacement, Wireless Network Interface Card: Schritt 7, Bild 1 von 1
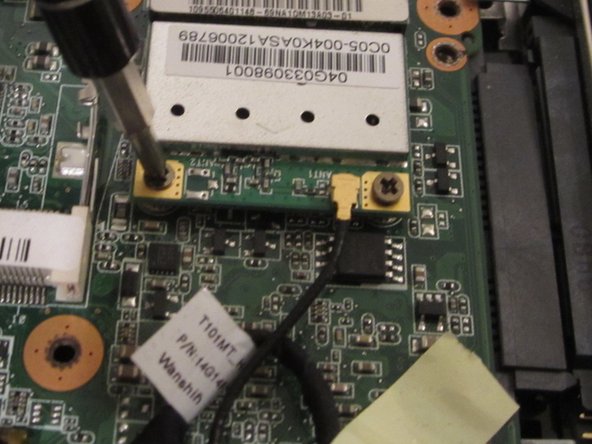
    • Locate the wireless NIC (network interface card).

  8. Asus Eee PC T101MT Wireless Network Interface Card Replacement: Schritt 8, Bild 1 von 2 Asus Eee PC T101MT Wireless Network Interface Card Replacement: Schritt 8, Bild 2 von 2
    • Use a nylon spudger to lift the wireless antenna from the NIC and remove the screws.

  9. Asus Eee PC T101MT Wireless Network Interface Card Replacement: Schritt 9, Bild 1 von 1
    • Remove and replace the wireless card.

Abschluss

To reassemble your device, follow these instructions in reverse order.

Team

Gateway, Team 1-1, Kuhn Fall 2015 Mitglied von Gateway, Team 1-1, Kuhn Fall 2015

GCC-KUHN-F15S1G1

1 Mitglied

10 Anleitungen geschrieben

0 Kommentare

Kommentar hinzufügen

Seitenaufrufe:

Letzte 24 Stunden: 0

Letzte 7 Tage: 3

Letzte 30 Tage: 5

Insgesamt: 633