Zum Hauptinhalt wechseln

Asus MeMO Pad 7 ME176C Speaker Replacement

Was du brauchst

  1. Asus MeMO Pad 7 ME176C Speaker Replacement, Speakers: Schritt 1, Bild 1 von 2 Asus MeMO Pad 7 ME176C Speaker Replacement, Speakers: Schritt 1, Bild 2 von 2
    In diesem Schritt verwendetes Werkzeug:
    iFixit Opening Tool
    $1.99
    Kaufen
    • Make sure the device is turned off.

    • Carefully insert the opening tool on the edge of the phone.

    • Slowly lift up the panel from the device and repeat the process on the other side.

  2. Asus MeMO Pad 7 ME176C Speaker Replacement: Schritt 2, Bild 1 von 3 Asus MeMO Pad 7 ME176C Speaker Replacement: Schritt 2, Bild 2 von 3 Asus MeMO Pad 7 ME176C Speaker Replacement: Schritt 2, Bild 3 von 3
    • To disconnect the ZIF connectors. Place the metal spudger underneath the ZIF cable and gently pull it outward.

    • ZIF connectors are fragile, so work with caution.

  3. Asus MeMO Pad 7 ME176C Speaker Replacement: Schritt 3, Bild 1 von 3 Asus MeMO Pad 7 ME176C Speaker Replacement: Schritt 3, Bild 2 von 3 Asus MeMO Pad 7 ME176C Speaker Replacement: Schritt 3, Bild 3 von 3
    • The battery connector is located on the right-hand side of the device

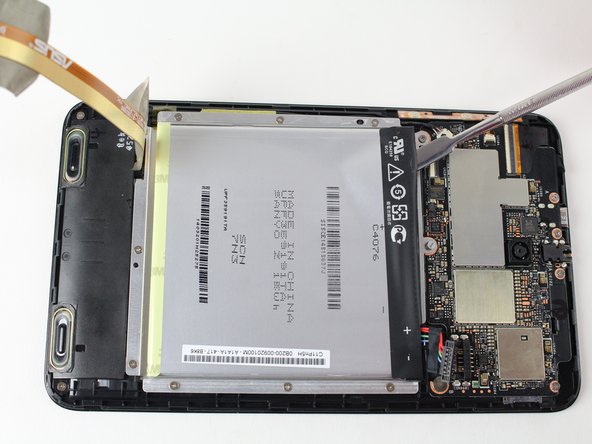
    • To disconnect the battery connector. Use tweezers, and carefully lift up the wire.

    • Remove the battery.

  4. Asus MeMO Pad 7 ME176C Speaker Replacement: Schritt 4, Bild 1 von 1
    • Using a Philips Head Screwdriver PH000, locate the 2.6mm screws and gently unscrew them .

    • Place these screws somewhere you will remember.

    • Applying too much pressure onto the screen may cause it to break.

  5. Asus MeMO Pad 7 ME176C Speaker Replacement: Schritt 5, Bild 1 von 3 Asus MeMO Pad 7 ME176C Speaker Replacement: Schritt 5, Bild 2 von 3 Asus MeMO Pad 7 ME176C Speaker Replacement: Schritt 5, Bild 3 von 3
    • Using tweezers, disconnect the speaker cable connected to the motherboard.

    • Be sure not to damage other components on the motherboard.

    • After that remove the speaker system completely.

  6. Asus MeMO Pad 7 ME176C Speaker Replacement: Schritt 6, Bild 1 von 1
    • Now you can attach a new speaker!

Abschluss

To reassemble your device, follow these instructions in reverse order.

Maxime

Mitglied seit: 09/26/17

101 Reputation

1 Anleitung geschrieben

Team

Cal Poly, Team S6-G3, Banghart Fall 2017 Mitglied von Cal Poly, Team S6-G3, Banghart Fall 2017

CPSU-BANGHART-F17S6G3

5 Mitglieder

9 Anleitungen geschrieben

0 Kommentare

Kommentar hinzufügen

Seitenaufrufe:

Letzte 24 Stunden: 0

Letzte 7 Tage: 0

Letzte 30 Tage: 2

Insgesamt: 221