Diese Version enthält möglicherweise inkorrekte Änderungen. Wechsle zur letzten geprüften Version.
Was du brauchst
-
Dieser Schritt ist noch nicht übersetzt. Hilf mit, ihn zu übersetzen!
-
Lift the rubber cover found on the bottom of the laptop.
-
Remove the 5.2 mm screw with a Phillips 1 Screwdriver.
-
-
Dieser Schritt ist noch nicht übersetzt. Hilf mit, ihn zu übersetzen!
-
Use the nylon spudger to remove the back center panel.
-
-
Dieser Schritt ist noch nicht übersetzt. Hilf mit, ihn zu übersetzen!
-
Use a Phillips 1 Screwdriver to remove the 5 mm screw that is located underneath the back panel.
-
-
Dieser Schritt ist noch nicht übersetzt. Hilf mit, ihn zu übersetzen!
-
Pull out the optical drive found on the side of the laptop.
-
-
Dieser Schritt ist noch nicht übersetzt. Hilf mit, ihn zu übersetzen!
-
Use a pair of tweezers to remove the top four rubber stoppers found on the bottom of the laptop.
-
-
-
Dieser Schritt ist noch nicht übersetzt. Hilf mit, ihn zu übersetzen!
-
Use a Phillips 1 Screwdriver to remove the top four 8.5 mm screws.
-
-
Dieser Schritt ist noch nicht übersetzt. Hilf mit, ihn zu übersetzen!
-
Use a nylon spudger to carefully pry the top back panel off.
-
Disconnect the four-pin connector and remove the top back panel from the computer.
-
-
Dieser Schritt ist noch nicht übersetzt. Hilf mit, ihn zu übersetzen!
-
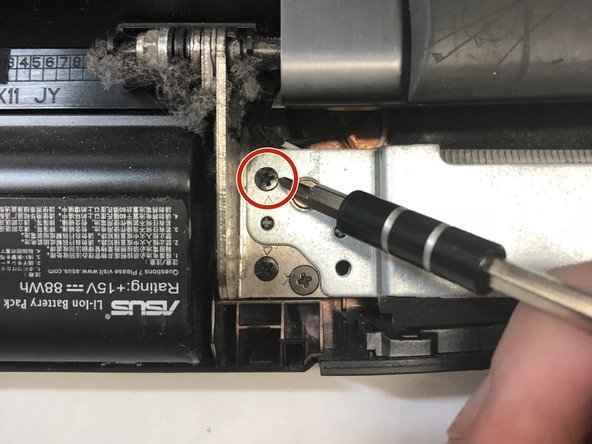
Use a Phillips 1 Screwdriver to remove the four 6.8 mm screws underneath the back panel.
-
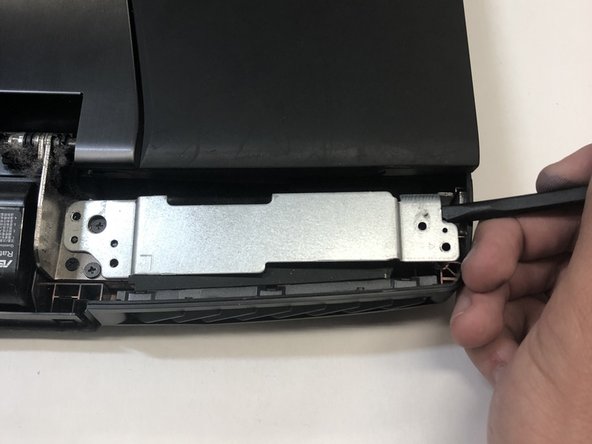
Lift away the metal housings from each side of the laptop.
There are 3 screws to remove on the left side as the rear of the laptop is facing you.
-
-
Dieser Schritt ist noch nicht übersetzt. Hilf mit, ihn zu übersetzen!
-
Use a Phillips 1 Screwdriver to remove the ten 5.2 mm screws holding the main panel in place.
-
Use a Phillips 1 Screwdriver to remove the four 5.2 mm screws underneath the center panel.
-
-
Dieser Schritt ist noch nicht übersetzt. Hilf mit, ihn zu übersetzen!
-
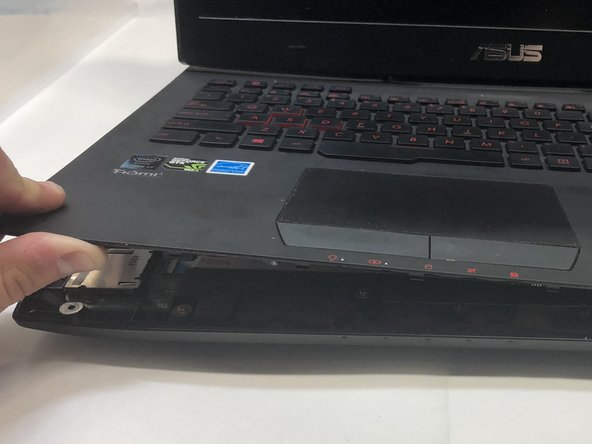
Use a plastic opening tool to pry the keyboard from the base of the laptop.
-
-
Dieser Schritt ist noch nicht übersetzt. Hilf mit, ihn zu übersetzen!
-
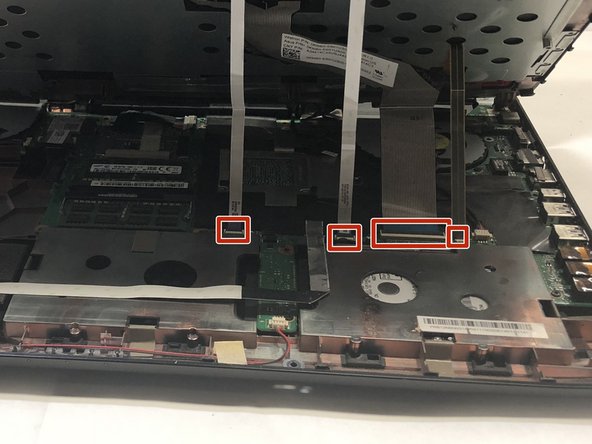
Use a pair of tweezers to undo each of the four ribbon connectors.
-
The keyboard is now completely disconnected from the laptop and you can remove it.
ON STEP 11
Do not just pull the ribbons out! locate the grey bar on the connectors and lift them gently from the ribbon side upward, they will open and the ribbons will come away easily, replace the ribbons by putting them in place and clicking down the grey bars to lock them in.
Crud!! I didn't see your comment in time, Pastor! I am not accustomed to ribbon connectors. I found out too late, after severing one, that they each have “clips” locking them in place. This battery replacement just became complicated.
This is the keyboard panel removal. What about removing the keyboard from the keyboard panel?
-
-
Dieser Schritt ist noch nicht übersetzt. Hilf mit, ihn zu übersetzen!
-
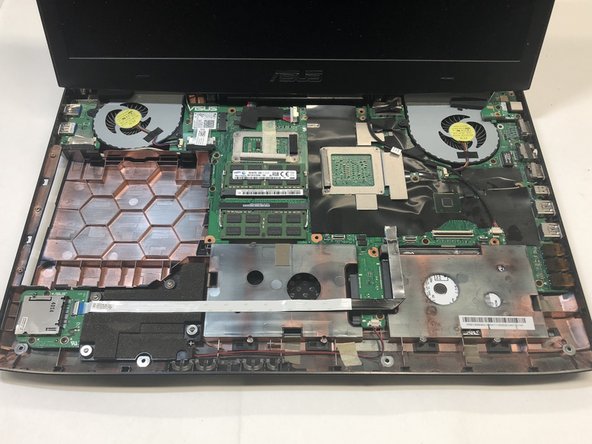
Use a pair of tweezers to carefully disconnect the pin connector.
ON STEP 12
BEWARE The guidance and second photo here is for the battery connector!!
DO NOT REMOVE MONITOR UNTIL YOU HAVE DISCONNECTED THE BLACK AND WHITE CABLES ON THE LEFT SIDE OF THE LEFT HINGE (Lift then off gently with tweezers) AND THE FLAT CONNECTOR ON THE RIGHT SIDE OF THE RIGHT HINGE! (There is a strap for you to gently pull on!)
I have a red and yellow wires that i have no idea were they go they are coming out of the monitor
I have a red and a blue wire coming from my monitor I have no idea where they go there's nothing in the instructions that said anything about them anyone have any thoughts
-
-
Dieser Schritt ist noch nicht übersetzt. Hilf mit, ihn zu übersetzen!
-
Use a Phillips 1 Screwdriver to remove the final four remaining 6.8 mm screws located underneath the back panel.
-
The monitor is now free to be completely lifted off the laptop.
-
-
Dieser Schritt ist noch nicht übersetzt. Hilf mit, ihn zu übersetzen!
-
Disconnect the pin connector that attaches the battery to the motherboard.
-
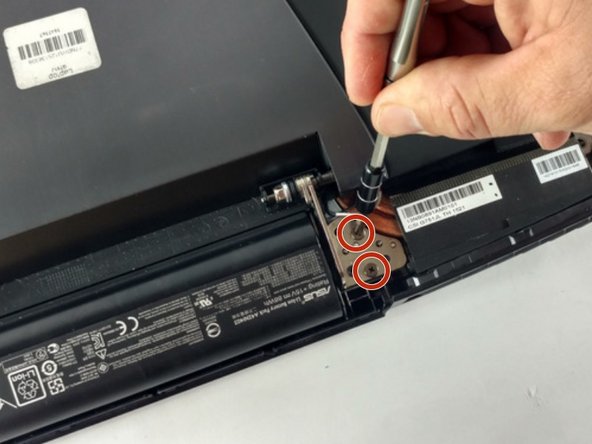
Use a Phillips 1 Screwdriver to remove the two 5.4 mm screws.
-
-
Dieser Schritt ist noch nicht übersetzt. Hilf mit, ihn zu übersetzen!
-
The battery can now be lifted away from the laptop.
-
Rückgängig: Ich habe diese Anleitung nicht absolviert.
7 weitere Nutzer:innen haben diese Anleitung absolviert.
3 Kommentare
Can yo please share the review of this battery? Should I go for original battery or ifixit battery?
Thank you so much for this Aurora it really helped me work on my ROG, hope my extra notes on Section 11 & 12 help others! Blessings!
I have a G751JT-CH71 & I'm not sure if the models are slightly different but I cannot remove the battery by simply lifting it out of the compartment. The battery has 4 lock-in tabs towards the back of the laptop AND 2 additional tabs that are beneath the board. I'm going to carefully pry the battery out, but I'm unsure if there's a recommended method to prying the battery out…









The screw doesn't come out completely.
Steve Menard - Antwort