Zum Hauptinhalt wechseln

Asus Transformer T100 Front Facing Camera Board Replacement

Was du brauchst

  1. Asus Transformer T100 Front Facing Camera Board Replacement, Rear Cover: Schritt 1, Bild 1 von 2 Asus Transformer T100 Front Facing Camera Board Replacement, Rear Cover: Schritt 1, Bild 2 von 2
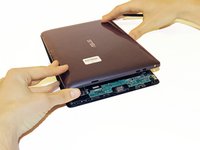
    • Separate the tablet from the base by pressing the large silver button below the tablet. The silver button is located at the base of the tablet.

    • Remove the tablet by lifting up.

  2. Asus Transformer T100 Front Facing Camera Board Replacement: Schritt 2, Bild 1 von 2 Asus Transformer T100 Front Facing Camera Board Replacement: Schritt 2, Bild 2 von 2
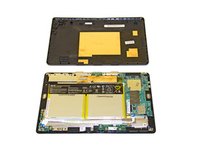
    • Insert the opening tool into the seam of the tablet casing and gently pry upwards.

    • With a little force, you will feel the clips release.

  3. Asus Transformer T100 Front Facing Camera Board Replacement: Schritt 3, Bild 1 von 1
    • Slide the tool along all four edges of the tablet, making sure that all the clips are released.

    • Do not break these clips; otherwise, the screen will become less secure.

  4. Asus Transformer T100 Front Facing Camera Board Replacement: Schritt 4, Bild 1 von 2 Asus Transformer T100 Front Facing Camera Board Replacement: Schritt 4, Bild 2 von 2
    • Remove the rear casing.

  5. Asus Transformer T100 Front Facing Camera Board Replacement, Front Facing Camera Board: Schritt 5, Bild 1 von 1
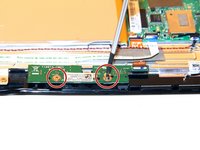
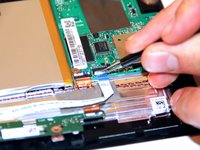
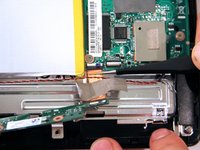
    • The camera board is located in the red square in this image.

  6. Asus Transformer T100 Front Facing Camera Board Replacement: Schritt 6, Bild 1 von 2 Asus Transformer T100 Front Facing Camera Board Replacement: Schritt 6, Bild 2 von 2
    • Remove the two screws on the camera board using a Phillips #1 Screwdriver.

  7. Asus Transformer T100 Front Facing Camera Board Replacement: Schritt 7, Bild 1 von 3 Asus Transformer T100 Front Facing Camera Board Replacement: Schritt 7, Bild 2 von 3 Asus Transformer T100 Front Facing Camera Board Replacement: Schritt 7, Bild 3 von 3
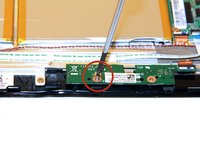
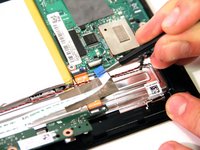
    • Lift up the power button cable retention clip on the motherboard and pull the cable out.

  8. Asus Transformer T100 Front Facing Camera Board Replacement: Schritt 8, Bild 1 von 2 Asus Transformer T100 Front Facing Camera Board Replacement: Schritt 8, Bild 2 von 2
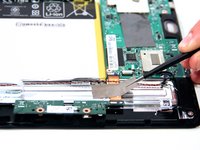
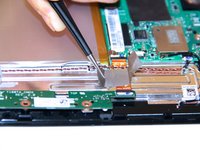
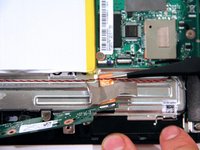
    • On the camera connection apparatus, locate the silver tape that connects to the tablet.

    • Peel the silver tape off of the tablet on both sides of the connection apparatus.

    • If this step has been completed correctly, the camera board should be loose, with the tape still attached to the connection apparatus.

  9. Asus Transformer T100 Front Facing Camera Board Replacement: Schritt 9, Bild 1 von 3 Asus Transformer T100 Front Facing Camera Board Replacement: Schritt 9, Bild 2 von 3 Asus Transformer T100 Front Facing Camera Board Replacement: Schritt 9, Bild 3 von 3
    • Gently pull the Orange ribbon cable out of the connection port.

    • This port has no clip. The orange apparatus should slide out with a small tug.

Abschluss

To reassemble your device, follow these instructions in reverse order.

2 weitere Nutzer:innen haben diese Anleitung absolviert.

Taylor Pantiga

Mitglied seit: 04/14/14

1.596 Reputation

6 Anleitungen geschrieben

Team

Cal Poly, Team 13-31, Maness Spring 2014 Mitglied von Cal Poly, Team 13-31, Maness Spring 2014

CPSU-MANESS-S14S13G31

3 Mitglieder

6 Anleitungen geschrieben

Ein Kommentar

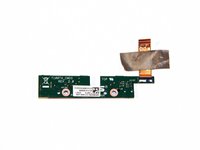
Hello, can you please tell a manufacturer of the camera (is it writter somethere on it)?

Alexius Hoopakele Ae - Antwort

Kommentar hinzufügen

Seitenaufrufe:

Letzte 24 Stunden: 0

Letzte 7 Tage: 4

Letzte 30 Tage: 4

Insgesamt: 3,658