Zum Hauptinhalt wechseln

Asus X502CA-BCL0901D Battery Replacement

Was du brauchst

  1. Asus X502CA-BCL0901D Battery Replacement, Keyboard: Schritt 1, Bild 1 von 1
    • Flip the laptop over so that it is upside down.

  2. Asus X502CA-BCL0901D Battery Replacement: Schritt 2, Bild 1 von 1
    • Remove the 11 screws from the bottom of the laptop with the Phillips #00 screwdriver.

    • All the screws are 20 mm in diameter. The 4 screws that are furthest from the hinge are 50 mm long, the other 7 are 90 mm long.

  3. Asus X502CA-BCL0901D Battery Replacement: Schritt 3, Bild 1 von 2 Asus X502CA-BCL0901D Battery Replacement: Schritt 3, Bild 2 von 2
    • Use the Plastic Opening Tool to pry the keyboard assembly away from the rest of the laptop.

    • Take care not to lift the keyboard assembly to far away from the laptop as there are short cables that need to be disconnected first.

  4. Asus X502CA-BCL0901D Battery Replacement: Schritt 4, Bild 1 von 1
    • While lifting the keyboard assembly, use the tweezers to gently remove the keyboard cable and the touch pad cable by pulling the wires away from the laptop base. Both cables must be gently but firmly pulled towards you for safe removal.

    • Take care not to lift the keyboard assembly to far away from the laptop as there are short cables that need to be disconnected first.

  5. Asus X502CA-BCL0901D Battery Replacement: Schritt 5, Bild 1 von 2 Asus X502CA-BCL0901D Battery Replacement: Schritt 5, Bild 2 von 2
    • Lift the keyboard assembly away from the remainder of the laptop.

  6. Asus X502CA-BCL0901D Battery Replacement, Battery: Schritt 6, Bild 1 von 1
    • Unplug the battery from the laptop with the tweezers.

    • If the battery is not unplugged, the motherboard may shock you.

  7. Asus X502CA-BCL0901D Battery Replacement: Schritt 7, Bild 1 von 2 Asus X502CA-BCL0901D Battery Replacement: Schritt 7, Bild 2 von 2
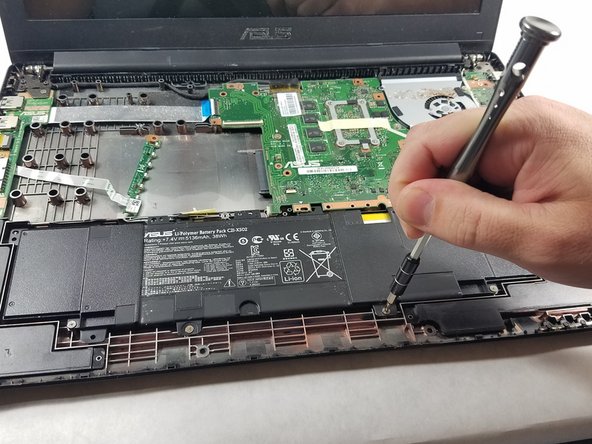
    • Using the Phillips #00 screwdriver, unscrew the 6 screws holding the battery in place.

    • Each screw is 50 mm in length and 15 mm in diameter.

  8. Asus X502CA-BCL0901D Battery Replacement: Schritt 8, Bild 1 von 1
    • Lift the battery out of the laptop.

Abschluss

To reassemble your device, follow these instructions in reverse order.

Gregory Browne

Mitglied seit: 10/19/17

501 Reputation

5 Anleitungen geschrieben

Team

UMass Dartmouth, Team S3-G5, Bailey Fall 2017 Mitglied von UMass Dartmouth, Team S3-G5, Bailey Fall 2017

UMASSD-BAILEY-F17S3G5

2 Mitglieder

5 Anleitungen geschrieben

0 Kommentare

Kommentar hinzufügen

Seitenaufrufe:

Letzte 24 Stunden: 0

Letzte 7 Tage: 0

Letzte 30 Tage: 1

Insgesamt: 275