Zum Hauptinhalt wechseln
Gemeinsam reparieren - Jetzt registrieren

Asus X751MA-DH01TQ Fan Replacement

Was du brauchst

  1. Asus X751MA-DH01TQ Fan Replacement, Fan: Schritt 1, Bild 1 von 2 Asus X751MA-DH01TQ Fan Replacement, Fan: Schritt 1, Bild 2 von 2
    • Turn the laptop upside down.

    • Remove all ten screws using a 00 Phillips head screwdriver.

    Frag FixBot

    Kommentar hinzufügen

  2. Asus X751MA-DH01TQ Fan Replacement: Schritt 2, Bild 1 von 1
    • Use a plastic opening tool to take the keyboard off of the base.

    • Gently take off the keyboard from the base.

    Frag FixBot

    Kommentar hinzufügen

  3. Asus X751MA-DH01TQ Fan Replacement: Schritt 3, Bild 1 von 2 Asus X751MA-DH01TQ Fan Replacement: Schritt 3, Bild 2 von 2
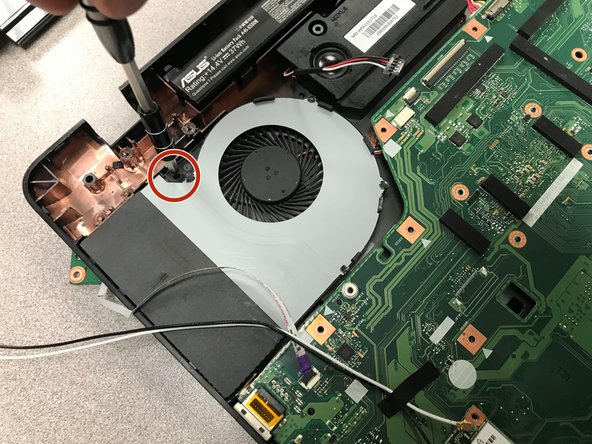
    • Remove the two screws directly above the fan.

    Frag FixBot

    Kommentar hinzufügen

  4. Asus X751MA-DH01TQ Fan Replacement: Schritt 4, Bild 1 von 2 Asus X751MA-DH01TQ Fan Replacement: Schritt 4, Bild 2 von 2
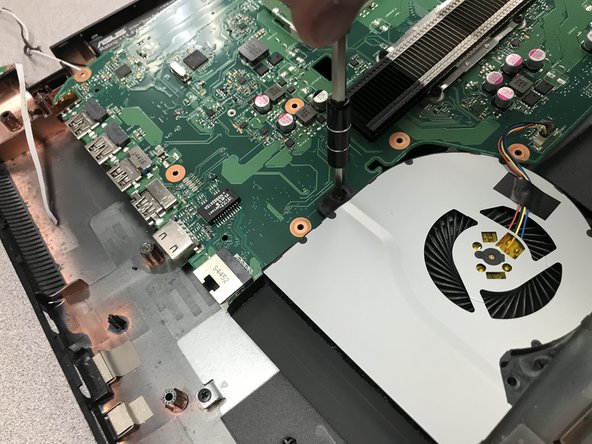
    • Unscrew the 11 screws that hold the motherboard to the base of the computer with a 00 Phillips screwdriver.

    Frag FixBot

    Kommentar hinzufügen

  5. Asus X751MA-DH01TQ Fan Replacement: Schritt 5, Bild 1 von 2 Asus X751MA-DH01TQ Fan Replacement: Schritt 5, Bild 2 von 2
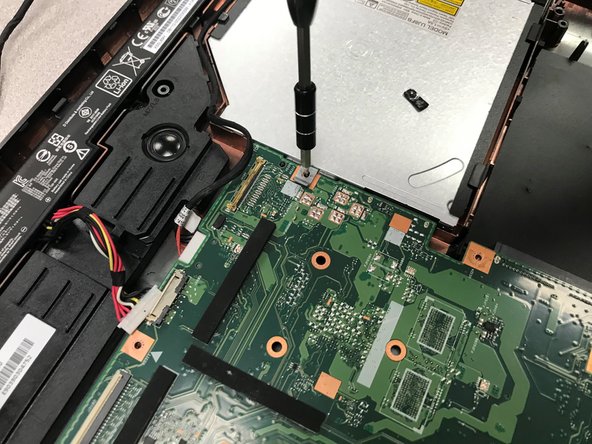
    • Remove the one screw on the right side of the motherboard that keeps the cd tray in place.

    Frag FixBot

    Kommentar hinzufügen

  6. Asus X751MA-DH01TQ Fan Replacement: Schritt 6, Bild 1 von 2 Asus X751MA-DH01TQ Fan Replacement: Schritt 6, Bild 2 von 2
    • Gently take the motherboard off the base and flip it over.

    • Remove the screws securing the fan to the motherboard.

    Frag FixBot

    Kommentar hinzufügen

  7. Asus X751MA-DH01TQ Fan Replacement: Schritt 7, Bild 1 von 2 Asus X751MA-DH01TQ Fan Replacement: Schritt 7, Bild 2 von 2
    • Remove the Phillips #00 screw that holds the fan to the motherboard.

    Frag FixBot

    Kommentar hinzufügen

  8. Asus X751MA-DH01TQ Fan Replacement: Schritt 8, Bild 1 von 2 Asus X751MA-DH01TQ Fan Replacement: Schritt 8, Bild 2 von 2
    • On the bottom of the motherboard, locate the wire plugged in and pull it out to completely detach the fan from the motherboard.

    Frag FixBot

    Kommentar hinzufügen

Abschluss

To reassemble your device, follow these instructions in reverse order.

Rückgängig: Ich habe diese Anleitung nicht absolviert.

Eine weitere Person hat diese Anleitung absolviert.

0 Kommentare zur Anleitung

Kommentar hinzufügen

Seitenaufrufe:

Letzte 24 Stunden: 2

Letzte 7 Tage: 7

Letzte 30 Tage: 32

Insgesamt: 701