Diese Version enthält möglicherweise inkorrekte Änderungen. Wechsle zur letzten geprüften Version.
Was du brauchst
-
Dieser Schritt ist noch nicht übersetzt. Hilf mit, ihn zu übersetzen!
-
Locate the back side of the phone.
-
The battery is the large main compartment (red box).
-
-
Dieser Schritt ist noch nicht übersetzt. Hilf mit, ihn zu übersetzen!
-
Use your finger to slide the latch (circled) upwards.
-
While holding the latch up, pull the battery off the phone.
-
-
Dieser Schritt ist noch nicht übersetzt. Hilf mit, ihn zu übersetzen!
-
The back of the phone will look like this when the battery is correctly removed.
-
-
Dieser Schritt ist noch nicht übersetzt. Hilf mit, ihn zu übersetzen!
-
Peel the rubber indicated toward the top of the phone
-
-
-
Dieser Schritt ist noch nicht übersetzt. Hilf mit, ihn zu übersetzen!
-
Remove the screw that sits underneath the rubber covering.
-
-
Dieser Schritt ist noch nicht übersetzt. Hilf mit, ihn zu übersetzen!
-
Remove the five (5) total screws using a Philips head screwdriver.
-
-
Dieser Schritt ist noch nicht übersetzt. Hilf mit, ihn zu übersetzen!
-
Use spudger and insert it towards the bottom of the phone as pictured.
-
Carefully working yourself around the phone with the spudger, pry it open. This may require a bit of force.
-
The volume control button will be loose, so make sure to take it out once the rear case is fully removed.
-
-
Dieser Schritt ist noch nicht übersetzt. Hilf mit, ihn zu übersetzen!
-
The back case should now be completely removed and the motherboard will be visible.
-
-
Dieser Schritt ist noch nicht übersetzt. Hilf mit, ihn zu übersetzen!
-
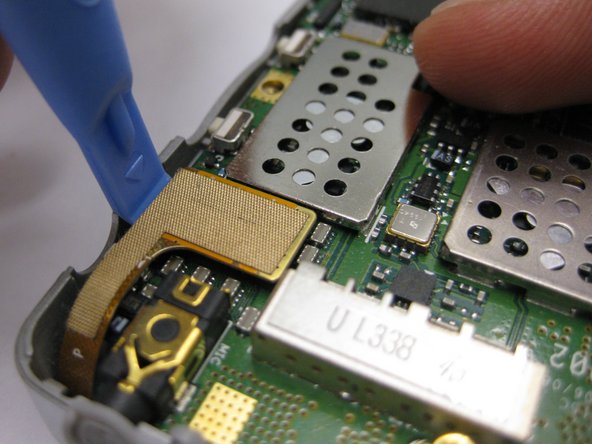
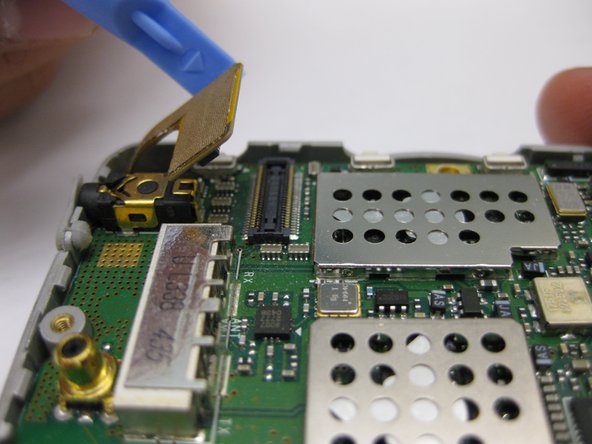
Disconnect the gold connection patch
-
Use a spudger or finger to disconnect the piece.
-
-
Dieser Schritt ist noch nicht übersetzt. Hilf mit, ihn zu übersetzen!
-
Using a spudger, lift the motherboard out of the phone case as pictured.
-
-
Dieser Schritt ist noch nicht übersetzt. Hilf mit, ihn zu übersetzen!
-
The motherboard should now be completely removed from the phone.
-


Team

Cal Poly, Team 3-24, Regan Fall 2010 Mitglied von Cal Poly, Team 3-24, Regan Fall 2010
CPSU-REGAN-F10S3G24
4 Mitglieder
12 Anleitungen geschrieben
Ein Kommentar
Where on this phone’s motherboard is the memory card located? I’d like to try and remove mine to download the data from it.