Einleitung
Wenn der Staubsauger keinen Schmutz aufnimmt oder wieder ausspuckt, überprüfe die Walzenbürste auf Beschädigungen. Mehrere fehlende oder gebrochene Borsten sowie eine gebrochene oder abgerissene Bürste können den Schmutz nicht aufnehmen.
Was du brauchst
-
-
Ziehe am Griff und drücke gleichzeitig die Abhebe-Taste, um den Körper des Staubsaugers zu entfernen.
-
-
-
Drehe das Unterteil des Staubsaugers um, um zur Bodeneinheit zu gelangen.
-
Entferne die beiden kleinen Räder mit einem Metallspudger.
-
-
-
-
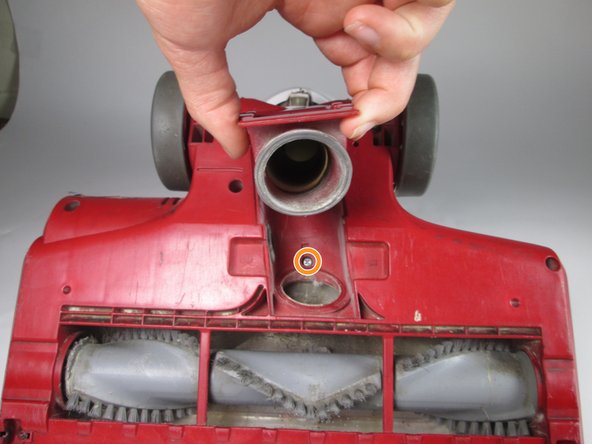
Entferne die neun 16 mm Schrauben mit dem Phillips #2 Schraubendreher. Drücke auf die seitlichen Laschen in der Mitte der Platte und ziehe sie nach oben, um die Schraube unter dem Schlauchanschluss freizulegen.
-
Entferne die beiden 13,5-mm-Schrauben mit dem Phillips #2 Schraubenzieher.
On my vacuum there are not 9 Phillips head screws. There are 2 Phillips head screws and 7 star head screws. If you have any sense at all when you put your vacuum back together you will throw away these star head screws and replace them with Phillips head screws of like thread and length.
I can’t find the right bit for these screws. What size/type are they??? Mine are not star bits…
On other vacuum models Shark uses Torx security screws. The Torx/Star screwdriver/bit needs to have a hole in the end to accommodate the pin inside the Tork screw head.
-
-
-
Ziehe die Abdeckung nach oben und bewege sie zur Seite.
-
Entferne den an der Basis befestigten Draht, indem du den Stift zusammendrückst und nach oben ziehst.
-
-
-
Entferne die beiden 11 mm Schrauben mit dem Phillips #2 Schraubenzieher.
-
Hebe die Walzenbürstenabdeckung an.
-
-
-
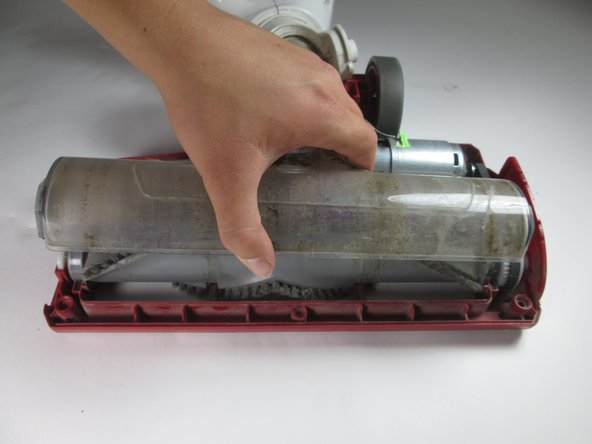
Ziehe die Walzenbürste heraus.
The photos were perfect. Followed the directions perfectly step by step and I was able to reassemble and I had no screws left over! Thanks (59yr old Nana)
I Found one on the bloody trash about an hour ago. Bleeding wankers! Throwing away a great bloody piece like it, is bloody crazy I say. !#off, it's mine now!
-


Folge diesen Anweisungen in umgekehrter Reihenfolge, um dein Gerät wieder zusammenzubauen.
Folge diesen Anweisungen in umgekehrter Reihenfolge, um dein Gerät wieder zusammenzubauen.
Rückgängig: Ich habe diese Anleitung nicht absolviert.
5 weitere Nutzer:innen haben diese Anleitung absolviert.
Besonderer Dank geht an diese Übersetzer:innen:
100%


Diese Übersetzer:innen helfen uns, die Welt zu reparieren! Wie kann ich mithelfen?
Hier starten ›
Team

Cal Poly, Team 4-3, Livingston Fall 2016 Mitglied von Cal Poly, Team 4-3, Livingston Fall 2016
CPSU-LIVINGSTON-F16S4G3
4 Mitglieder
19 Anleitungen geschrieben
6 Kommentare
Good day, I have a rotator lift away NV500 my belt indicator light stopped working but I was still getting suction. I replaced the filters and hep filters,as well as changed the belt. I cleaned off the dust and then carefully put the vacuum back to gather. I went to plug it in all worked until I pushed the roller brush indicator on and it still did not work. What else could it be? Any suggestions.
I await your reply
Angela
Same here what would be wrong with it
Great instructions - the 11mm hidden screws plus one more were tricky to find. Thanks so much for the great graphics and very clear disassembly steps; I almost gave up and was going to take it to a dealer for a costly repair fee. Thanks again!
Great directions and guidance - many thanks!
I found no 11mm screws, + type. On my machine all the screw were T10H or T15H security type screws.