Diese Anleitung enthält neuere Änderungen. Wechsel zur neuesten unüberprüften Version.
Einleitung
This guide will be helpful for repairing the subwoofer if the troubleshooting page recommends that you replace it. This is a necessary step when you have determined no other way to repair your current subwoofer. Be wary of accidentally damaging other parts of the device when replacing the subwoofer.
Was du brauchst
-
-
Look at the side of the speaker without the red interface plate, there will be a red ring around the mesh but no buttons on the side.
-
Use a Phillips head PH1 screwdriver and remove the one 0.55 cm from the top and one from the bottom of the black face plate, (do not remove plate yet).
-
-
-
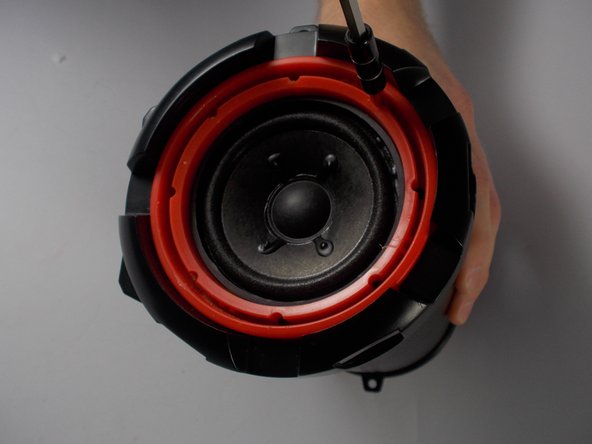
Use a metal spudger to remove the mesh speaker cover by wedging the narrow end into the center of the outer edge of the mesh touching the red plate.
-
-
-
Use Phillips head ph1 to remove four 0.55 cm from the red panel (under mesh).
-
Note: For subwoofer replacement there will be 4 screws to remove and four bolts as well. The bolts are used for alignment and cannot be removed, locate the screws and remove.
-
The Screws will have 0.7cm in depth
-
-
-
-
If the screws are difficult to remove, use the tweezers to twist and pick them out.
-
-
-
Separate the red plate from the black face plate by removing the black plate from the tube and pushing on the inside of the subwoofer.
-
You may place the black faceplate back on the tube, but do not screw it back in yet.
-
-
-
To remove the the wires from the subwoofer terminals, use a soldering iron to reheat the solder at each of the four points of connection.
It's blowing my mind man, why is their 4 connecting points for the sub woofer WHY?
-
-
-
Remove the old subwoofer.
-


To reassemble your device, follow these instructions in reverse order.
To reassemble your device, follow these instructions in reverse order.
Rückgängig: Ich habe diese Anleitung nicht absolviert.
2 weitere Nutzer:innen haben diese Anleitung absolviert.
Team

UMass Dartmouth, Team 8-6, Botvin Spring 2016 Mitglied von UMass Dartmouth, Team 8-6, Botvin Spring 2016
UMASSD-BOTVIN-S16S8G6
3 Mitglieder
8 Anleitungen geschrieben
Ein Kommentar
I Ned to replace the charger conection and I need the parts please u can email me at elpaleterolopez@Gmail.com or call me at 6613402547