Einleitung
Use this guide to proceed with removing both camera lens.
After completing the prerequisite locate the camera, which is near top left corner of device.
Was du brauchst
-
-
Remove the 2 screws along the bottom on either side of the speaker port with the size 2 Pentalobe driver.
-
After screws are removed, dislodge the speaker and charger port cover from device using the tweezers.
-
-
-
Remove the top and bottom covers.
-
Start by sliding the pick around the edges of both covers. (If you have the glue adhesive removal tool use that instead of pick, as it creates less damage.)
-
After freeing the edges gentle start peeling the covers off.
-
-
-
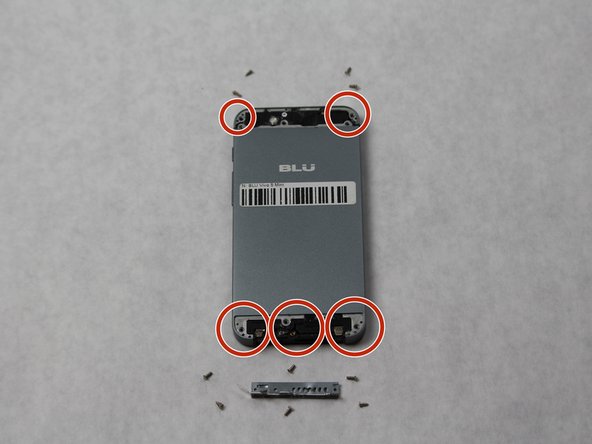
Using a Phillips #000, remove all 10 screws found on the back of the phone.
-
The 6 on the bottom are to be removed with a size PH000 Phillips Head screwdriver.
-
The 4 on the top can be removed with the same screwdriver.
-
-
-
-
Completely remove SIM card port from side of phone using the SIM Card Eject Tool.
-
Release the back cover (it may be glued down encasing the phone) using the suction device to lift the back off.
-
Begin inserting the pick sliding it between the back of the phone and the cover to completely remove back cover, if suction does not lift.
-
-
-
Using tweezers, remove the top black encasing of the camera.
-
-
-
Use the spudger to gently lift the motherboard out of the device.
-
After completely removing the back camera and motherboard, now check underneath for debris near front lens.
-
Front lens can now be removed for replacement.
-


To reassemble your device, follow these instructions in reverse order.
To reassemble your device, follow these instructions in reverse order.
Team

Sam Houston State, Team S15-G6, Blackburne Fall 2018 Mitglied von Sam Houston State, Team S15-G6, Blackburne Fall 2018
SHSU-BLACKBURNE-F18S15G6
3 Mitglieder
5 Anleitungen geschrieben