Zum Hauptinhalt wechseln

Black Hole® Wheeled Duffel Handle Replacement

Was du brauchst

  1. Black Hole® Wheeled Duffel Handle Replacement, Open the Main Compartment: Schritt 1, Bild 1 von 3 Black Hole® Wheeled Duffel Handle Replacement, Open the Main Compartment: Schritt 1, Bild 2 von 3 Black Hole® Wheeled Duffel Handle Replacement, Open the Main Compartment: Schritt 1, Bild 3 von 3
    • Place luggage on back and locate the zipper sliders to the main compartment zipper.

    • Open the main zipper completely.

    • Open the flap to the main compartment.

  2. Black Hole® Wheeled Duffel Handle Replacement, Locate Handle Housing: Schritt 2, Bild 1 von 3 Black Hole® Wheeled Duffel Handle Replacement, Locate Handle Housing: Schritt 2, Bild 2 von 3 Black Hole® Wheeled Duffel Handle Replacement, Locate Handle Housing: Schritt 2, Bild 3 von 3
    • A headlamp or flashlight is recommended when working inside the bag.

    • Unclip the buckles of the compression straps for ease of access in the main compartment.

    • At the bottom of the main compartment, open the zipper of the lining to expose the handle housing inside the liner compartment.

    • Push the lining fabric out of the way.

  3. Black Hole® Wheeled Duffel Handle Replacement, Locate Remove Inside Top Handle Bracket: Schritt 3, Bild 1 von 3 Black Hole® Wheeled Duffel Handle Replacement, Locate Remove Inside Top Handle Bracket: Schritt 3, Bild 2 von 3 Black Hole® Wheeled Duffel Handle Replacement, Locate Remove Inside Top Handle Bracket: Schritt 3, Bild 3 von 3
    • It is important that you do not lose the screws during removal.

    • Locate the Inside Top Handle Bracket for removal.

    • With a #2 Phillips-head Screwdriver, unscrew all 5 screws of the Inside Top Handle Bracket.

    • Once all screws are removed, you can now remove the Inside Top Handle Bracket.

  4. Black Hole® Wheeled Duffel Handle Replacement, Locate and Remove Screws from Bottom Post: Schritt 4, Bild 1 von 1
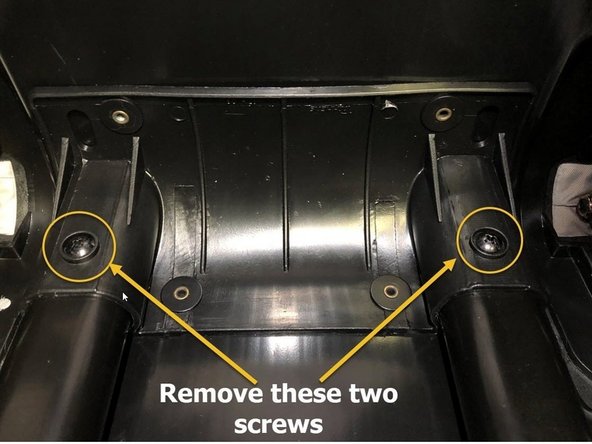
    • Locate Bottom Handle Post and remove the 2 screws.

  5. Black Hole® Wheeled Duffel Handle Replacement, Remove Handle from bag: Schritt 5, Bild 1 von 3 Black Hole® Wheeled Duffel Handle Replacement, Remove Handle from bag: Schritt 5, Bild 2 von 3 Black Hole® Wheeled Duffel Handle Replacement, Remove Handle from bag: Schritt 5, Bild 3 von 3
    • To remove Handle from bag, pull Handle Assembly straight out of the bag while pushing fabric inward away from Plastic Handle Housing to separate it from the bag.

    • Once you have released the Outside Plastic Handle Assembly from the bag continue to pull Handle straight out to completely remove it from bag.

    • Handle Assembly is now removed

  6. Black Hole® Wheeled Duffel Handle Replacement, Install New Handle: Schritt 6, Bild 1 von 3 Black Hole® Wheeled Duffel Handle Replacement, Install New Handle: Schritt 6, Bild 2 von 3 Black Hole® Wheeled Duffel Handle Replacement, Install New Handle: Schritt 6, Bild 3 von 3
    • Install New Handle into Outside Top Handle opening of bag as shown.

    • Insert Handle post into Bottom Bracket slots.

    • While inserting Handle, align Outside Plastic Handle Housing screw post into each hole in bag .

  7. Black Hole® Wheeled Duffel Handle Replacement, Secure Bottom Post: Schritt 7, Bild 1 von 1
    • Once the New Handle is in place, install screws into bottom post. Do not over tighten.

  8. Black Hole® Wheeled Duffel Handle Replacement, Reinstall  Inside Top Handle Bracket: Schritt 8, Bild 1 von 3 Black Hole® Wheeled Duffel Handle Replacement, Reinstall  Inside Top Handle Bracket: Schritt 8, Bild 2 von 3 Black Hole® Wheeled Duffel Handle Replacement, Reinstall  Inside Top Handle Bracket: Schritt 8, Bild 3 von 3
    • Place Inside Top Handle Bracket on top of Handle Housing. See Reference image #1

    • Ensure Inside Top Handle Bracket aligns with screw post of Handle Housing for proper installation of screws. See Reference image #2

    • Using a #2 Philips Screwdriver, install screws in sequential order as pictured in Reference Image#3 for ease of installation while holding bracket in place. Do not over tighten.

    • After installing all 5 screws, check installation of Top Handle Bracket to ensure it's securely in place by lifting bracket up at each screw location. Any screw not properly in place should be reinstalled until firmly secure.

  9. Black Hole® Wheeled Duffel Handle Replacement, Test Handle Function: Schritt 9, Bild 1 von 3 Black Hole® Wheeled Duffel Handle Replacement, Test Handle Function: Schritt 9, Bild 2 von 3 Black Hole® Wheeled Duffel Handle Replacement, Test Handle Function: Schritt 9, Bild 3 von 3
    • Test Handle to ensure it works properly by fully extending it until it locks into position.

    • Collapse Handle down into the middle locking position.

    • Collapse Handle completely down into the Handle Housing. Handle should lock into place.

  10. Black Hole® Wheeled Duffel Handle Replacement, Handle Installation Complete: Schritt 10, Bild 1 von 3 Black Hole® Wheeled Duffel Handle Replacement, Handle Installation Complete: Schritt 10, Bild 2 von 3 Black Hole® Wheeled Duffel Handle Replacement, Handle Installation Complete: Schritt 10, Bild 3 von 3
    • Zip up Inside Liner.

    • Reinsert Compression Strap Buckles

    • Zip up Main Compartment Flap and snap Soft Handle Haul Strap back together

    • The repair is complete, Great Job!

Abschluss

Black Hole® Wheeled Duffel Handle, To obtain a replacement handle please contact Patagonia Customer Service or your regional Patagonia Retail Store.

Team

Patagonia Mitglied von Patagonia

Community

12 Mitglieder

10 Anleitungen geschrieben

0 Kommentare

Kommentar hinzufügen

Seitenaufrufe:

Letzte 24 Stunden: 0

Letzte 7 Tage: 4

Letzte 30 Tage: 48

Insgesamt: 1,033