Einleitung
This guide demonstrates how to replace a Black & Decker IR02V-T flat iron power cord. A guide like this is crucial because any internal damage to your power cord could lead to a short circuit and would ruin the flat iron.
When completing the process ensure the flatiron is unplugged and has completely cooled down.
Was du brauchst
-
-
Remove the two silicone covers which encase the screws.
-
Remove both 1 mm screws using a T5 Torx screwdriver.
-
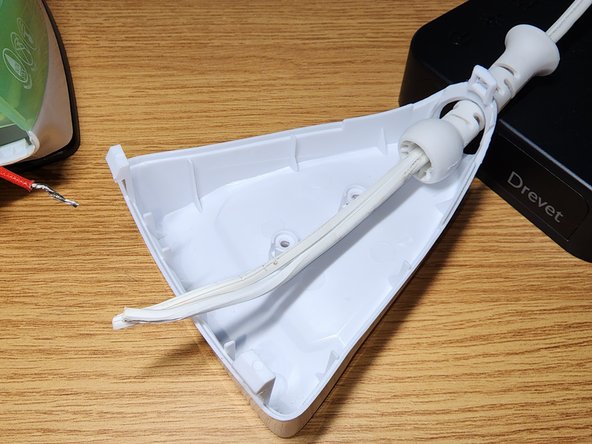
Pry open the plastic cover starting from the top of the iron.
-
-
-
Remove both caps from the end of the wire by using pliers.
-
Unfold the metal in the caps using the pliers to release the exposed wire.
-
Remove the two 1 mm screws holding down the wire using a Phillips #00 screwdriver.
-
Once the wires are exposed separate and fold to opposite sides.
-
-
-
-
Remove the old power cord from the iron completely.
-
Insert the new cord through the plastic cover and hole of the iron as demonstrated in the image.
-
-
-
Expose about half an inch of wire by removing the silicone that encases it.
-
Tie the new wire into a knot and connect the wires accordingly.
-
Place the caps over the exposed wire and use pliers to tighten the metal to secure the wire.
-
-
-
Once the caps are over the wires add the two 1 mm Phillips screws along with the small base plate which secures the wire.
-
When all wires are secure place the plastic cover and screw back in the 1mm Torx screws.
-


Team

CSU Los Angeles, Team 2-28, Briggs Fall 2022 Mitglied von CSU Los Angeles, Team 2-28, Briggs Fall 2022
CSULA-BRIGGS-F22S2G28
1 Mitglied
1 Anleitung geschrieben