Zum Hauptinhalt wechseln

BlackBerry Curve 8520 Motherboard Replacement

Was du brauchst

  1. BlackBerry Curve 8520 Motherboard Replacement, Back Panel: Schritt 1, Bild 1 von 2 BlackBerry Curve 8520 Motherboard Replacement, Back Panel: Schritt 1, Bild 2 von 2
    • Insert a plastic opening tool into the small notch on the rear cover of the phone.

    • Pry the rear cover up from the phone.

  2. BlackBerry Curve 8520 Motherboard Replacement, Battery: Schritt 2, Bild 1 von 2 BlackBerry Curve 8520 Motherboard Replacement, Battery: Schritt 2, Bild 2 von 2
    • Locate the slit between the top of the battery and the casing.

    • Gently apply pressure on the top of the battery to trigger the spring release.

  3. BlackBerry Curve 8520 Motherboard Replacement, Keyboard Cover: Schritt 3, Bild 1 von 2 BlackBerry Curve 8520 Motherboard Replacement, Keyboard Cover: Schritt 3, Bild 2 von 2
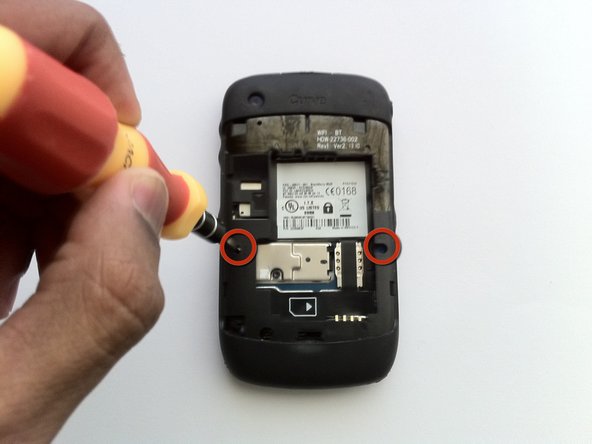
    • Remove the two Torx T6 screws to the left and right of the battery.

  4. BlackBerry Curve 8520 Motherboard Replacement: Schritt 4, Bild 1 von 2 BlackBerry Curve 8520 Motherboard Replacement: Schritt 4, Bild 2 von 2
    • Using hairdryer or heat gun, warm the front panel to soften the adhesive beneath.

    • Starting from one side, use a plastic opening tool to pry up the screen cover.

    • Work carefully to avoid bending the screen cover.

    • Once one side is loose, gently peel up the entire cover.

  5. BlackBerry Curve 8520 Motherboard Replacement: Schritt 5, Bild 1 von 3 BlackBerry Curve 8520 Motherboard Replacement: Schritt 5, Bild 2 von 3 BlackBerry Curve 8520 Motherboard Replacement: Schritt 5, Bild 3 von 3
    • Insert the plastic opening tool in the seam along the side of the device.

    • Slide the tool along the length of the seam, applying moderate force with the plastic opening tool.

    • Carefully remove the faceplate.

  6. BlackBerry Curve 8520 Motherboard Replacement: Schritt 6, Bild 1 von 3 BlackBerry Curve 8520 Motherboard Replacement: Schritt 6, Bild 2 von 3 BlackBerry Curve 8520 Motherboard Replacement: Schritt 6, Bild 3 von 3
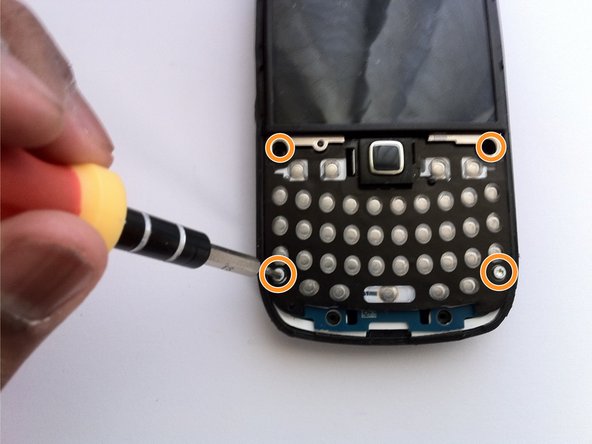
    • Remove four T6 Torx screws from the front of the phone.

    • Using tweezers, remove the keyboard buttons from the phone.

    bb is nt a freely phone is a phone bcz of ringing some how it is nt

    tankiso - Antwort

  7. BlackBerry Curve 8520 Motherboard Replacement, Motherboard: Schritt 7, Bild 1 von 2 BlackBerry Curve 8520 Motherboard Replacement, Motherboard: Schritt 7, Bild 2 von 2
    • Remove the two T6 Torx screws securing the small plastic bracket at the bottom of the phone.

    • Remove the four T6 Torx screws from the corners of the keyboard.

  8. BlackBerry Curve 8520 Motherboard Replacement: Schritt 8, Bild 1 von 2 BlackBerry Curve 8520 Motherboard Replacement: Schritt 8, Bild 2 von 2
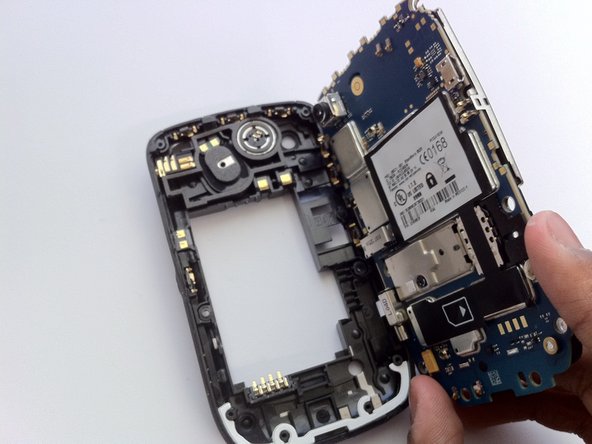
    • Using a plastic opening tool, gently pry the motherboard assembly from the device's frame.

Abschluss

To reassemble your device, follow these instructions in reverse order.

32 weitere Nutzer:innen haben diese Anleitung absolviert.

Matt

Mitglied seit: 04/07/11

1.722 Reputation

5 Anleitungen geschrieben

Team

Cal Poly, Team 9-62, Walters Spring 2011 Mitglied von Cal Poly, Team 9-62, Walters Spring 2011

CPSU-WALTERS-S11S9G62

5 Mitglieder

5 Anleitungen geschrieben

Ein Kommentar

hi sir can u provide me the dead 8520 cuvre mobile phone

hunkerbhullar - Antwort

Kommentar hinzufügen

Seitenaufrufe:

Letzte 24 Stunden: 0

Letzte 7 Tage: 2

Letzte 30 Tage: 8

Insgesamt: 36,779