Diese Version enthält möglicherweise inkorrekte Änderungen. Wechsle zur letzten geprüften Version.
Was du brauchst
-
Dieser Schritt ist noch nicht übersetzt. Hilf mit, ihn zu übersetzen!
-
Turn the device upside down.
-
Using your finger, slide the silver cover release button towards the top of the device.
-
Lift and remove the back cover.
-
-
Dieser Schritt ist noch nicht übersetzt. Hilf mit, ihn zu übersetzen!
-
Using your fingernails, lift the sides of the battery.
-
Remove the battery.
-
-
Dieser Schritt ist noch nicht übersetzt. Hilf mit, ihn zu übersetzen!
-
Orient the device so that the screen is facing the ground.
-
Using your finger, gently lift the top of the SIM card.
-
-
Dieser Schritt ist noch nicht übersetzt. Hilf mit, ihn zu übersetzen!
-
Using a T6 Torx screwdriver, remove the four screws from the bottom half of the device.
-
-
Dieser Schritt ist noch nicht übersetzt. Hilf mit, ihn zu übersetzen!
-
Orient the device so that the screen is facing you.
-
Using a spudger, remove the ear piece cover.
-
-
-
Dieser Schritt ist noch nicht übersetzt. Hilf mit, ihn zu übersetzen!
-
Using a T6 Torx screwdriver, remove the two screws from the top corners of the device.
-
-
Dieser Schritt ist noch nicht übersetzt. Hilf mit, ihn zu übersetzen!
-
Remove the back chassis by gently pulling the chassis back and forth.
-
-
Dieser Schritt ist noch nicht übersetzt. Hilf mit, ihn zu übersetzen!
-
Orient the device so that the screen is facing the ground, and the top of the phone is facing you.
-
Using a pair of tweezers, lift and remove the following:
-
The two round connectors on the top of the mother board.
-
The flat connector in the lower corner of the mother board.
-
-
Dieser Schritt ist noch nicht übersetzt. Hilf mit, ihn zu übersetzen!
-
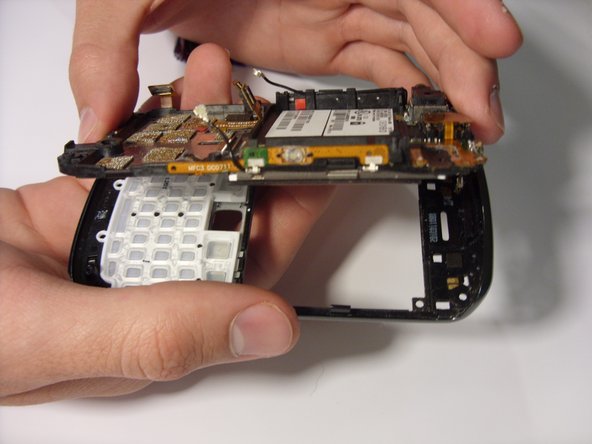
Using your fingers, carefully lift and remove the mother board.
-
-
Dieser Schritt ist noch nicht übersetzt. Hilf mit, ihn zu übersetzen!
-
Using a pair of tweezers, remove the three ribbon connectors.
-
-
Dieser Schritt ist noch nicht übersetzt. Hilf mit, ihn zu übersetzen!
-
Remove the mother board by lifting the board upward.
-
-
Dieser Schritt ist noch nicht übersetzt. Hilf mit, ihn zu übersetzen!
-
Using a pry tool, lift up on the four tabs located on the edges of the faceplate.
-
Remove the faceplate by lifting the plate upward.
-
-
Dieser Schritt ist noch nicht übersetzt. Hilf mit, ihn zu übersetzen!
-
Using a plastic pry tool, lift and remove the three tabs securing the trackpad restrainer to the trackpad.
-
-
Dieser Schritt ist noch nicht übersetzt. Hilf mit, ihn zu übersetzen!
-
Flip the device over. The screen is facing upwards.
-
Remove the trackpad restrainer.
-
-
Dieser Schritt ist noch nicht übersetzt. Hilf mit, ihn zu übersetzen!
-
Slowly remove the trackpad by gently pulling the trackpad away from the device.
-
Rückgängig: Ich habe diese Anleitung nicht absolviert.
2 weitere Nutzer:innen haben diese Anleitung absolviert.


