Einleitung
If your speaker sound is muffled or broken, the speaker cone may be damaged. To solve this problem, you can remove the old speaker cone and replace it with a new part. This guide will show you how to access the speaker cone and remove it. The guide will include the necessary prerequisites needed.
Was du brauchst
-
-
To remove the outer case, remove 4 phillips screws (Phillips #00 headtype, 9.3mm long)
-
-
-
Still using the metal spudger, continue to work your way around the outer case.
-
-
-
-
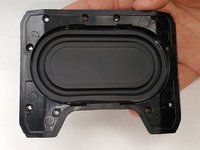
To remove the speaker cone plate, remove 10 phillips screws (Phillips #00 headtype, 9.3mm long)
-
-
-
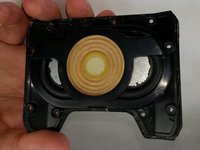
Using a metal spudger, gently pry the side of the defective speaker cone plate.
-
Remember to pry all around the side of the speaker cone plate.
-
Keep in mind that the adhesive will make it difficult to pry the plate off. To loosen the adhesive, heat the plate with a device such as a hair dryer.
-


To reassemble your device, follow these instructions in reverse order.
To reassemble your device, follow these instructions in reverse order.
Team

IUPUI, Team S2-G2, Harley Spring 2017 Mitglied von IUPUI, Team S2-G2, Harley Spring 2017
IUPUI-HARLEY-S17S2G2
4 Mitglieder
3 Anleitungen geschrieben