Zum Hauptinhalt wechseln

Braven BRV-HD Speakers Replacement

Was du brauchst

  1. Braven BRV-HD Speakers Replacement, Battery: Schritt 1, Bild 1 von 2 Braven BRV-HD Speakers Replacement, Battery: Schritt 1, Bild 2 von 2
    • Placing the device on its back with the BRV-HD logo facing up, remove the eight 5mm hexagon 2.0 screws on the front panel.

    • Make sure the device is turned off before starting.

  2. Braven BRV-HD Speakers Replacement: Schritt 2, Bild 1 von 1
    • Lift the front panel off of the speaker using a plastic opening tool.

  3. Braven BRV-HD Speakers Replacement: Schritt 3, Bild 1 von 2 Braven BRV-HD Speakers Replacement: Schritt 3, Bild 2 von 2
    • Placing the device with the back panel facing up, remove the eight 5mm hexagon 2.0 screws from the back panel.

  4. Braven BRV-HD Speakers Replacement: Schritt 4, Bild 1 von 1
    • Lift the back panel off of the device with a plastic opening tool.

  5. Braven BRV-HD Speakers Replacement: Schritt 5, Bild 1 von 2 Braven BRV-HD Speakers Replacement: Schritt 5, Bild 2 von 2
    • Turning the device on its side, unscrew the four 15mm hexagon 2.0 screws on the charging port panel.

  6. Braven BRV-HD Speakers Replacement: Schritt 6, Bild 1 von 1
    • Remove the outer rubber flap and the plastic side port panel.

  7. Braven BRV-HD Speakers Replacement: Schritt 7, Bild 1 von 2 Braven BRV-HD Speakers Replacement: Schritt 7, Bild 2 von 2
    • Place the device on its front.

    • Loosen the four 12mm Phillips screws in the four corners with a J1 screwdriver.

    • Loosen the two 8mm Phillips screws in the center with a J1 screwdriver.

    • These screws are difficult to reach and will require a screwdriver extension piece.

  8. Braven BRV-HD Speakers Replacement: Schritt 8, Bild 1 von 1
    • Pull off the rubber sleeve surrounding the speaker using your hands.

    • There is adhesive binding the sleeve to the speaker and force will be required to remove the sleeve.

  9. Braven BRV-HD Speakers Replacement: Schritt 9, Bild 1 von 1
    • Lift the black covering off of the speaker using both hands.

    • Loose screws that you were unable to remove with the screwdriver will be removed when you lift off the black covering.

  10. Braven BRV-HD Speakers Replacement: Schritt 10, Bild 1 von 1
    • Remove the four 12mm Phillips screws securing the two battery brackets with a J1 screwdriver.

    • Move any wires aside to have better access to the screws securing the battery.

  11. Braven BRV-HD Speakers Replacement: Schritt 11, Bild 1 von 1
    • Remove the two brackets that hold down the battery using your hands.

  12. Braven BRV-HD Speakers Replacement: Schritt 12, Bild 1 von 2 Braven BRV-HD Speakers Replacement: Schritt 12, Bild 2 von 2
    • Use the plastic opening tool to lift up the battery.

    • Remove the battery using your hands.

    • The wires connecting the battery to the motherboard are still plugged in. Avoid pulling on the battery or these wires may break.

  13. Braven BRV-HD Speakers Replacement: Schritt 13, Bild 1 von 1
    • Disconnect the wire attaching the battery to the motherboard.

    • There is green glue on the wire ports preventing the wires from falling out. Peel and remove this glue as necessary.

    • Be careful when pulling out the wires from their ports. The metal stems attached to the ports can break. A spudger or tweezers may help.

  14. Braven BRV-HD Speakers Replacement, Speakers: Schritt 14, Bild 1 von 2 Braven BRV-HD Speakers Replacement, Speakers: Schritt 14, Bild 2 von 2
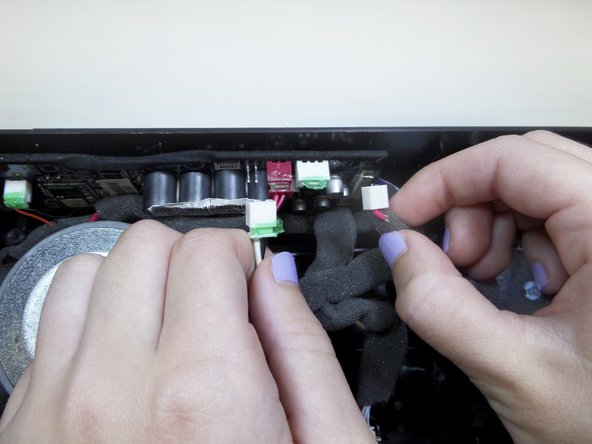
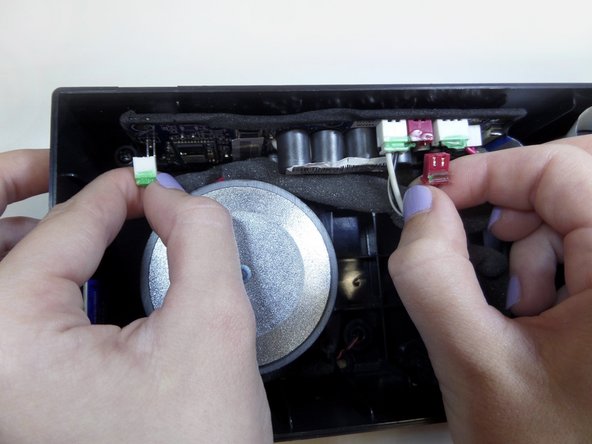
    • Locate the two wires that connect the right speaker to the motherboard.

    • Gently disconnect the wires from the motherboard.

  15. Braven BRV-HD Speakers Replacement: Schritt 15, Bild 1 von 2 Braven BRV-HD Speakers Replacement: Schritt 15, Bild 2 von 2
    • Locate the two wires that connect the left speaker to the motherboard.

    • Gently disconnect the wires from the motherboard.

  16. Braven BRV-HD Speakers Replacement: Schritt 16, Bild 1 von 2 Braven BRV-HD Speakers Replacement: Schritt 16, Bild 2 von 2
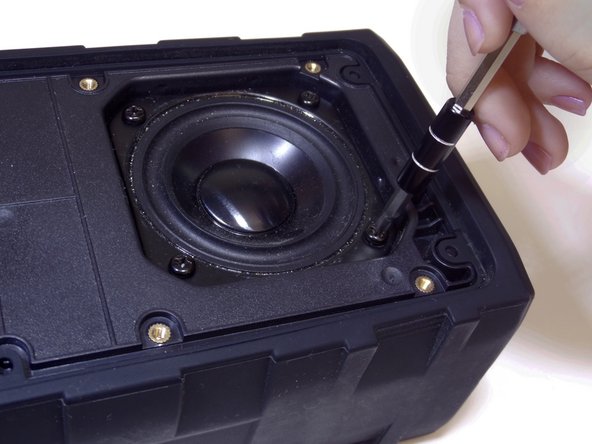
    • Position the device facing up and remove eight 10mm Phillips head screws using a J1 Phillips head screwdriver.

  17. Braven BRV-HD Speakers Replacement: Schritt 17, Bild 1 von 3 Braven BRV-HD Speakers Replacement: Schritt 17, Bild 2 von 3 Braven BRV-HD Speakers Replacement: Schritt 17, Bild 3 von 3
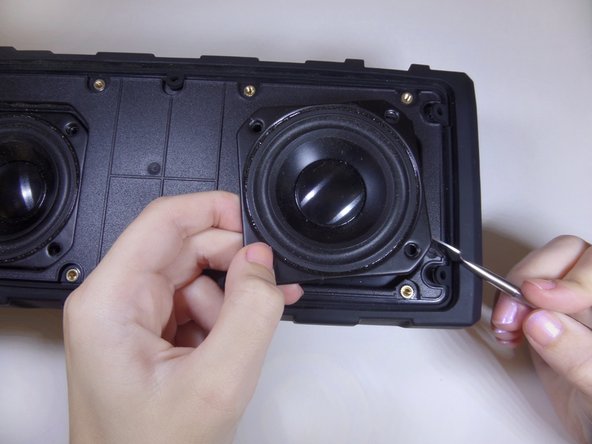
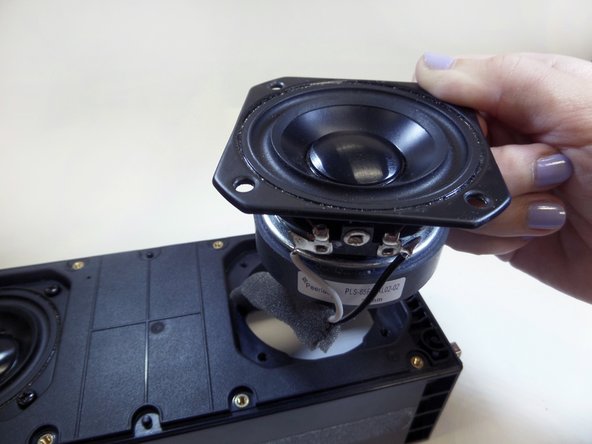
    • Lift the speaker out using the metal spudger and complete lifting by using your hands.

    • Remove the speakers with your hands and replace with new ones.

Abschluss

To reassemble your device, follow these instructions in reverse order.

2 weitere Nutzer:innen haben diese Anleitung absolviert.

Team

CSU Fullerton, Team 1-5, Bruce Fall 2016 Mitglied von CSU Fullerton, Team 1-5, Bruce Fall 2016

CSUF-BRUCE-F16S1G5

5 Mitglieder

5 Anleitungen geschrieben

3 Kommentare

Where can I find a replacement speaker?

dillon0987 - Antwort

Peerless by Tymphany PLS-65F25AL01-02

Alex -

Where can I find or order a replacement speaker for BRV PRO

jvp_hunter28 - Antwort

Kommentar hinzufügen

Seitenaufrufe:

Letzte 24 Stunden: 0

Letzte 7 Tage: 4

Letzte 30 Tage: 11

Insgesamt: 1,662