Zum Hauptinhalt wechseln

Cambridge SoundWorks OontZ Angle Plus Speaker Grill Replacement

Was du brauchst

  1. Cambridge SoundWorks OontZ Angle Plus Speaker Grill Replacement, Rubber Casing: Schritt 1, Bild 1 von 1
    • Remove the six screw covers from the bottom of the device.

  2. Cambridge SoundWorks OontZ Angle Plus Speaker Grill Replacement: Schritt 2, Bild 1 von 1
    • Starting from the screw covers, remove the front and back casing of the device.

  3. Cambridge SoundWorks OontZ Angle Plus Speaker Grill Replacement: Schritt 3, Bild 1 von 1
    • Carefully pull off the casing covering the ends.

  4. Cambridge SoundWorks OontZ Angle Plus Speaker Grill Replacement: Schritt 4, Bild 1 von 1
    • Slowly remove the casing from the top of the device.

  5. Cambridge SoundWorks OontZ Angle Plus Speaker Grill Replacement, Speaker Grill: Schritt 5, Bild 1 von 1
    • Unscrew the five 11.5mm Phillips screws from the bottom plate.

  6. Cambridge SoundWorks OontZ Angle Plus Speaker Grill Replacement: Schritt 6, Bild 1 von 1
    • Carefully pull apart the bottom and top plates, using the blue plastic opening tool.

  7. Cambridge SoundWorks OontZ Angle Plus Speaker Grill Replacement: Schritt 7, Bild 1 von 1
    • Once the plates are separated, slowly pull the bottom plate away from the top plate.

    • There are wires connected to both plates, so be cautious while doing this step.

  8. Cambridge SoundWorks OontZ Angle Plus Speaker Grill Replacement: Schritt 8, Bild 1 von 1
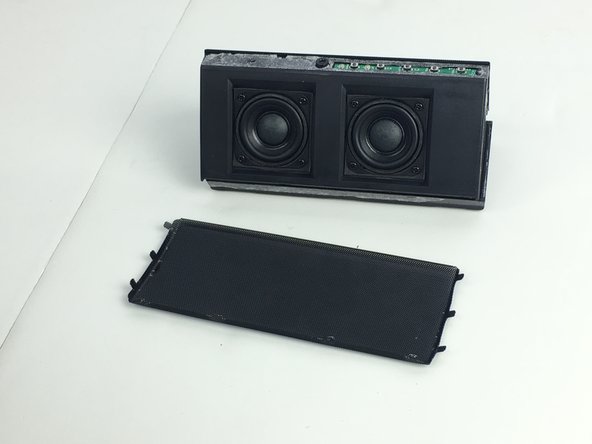
    • Use the metal spudger to bend the three bendable clamps on the ends of the speaker cover.

    • Beware, the bending process requires patience and extra time.

  9. Cambridge SoundWorks OontZ Angle Plus Speaker Grill Replacement: Schritt 9, Bild 1 von 1
    • Next, use the metal spudger to bend the four bendable clamps on the bottom of the speaker cover.

    • This step also requires some time and patience.

  10. Cambridge SoundWorks OontZ Angle Plus Speaker Grill Replacement: Schritt 10, Bild 1 von 2 Cambridge SoundWorks OontZ Angle Plus Speaker Grill Replacement: Schritt 10, Bild 2 von 2
    • Finally, bend the speaker cover upward and it will slide out.

Abschluss

To reassemble your device, follow these instructions in reverse order.

Eine weitere Person hat diese Anleitung absolviert.

Team

USF Tampa, Team 1-1, Nance Spring 2016 Mitglied von USF Tampa, Team 1-1, Nance Spring 2016

USFT-NANCE-S16S1G1

4 Mitglieder

6 Anleitungen geschrieben

0 Kommentare

Kommentar hinzufügen

Seitenaufrufe:

Letzte 24 Stunden: 0

Letzte 7 Tage: 0

Letzte 30 Tage: 7

Insgesamt: 971