Diese Version enthält möglicherweise inkorrekte Änderungen. Wechsle zur letzten geprüften Version.
Was du brauchst
-
Dieser Schritt ist noch nicht übersetzt. Hilf mit, ihn zu übersetzen!
-
On the bottom of the camera, push and slide open the battery compartment.
-
Remove the battery.
-
-
Dieser Schritt ist noch nicht übersetzt. Hilf mit, ihn zu übersetzen!
-
Open the screen.
-
Remove the Phillips #0 screws on the end of the screen.
-
-
Dieser Schritt ist noch nicht übersetzt. Hilf mit, ihn zu übersetzen!
-
Remove both Phillips #0 screws on the opposite side of the screen, located near the hinge.
-
-
Dieser Schritt ist noch nicht übersetzt. Hilf mit, ihn zu übersetzen!
-
Remove the back panel of the screen, using a spudger or opening tool if necessary.
-
-
-
Dieser Schritt ist noch nicht übersetzt. Hilf mit, ihn zu übersetzen!
-
Remove both Phillips #0 screws at the top of the screen.
-
-
Dieser Schritt ist noch nicht übersetzt. Hilf mit, ihn zu übersetzen!
-
Turn the screen perpendicular to body of the camera.
-
Remove the Phillips #0 screw at the base of the hinge.
-
-
Dieser Schritt ist noch nicht übersetzt. Hilf mit, ihn zu übersetzen!
-
Push the screen down and away from the camera.
-
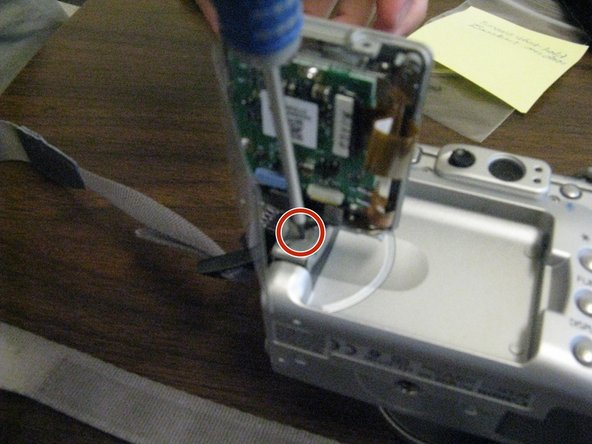
Remove the single Phillips #0 screw at the base of the rotating arm. This will allow you to remove the screen cover.
-
-
Dieser Schritt ist noch nicht übersetzt. Hilf mit, ihn zu übersetzen!
-
Remove the black bar attached to the data ribbon cable. You will use this with the replacement.
-
Slide the black bar from underneath the white socket.
-
-
Dieser Schritt ist noch nicht übersetzt. Hilf mit, ihn zu übersetzen!
-
Insert the ribbon into the white socket.
-
-
Dieser Schritt ist noch nicht übersetzt. Hilf mit, ihn zu übersetzen!
-
Place the screen with monitor side out.
-


Rückgängig: Ich habe diese Anleitung nicht absolviert.
2 weitere Nutzer:innen haben diese Anleitung absolviert.
Team

Ohio State, Team 1-4, Buehl Fall 2012 Mitglied von Ohio State, Team 1-4, Buehl Fall 2012
OSU-BUEHL-F12S1G4
3 Mitglieder
1 Anleitung geschrieben
2 Kommentare
I'm guessing that the screen is OK and the wiring/connections is the problem.