Zum Hauptinhalt wechseln

Diese Anleitung enthält neuere Änderungen. Wechsel zur neuesten unüberprüften Version.

Canon PowerShot S500 LCD Replacement

Was du brauchst

  1. Canon PowerShot S500 LCD Replacement, Front and Rear Casing : Schritt 1, Bild 1 von 2 Canon PowerShot S500 LCD Replacement, Front and Rear Casing : Schritt 1, Bild 2 von 2
    • Unscrew five Phillips screws using a #0 Phillips screwdriver.

    • One screw is on upper right corner of the back panel.

    • The other four screws are on the bottom of the camera.

  2. Canon PowerShot S500 LCD Replacement: Schritt 2, Bild 1 von 1
    • Open the memory card cover by moving the slide switch toward the top end of of the camera.

    • Remove the memory card from the slot.

  3. Canon PowerShot S500 LCD Replacement: Schritt 3, Bild 1 von 1
    • Remove the rear cover from the rest of the camera.

    • This may require gentle rocking of the case to free it.

  4. Canon PowerShot S500 LCD Replacement: Schritt 4, Bild 1 von 2 Canon PowerShot S500 LCD Replacement: Schritt 4, Bild 2 von 2
    • Unscrew the four Phillips screws from the side of the casing and one screw from the bottom using a #0 Phillips screwdriver.

  5. Canon PowerShot S500 LCD Replacement: Schritt 5, Bild 1 von 1
    • Free the front cover from the rest of the camera.

    • The cover may require gentle rocking to remove.

  6. Canon PowerShot S500 LCD Replacement, LCD: Schritt 6, Bild 1 von 1
    • Unscrew two Phillips screws above the LCD using a #0 Phillips screwdriver.

  7. Canon PowerShot S500 LCD Replacement: Schritt 7, Bild 1 von 1
    • Gently separate the top of LCD from the rest of the camera using your thumb.

    • Be careful not pull the LCD too far because of the ribbon cable connection.

    • Place the Spudger in the hole of the electrical ribbon.

    • Gently pull the ribbon down using the Spudger until it is free from the camera but still connected to the LCD.

    • The LCD will still be connected to the rest of the camera

  8. Canon PowerShot S500 LCD Replacement: Schritt 8, Bild 1 von 2 Canon PowerShot S500 LCD Replacement: Schritt 8, Bild 2 von 2
    • Unscrew single Phillips screw with a #0 Phillips screwdriver.

    • Free the bottom panel and attached ribbon from the rest of the camera.

    • Be careful not to damage the ribbon.

  9. Canon PowerShot S500 LCD Replacement: Schritt 9, Bild 1 von 1
    • Turn over the camera.

    • Lift the clear plastic from the face of the camera, peeling the adhesive just below the zoom lens.

    • The plastic will still be connected on the left side.

  10. Canon PowerShot S500 LCD Replacement: Schritt 10, Bild 1 von 1
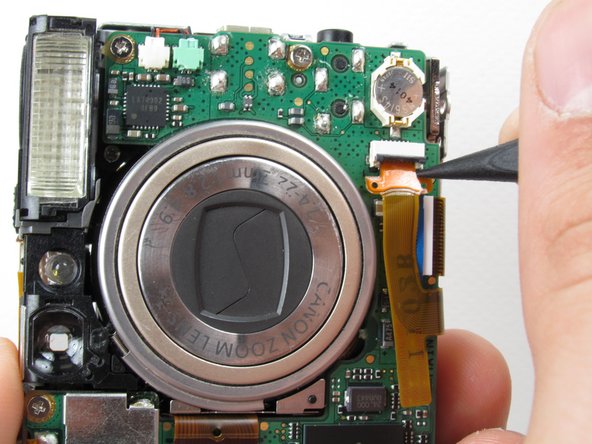
    • Place the Spudger between the orange ribbon and the black ribbon gate.

    • Lift the ribbon gate using the Spudger.

  11. Canon PowerShot S500 LCD Replacement: Schritt 11, Bild 1 von 1
    • Place the Spudger in the corner of the ribbon above the hole.

    • Remove the ribbon from the ribbon gate by pulling the Spudger away from the gate.

  12. Canon PowerShot S500 LCD Replacement: Schritt 12, Bild 1 von 1
    • Free this ribbon and the bottom panel from the rest of the camera.

    • Be careful not to damage the ribbon.

  13. Canon PowerShot S500 LCD Replacement: Schritt 13, Bild 1 von 1
    • Turn the camera over so you can see the LCD.

    • Remove single Phillips screw below the LCD using a #0 Phillips screwdriver.

  14. Canon PowerShot S500 LCD Replacement: Schritt 14, Bild 1 von 1
    • Lift the blue ribbon gate using the Spudger.

  15. Canon PowerShot S500 LCD Replacement: Schritt 15, Bild 1 von 1
    • Insert the Spudger into the hole of the ribbon.

    • Move the Spudger away from the gate to fully remove ribbon.

    • Be careful not to damage the ribbon.

  16. Canon PowerShot S500 LCD Replacement: Schritt 16, Bild 1 von 1
    • Lift the LCD away from the rest of the camera.

Abschluss

To reassemble your device, follow these instructions in reverse order.

Nathan Balcom

Mitglied seit: 01/21/10

81 Reputation

8 Anleitungen geschrieben

Team

Cal Poly, Team 16-28, Maness Winter 2010 Mitglied von Cal Poly, Team 16-28, Maness Winter 2010

CPSU-MANESS-W10S16G28

4 Mitglieder

8 Anleitungen geschrieben

0 Kommentare

Kommentar hinzufügen

Seitenaufrufe:

Letzte 24 Stunden: 0

Letzte 7 Tage: 1

Letzte 30 Tage: 11

Insgesamt: 3,100