Zum Hauptinhalt wechseln

Canon Powershot A3300 IS Front Cover Replacement

Was du brauchst

  1. Canon Powershot A3300 IS Front Cover Replacement, Back Cover: Schritt 1, Bild 1 von 3 Canon Powershot A3300 IS Front Cover Replacement, Back Cover: Schritt 1, Bild 2 von 3 Canon Powershot A3300 IS Front Cover Replacement, Back Cover: Schritt 1, Bild 3 von 3
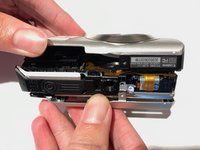
    • Remove four 2.7 mm screws, two on each side, from the camera with a JIS 000 screwdriver.

    • Remove one 3.5 mm screw on the bottom of the camera with a JIS 000 screwdriver.

    • When removing the front and back housings, be careful to not break the tabs that hook into the top section of the chassis.

  2. Canon Powershot A3300 IS Front Cover Replacement: Schritt 2, Bild 1 von 2 Canon Powershot A3300 IS Front Cover Replacement: Schritt 2, Bild 2 von 2
    • Pull off the back cover.

  3. Canon Powershot A3300 IS Front Cover Replacement, Front Cover: Schritt 3, Bild 1 von 2 Canon Powershot A3300 IS Front Cover Replacement, Front Cover: Schritt 3, Bild 2 von 2
    • Pull the front cover off.

Abschluss

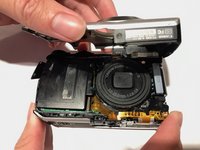
To reassemble your device, follow these instructions in reverse order.

Eine weitere Person hat diese Anleitung absolviert.

Phillip Chen

Mitglied seit: 10/17/17

440 Reputation

4 Anleitungen geschrieben

Team

UC Santa Barbara, Team S2-G7, Weedon Fall 2017 Mitglied von UC Santa Barbara, Team S2-G7, Weedon Fall 2017

UCSB-WEEDON-F17S2G7

4 Mitglieder

10 Anleitungen geschrieben

0 Kommentare

Kommentar hinzufügen

Seitenaufrufe:

Letzte 24 Stunden: 0

Letzte 7 Tage: 3

Letzte 30 Tage: 9

Insgesamt: 365