Zum Hauptinhalt wechseln

Canon Powershot S200 Motherboard Replacement

Was du brauchst

  1. Canon Powershot S200 Motherboard Replacement, Battery: Schritt 1, Bild 1 von 2 Canon Powershot S200 Motherboard Replacement, Battery: Schritt 1, Bild 2 von 2
    • Slide the grey latch to open the battery compartment.

  2. Canon Powershot S200 Motherboard Replacement: Schritt 2, Bild 1 von 2 Canon Powershot S200 Motherboard Replacement: Schritt 2, Bild 2 von 2
    • Push and slide the orange retaining clip to the right to remove the battery.

  3. Canon Powershot S200 Motherboard Replacement: Schritt 3, Bild 1 von 1
    • Remove battery from the camera.

  4. Canon Powershot S200 Motherboard Replacement, Motherboard: Schritt 4, Bild 1 von 1
    • Remove the lanyard.

  5. Canon Powershot S200 Motherboard Replacement: Schritt 5, Bild 1 von 1
    • Position the camera so that the bottom is facing up.

    • Remove the two 2.3mm screws beneath the name plate.

    • Remove the two 2.8 mm screws surrounding the threaded tripod mount.

  6. Canon Powershot S200 Motherboard Replacement: Schritt 6, Bild 1 von 1
    • Remove the 3.8mm screw from the back face of the camera.

  7. Canon Powershot S200 Motherboard Replacement: Schritt 7, Bild 1 von 1
    • Remove the two 2.3mm screws from the right face of the camera.

  8. Canon Powershot S200 Motherboard Replacement: Schritt 8, Bild 1 von 1
    • Remove the two outer 3.2mm screws from the left side of the camera

    • Remove the two inner 3.7mm screws from the left side of the camera.

  9. Canon Powershot S200 Motherboard Replacement: Schritt 9, Bild 1 von 1
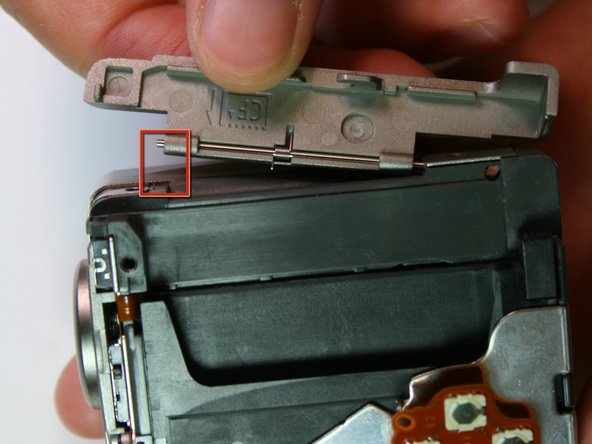
    • Pull the back face panel away from the front end of the body. This may take some wiggling and force.

  10. Canon Powershot S200 Motherboard Replacement: Schritt 10, Bild 1 von 2 Canon Powershot S200 Motherboard Replacement: Schritt 10, Bild 2 von 2
    • Remove the CF card door from the left side of the camera body.

  11. Canon Powershot S200 Motherboard Replacement: Schritt 11, Bild 1 von 2 Canon Powershot S200 Motherboard Replacement: Schritt 11, Bild 2 von 2
    • Slide the rubber digital a/v cap out of place on the front plate.

  12. Canon Powershot S200 Motherboard Replacement: Schritt 12, Bild 1 von 1
    • Remove the front face by sliding it off.

  13. Canon Powershot S200 Motherboard Replacement: Schritt 13, Bild 1 von 1
    • Remove the rubber seal that covers the right side of the viewfinder.

  14. Canon Powershot S200 Motherboard Replacement: Schritt 14, Bild 1 von 1
    • Remove the two 3.9mm screws that hold the laminated copper sheet.

  15. Canon Powershot S200 Motherboard Replacement: Schritt 15, Bild 1 von 2 Canon Powershot S200 Motherboard Replacement: Schritt 15, Bild 2 von 2
    • Remove the wire connections that connect along the bottom of the motherboard.

  16. Canon Powershot S200 Motherboard Replacement: Schritt 16, Bild 1 von 1
    • Remove the single 3.8mm screw that is on the motherboard.

  17. Canon Powershot S200 Motherboard Replacement: Schritt 17, Bild 1 von 1
    • Remove the motherboard from the main frame of the camera body.

Abschluss

To reassemble your device, follow these instructions in reverse order.

Orlando Zuniga

Mitglied seit: 04/14/11

11 Reputation

1 Anleitung geschrieben

Team

Cal Poly, Team 20-70, Walters Spring 2011 Mitglied von Cal Poly, Team 20-70, Walters Spring 2011

CPSU-WALTERS-S11S20G70

5 Mitglieder

4 Anleitungen geschrieben

0 Kommentare

Kommentar hinzufügen

Seitenaufrufe:

Letzte 24 Stunden: 0

Letzte 7 Tage: 1

Letzte 30 Tage: 2

Insgesamt: 1,879