Einleitung
My Subaru's keyless entry buttons weren't working too well, so I decided to replace the battery within it.
This procedure is relatively simple, and the same basic principle can be applied to most other manufacturers' key fobs.
Was du brauchst
-
-
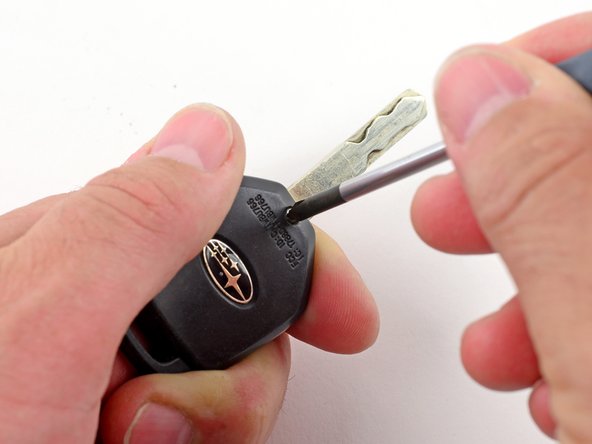
Unscrew the single Phillips screw on the back of the key fob using a #1 Phillips screwdriver.
-
The two black plastic pieces should separate, revealing the control module. Lift out the control module from the rest of the key.
-
-
-
There are four plastic retaining clips that hold the control module intact.
-
Starting with the smallest retaining clip, insert the flat end of a spudger in between the black and white plastic pieces of the clip in order to release its hold.
-
Rotate the control module to the next retaining clip, taking care not to accidentally clamp down the previously-released clip. Repeat the same procedure in the previous bullet to release the other two retaining clips.
-
Once all four clips are released, separate the white plastic piece from the rest of the control module.
-
-
-
-
The CR1620 battery is held in place by metal contacts. Use the pointy end of the spudger to release the battery from the metal contacts.
-
Swap in a new CR1620 battery, and make sure it is securely held in place by the metal contacts.
-
-
-
Optional: Use the pointy end of the spudger to remove some of the gunk/buildup within the key fob.
-
Insert the control module back into the key fob, making sure all the buttons line up with the holes.
-
Reattach the two halves of the key fob on the side opposite of the key first, then continue until the entire fob is back together in its original state.
-


To reassemble your device, follow these instructions in reverse order.
To reassemble your device, follow these instructions in reverse order.
Rückgängig: Ich habe diese Anleitung nicht absolviert.
24 weitere Nutzer:innen haben diese Anleitung absolviert.

19 Kommentare
All fine and good, except the identical looking key fob from my 2010 Outback uses a CR1620 battery. So much for the CR2025s I bought!
Nice, clear description of the process (which is very simple). My 2010 Outback also uses the CR1620 battery, not the CR2025 the instructions say. I would recommend disassembling your key fob and taking the old battery to the store to compare. You can still drive with the disassembled key fob; you just have to lock/unlock the door manually.
Great instructions! However, just like Mark and Janet, my 2010 Legacy keys had a CR1620 battery. Also, there were 4 plastic clips on step 2. Thanks for the guide!
Apparently the instructions have been updated since the above comments, because they now call for the CR1620, which is what I bought, and they work perfectly!
The instructions and photos are very clear, easy to follow, and accurate. I was very pleased to find this site and realize that for about 15 bucks total I could replace the batteries in both our 2010 Outback keys - I had imagined we'd have to get new keys or at the least take them to the dealer for a highly pricey replacement. Thanks, ifixit!!
Question, I replaced mine but it still doesn't work. do I need to reset the system?