Diese Version enthält möglicherweise inkorrekte Änderungen. Wechsle zur letzten geprüften Version.
Was du brauchst
-
Dieser Schritt ist noch nicht übersetzt. Hilf mit, ihn zu übersetzen!
-
Flip the device over to the back side.
-
-
Dieser Schritt ist noch nicht übersetzt. Hilf mit, ihn zu übersetzen!
-
Slide the small switch on the back to "MAIN".
-
-
Dieser Schritt ist noch nicht übersetzt. Hilf mit, ihn zu übersetzen!
-
Slide the battery cover downwards.
-
Pull off the battery cover.
-
-
Dieser Schritt ist noch nicht übersetzt. Hilf mit, ihn zu übersetzen!
-
Pull the black tab to remove the battery.
-
-
Dieser Schritt ist noch nicht übersetzt. Hilf mit, ihn zu übersetzen!
-
Use the Phillips #00 screwdriver to remove the two screws near the top of the device.
-
-
Dieser Schritt ist noch nicht übersetzt. Hilf mit, ihn zu übersetzen!
-
Use the Phillips #00 screwdriver to remove the two screws located inside the battery compartment.
-
-
-
Dieser Schritt ist noch nicht übersetzt. Hilf mit, ihn zu übersetzen!
-
Use a spudger or opening tool to separate the two halves of the case.
-
-
Dieser Schritt ist noch nicht übersetzt. Hilf mit, ihn zu übersetzen!
-
Pry the two halves of the case apart with the opening tool.
-
-
Dieser Schritt ist noch nicht übersetzt. Hilf mit, ihn zu übersetzen!
-
Lay the two halves of the outer case next to the central components as shown.
-
-
Dieser Schritt ist noch nicht übersetzt. Hilf mit, ihn zu übersetzen!
-
Use the Philips #00 screwdriver to remove the three screws in the corners of the screen.
-
-
Dieser Schritt ist noch nicht übersetzt. Hilf mit, ihn zu übersetzen!
-
Lift the tab on the motherboard and pull out the ribbon cable.
-
After the ribbon cable is detached from the motherboard, the touch screen is completely separated from the device.
-
-
Dieser Schritt ist noch nicht übersetzt. Hilf mit, ihn zu übersetzen!
-
Locate the small grey ribbon cable towards the bottom of the device. It should be located above the battery slot. Pinch both sides of the ribbon cable and pull it out.
-
-
Dieser Schritt ist noch nicht übersetzt. Hilf mit, ihn zu übersetzen!
-
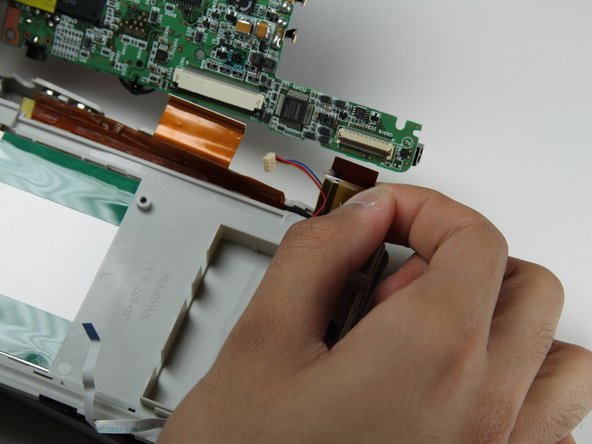
Locate the multicolored wire on the motherboard near the battery compartment. Pull on the wire by the base and lift to remove.
-
-
Dieser Schritt ist noch nicht übersetzt. Hilf mit, ihn zu übersetzen!
-
Use the Phillips #00 Screwdriver to remove the two screws from the green circuit board on the back case.
-
-
Dieser Schritt ist noch nicht übersetzt. Hilf mit, ihn zu übersetzen!
-
Remove the the three screws on the motherboard that are shown using the Phillips #00 Screwdriver.
-
-
Dieser Schritt ist noch nicht übersetzt. Hilf mit, ihn zu übersetzen!
-
Flip the motherboard towards the front cover to expose the ribbon cables underneath.
-
-
Dieser Schritt ist noch nicht übersetzt. Hilf mit, ihn zu übersetzen!
-
Locate the two ribbon cables on the motherboard. Select one to remove first and then pinch either side of it and pull out to remove the ribbon cable. Do the same for the second.
-


Rückgängig: Ich habe diese Anleitung nicht absolviert.
Ein:e weitere:r Nutzer:in hat diese Anleitung absolviert.
Team

Cal Poly, Team 5-4, Forte Spring 2012 Mitglied von Cal Poly, Team 5-4, Forte Spring 2012
CPSU-FORTE-S12S5G4
6 Mitglieder
5 Anleitungen geschrieben