Was du brauchst
-
-
Place the phone screen-side down and place thumb on the yellow and black switch. Slide the switch to the right to unlock the back covering for removal.
-
-
-
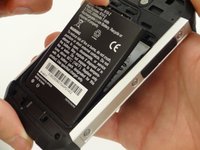
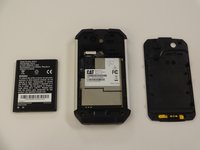
Remove the back covering by gently lifting upwards from the bottom of the back covering. The back will snap off and the battery is exposed.
-
-
-
Place index finger at the top edge of the battery and gently lift upwards. The battery will slide cleanly out of the phone.
-
-
-
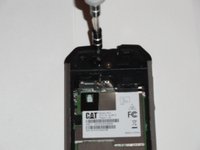
With the back cover removed, locate and remove the Phillips screw pictured top-center, and the two torx screws above and to either side of the Phillips screw. A T-5 bit is required for removal of the torx screws.
-
WARNING: Proceeding beyond this point will void the warranty for this device.
-
-
-
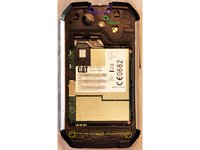
Next, remove the two torx (star-shaped) screws below the battery. These screws help to secure the outer shell of the phone around the motherboard. A T-5 bit is required for removal.
-
-
-
-
There are three remaining screws on each long side of the phone. A small hex bit is required for removal.
-
-
-
There is one more Phillips screw remaining. It is located beneath the headphone cover.
-
-
-
With all screws removed, the back and side pieces should come off the front of the phone, exposing the motherboard and various components as shown.
-
-
-
With all screws removed, move around the motherboard, carefully prying it from the remaining shell.
-
-
-
Finally, disconnect the chip seen in the upper right, and the board should pull away from the rest of the phone.
-
-
-
With the device completely disassembled, the LCD can easily be accessed. It is pictured here, in which it adheres to the front of the motherboard.
-
-
-
The LCD is held to the board by an adhesive, and will peel away with either a spudger or by hand. Disconnect any ribbon cables if applicable.
-
-
-
Installing the new LCD is the reverse of removing the old one. The 2mm 3M adhesive tape listed in the guide is recommended for fixing the new display to the board.
-


To reassemble your device, follow these instructions in reverse order.
To reassemble your device, follow these instructions in reverse order.
Rückgängig: Ich habe diese Anleitung nicht absolviert.
9 weitere Personen haben diese Anleitung absolviert.
Team

USF Tampa, Team 4-7, Brown Fall 2014 Mitglied von USF Tampa, Team 4-7, Brown Fall 2014
USFT-BROWN-F14S4G7
4 Mitglieder
10 Anleitungen geschrieben