Zum Hauptinhalt wechseln
Gemeinsam reparieren - Jetzt registrieren

Chromebook 15 CB3-531-C4A5 Motherboard Replacement

Was du brauchst

  1. Chromebook 15 CB3-531-C4A5 Motherboard Replacement, Case: Schritt 1, Bild 1 von 2 Chromebook 15 CB3-531-C4A5 Motherboard Replacement, Case: Schritt 1, Bild 2 von 2
    • Remove the 18 Phillips screws using a screwdriver with a PH0 bit.

    Frag FixBot

    Kommentar hinzufügen

  2. Chromebook 15 CB3-531-C4A5 Motherboard Replacement: Schritt 2, Bild 1 von 2 Chromebook 15 CB3-531-C4A5 Motherboard Replacement: Schritt 2, Bild 2 von 2
    • Using a spudger, gently pry open the back from the top.

    Frag FixBot

    Kommentar hinzufügen

  3. Chromebook 15 CB3-531-C4A5 Motherboard Replacement, Battery: Schritt 3, Bild 1 von 1
    • Once it is opened up, locate the battery and the cable that is attached to it.

    Frag FixBot

    Kommentar hinzufügen

  4. Chromebook 15 CB3-531-C4A5 Motherboard Replacement: Schritt 4, Bild 1 von 2 Chromebook 15 CB3-531-C4A5 Motherboard Replacement: Schritt 4, Bild 2 von 2
    • Next, unscrew the battery pack. The one screw should be located on the far right of it. This will ensure that the battery comes out easily and affectively.

    Frag FixBot

    Kommentar hinzufügen

  5. Chromebook 15 CB3-531-C4A5 Motherboard Replacement: Schritt 5, Bild 1 von 1
    • Take the battery out easily for replacement.

    Frag FixBot

    Kommentar hinzufügen

  6. Chromebook 15 CB3-531-C4A5 Motherboard Replacement, Wireless Card: Schritt 6, Bild 1 von 1
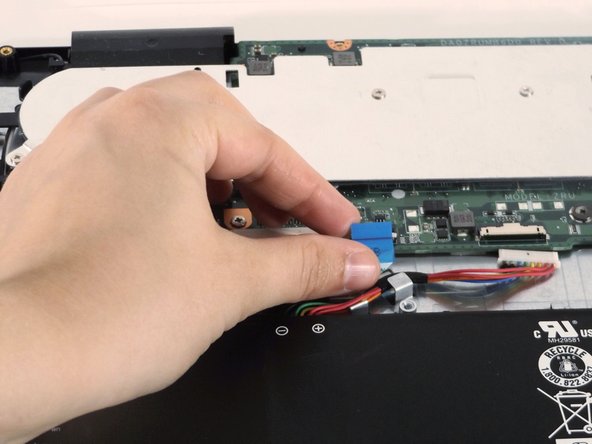
    • Remove the two antenna cables that attach the wireless card to the motherboard. One will be black and the other will be white.

    Frag FixBot

    Kommentar hinzufügen

  7. Chromebook 15 CB3-531-C4A5 Motherboard Replacement: Schritt 7, Bild 1 von 2 Chromebook 15 CB3-531-C4A5 Motherboard Replacement: Schritt 7, Bild 2 von 2
    • Locate the screw that holds the wireless card in place and then remove it using a screwdriver with a PH0 bit.

    Frag FixBot

    Kommentar hinzufügen

  8. Chromebook 15 CB3-531-C4A5 Motherboard Replacement: Schritt 8, Bild 1 von 1
    • Slide the Wireless card out gently with two fingers while being careful not to damage any surrounding parts.

    Frag FixBot

    Kommentar hinzufügen

  9. Chromebook 15 CB3-531-C4A5 Motherboard Replacement, Motherboard: Schritt 9, Bild 1 von 2 Chromebook 15 CB3-531-C4A5 Motherboard Replacement, Motherboard: Schritt 9, Bild 2 von 2
    • Remove the four Phillips screws.

    Frag FixBot

    Kommentar hinzufügen

  10. Chromebook 15 CB3-531-C4A5 Motherboard Replacement: Schritt 10, Bild 1 von 3 Chromebook 15 CB3-531-C4A5 Motherboard Replacement: Schritt 10, Bild 2 von 3 Chromebook 15 CB3-531-C4A5 Motherboard Replacement: Schritt 10, Bild 3 von 3
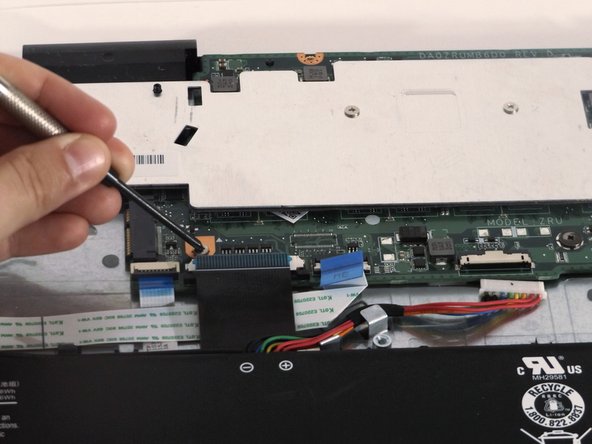
    • Remove tape that secures the ribbon cables.

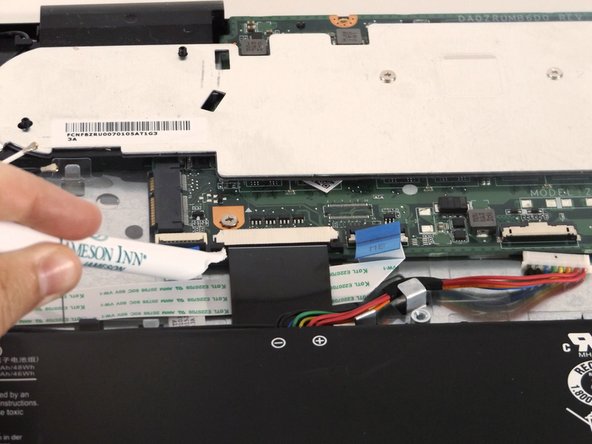
    • Using the spudger, lift the latches to unlock each ribbon cable.

    • Remove the cables.

    Frag FixBot

    Kommentar hinzufügen

  11. Chromebook 15 CB3-531-C4A5 Motherboard Replacement: Schritt 11, Bild 1 von 1
    • Remove the large black cable between the two ribbon cables.

    Frag FixBot

    Kommentar hinzufügen

  12. Chromebook 15 CB3-531-C4A5 Motherboard Replacement: Schritt 12, Bild 1 von 1
    • Remove the remaining cable.

    • Remove the motherboard.

    Frag FixBot

    Kommentar hinzufügen

Abschluss

To reassemble your device, follow these instructions in reverse order.

Rückgängig: Ich habe diese Anleitung nicht absolviert.

5 weitere Personen haben diese Anleitung absolviert.

2 Kommentare zur Anleitung

RAM?

SSD?

Upgradable?

Removable?

www - Antwort Teilen

How is this difficult lol, should be easy difficult fr

Alex Karpov - Antwort Teilen

Kommentar hinzufügen

Seitenaufrufe:

Letzte 24 Stunden: 0

Letzte 7 Tage: 2

Letzte 30 Tage: 21

Insgesamt: 2,307