Diese Version enthält möglicherweise inkorrekte Änderungen. Wechsle zur letzten geprüften Version.
Was du brauchst
-
Dieser Schritt ist noch nicht übersetzt. Hilf mit, ihn zu übersetzen!
-
Unscrew the two 18 mm long Phillips #2 screws on the side of the hair dryer.
-
-
Dieser Schritt ist noch nicht übersetzt. Hilf mit, ihn zu übersetzen!
-
Once you have taken the screws out, take the top half of the handle off by lifting it off of the dryer.
-
-
Dieser Schritt ist noch nicht übersetzt. Hilf mit, ihn zu übersetzen!
-
Remove the inner white disk piece by gently pulling it out with your finger nail.
-
-
Dieser Schritt ist noch nicht übersetzt. Hilf mit, ihn zu übersetzen!
-
Gently remove the tan boxes (power supply) by wiggling them out of place and set them aside so you can take the back part of the handle off.
-
-
-
Dieser Schritt ist noch nicht übersetzt. Hilf mit, ihn zu übersetzen!
-
Remove the inner white disk piece from the base of the dryer head by gently pulling it out with your finger nail.
-
-
Dieser Schritt ist noch nicht übersetzt. Hilf mit, ihn zu übersetzen!
-
Unscrew the three 12 mm long Phillips #2 screws to remove the back of the hairdryer.
-
-
Dieser Schritt ist noch nicht übersetzt. Hilf mit, ihn zu übersetzen!
-
Once the three screws are removed, pop the back of the dryer off by wiggling it until it comes loose. This shouldn't take too much effort.
-
-
Dieser Schritt ist noch nicht übersetzt. Hilf mit, ihn zu übersetzen!
-
Unwind the cord and lay it to the side so you can get to the screw in the middle easier.
-
Remove the single 12 mm long Phillips #2 screw in the middle of the cord track.
-
-
Dieser Schritt ist noch nicht übersetzt. Hilf mit, ihn zu übersetzen!
-
Take off the white cap that covers the heating coil. You will see a wound up piece of metal (cord retracting coil) underneath once the cap is removed.
-
-
Dieser Schritt ist noch nicht übersetzt. Hilf mit, ihn zu übersetzen!
-
To remove the coil, use your screw driver to pop the coil out of the slot.
-
-
Dieser Schritt ist noch nicht übersetzt. Hilf mit, ihn zu übersetzen!
-
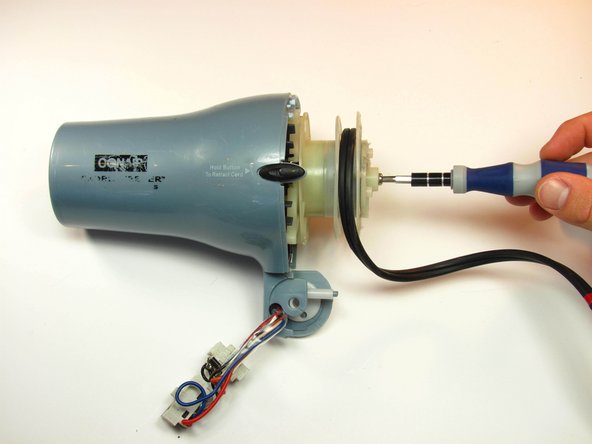
Once the coil is removed, unscrew the three 11 mm long Phillips #2 screws underneath to remove the retracting wheel.
-
-
Dieser Schritt ist noch nicht übersetzt. Hilf mit, ihn zu übersetzen!
-
Remove the two parts of the retracting wheel.
-


Rückgängig: Ich habe diese Anleitung nicht absolviert.
Ein:e weitere:r Nutzer:in hat diese Anleitung absolviert.
Team

Cal Poly, Team 10-33, Maness Winter 2014 Mitglied von Cal Poly, Team 10-33, Maness Winter 2014
CPSU-MANESS-W14S10G33
3 Mitglieder
7 Anleitungen geschrieben
Ein Kommentar
Nicely done, just a suggestion, in Step #10 would suggest using fingers or flat object on top of spring when disengaging from frame …to ensure it won’t unravel and jump (as shown in 2nd picture + have some strong tape, string, wire ties, etc. to keep the spring wound up. This works for me when dealing with lawn mower recoil mechanism or tape measures. Tape measures are the worst to work on. lol - AHNauss