Diese Version enthält möglicherweise inkorrekte Änderungen. Wechsle zur letzten geprüften Version.
Was du brauchst
-
Dieser Schritt ist noch nicht übersetzt. Hilf mit, ihn zu übersetzen!
-
Turn the device around until you are looking at the line-out port.
-
With a cordless drill or Phillips #0 screwdriver, remove the ten 12-mm screws.
-
-
Dieser Schritt ist noch nicht übersetzt. Hilf mit, ihn zu übersetzen!
-
Gently remove the back of the device. It should be connected by two wires.
-
-
Dieser Schritt ist noch nicht übersetzt. Hilf mit, ihn zu übersetzen!
-
Gently remove both wires.
-
After de-threading the antenna wire, remove the back of the device and set it aside.
-
-
-
Dieser Schritt ist noch nicht übersetzt. Hilf mit, ihn zu übersetzen!
-
Locate where the power cable connects to the device.
-
Pick up the device and locate the screw holding the small black peg to the device. Unscrew it and set the screw aside.
-
-
Dieser Schritt ist noch nicht übersetzt. Hilf mit, ihn zu übersetzen!
-
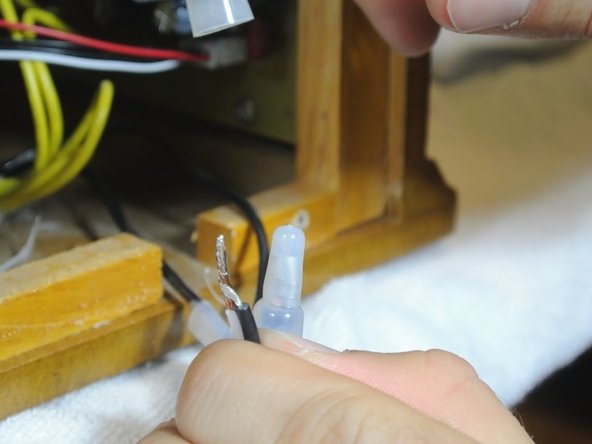
With the pliers, remove the wire connectors. You may need to be forceful
-
-
Dieser Schritt ist noch nicht übersetzt. Hilf mit, ihn zu übersetzen!
-
Pull apart both groups of wires.
-
-
Dieser Schritt ist noch nicht übersetzt. Hilf mit, ihn zu übersetzen!
-
Twist the connecting wires together.
-
Attach the twist-on wire connectors to the exposed wires.
-


Rückgängig: Ich habe diese Anleitung nicht absolviert.
Ein:e weitere:r Nutzer:in hat diese Anleitung absolviert.
Team

Cal Poly, Team 1-38, Maness Winter 2014 Mitglied von Cal Poly, Team 1-38, Maness Winter 2014
CPSU-MANESS-W14S1G38
4 Mitglieder
5 Anleitungen geschrieben