Einleitung
Over time, dust and dirt particles may accumulate inside of your D-Link router. This is a guide that shows you how to maintain your router through a process of internal cleaning and other maintenance tricks.
Was du brauchst
-
-
Begin by placing the wired router face down.
-
Locate the two black plastic screw coverings at the top of the device and remove them with your fingers.
-
-
-
Use a plastic opening tool between the edges of the router and gently pry the device apart.
-
Release the clips as you work your way around the device to avoid breaking them.
-
Separate the front and back case of the router.
-
-
-
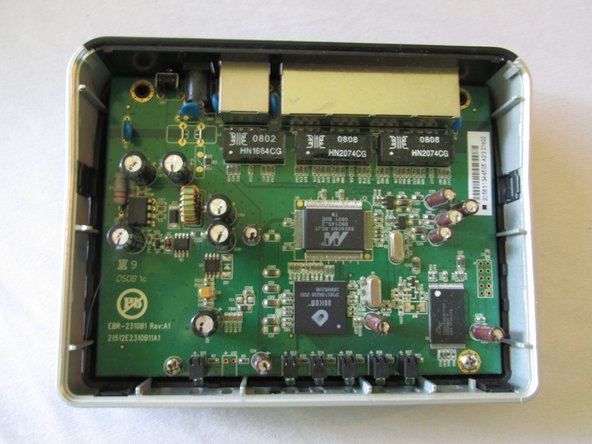
Once you have removed the top black case of the router, remove the silver casing surrounding the logic board.
-
-
-
Use a Phillips #2 screwdriver to remove the two screws at the bottom of the motherboard.
-
-
-
Now that you have removed all screws and the surrounding silver casing, pop the logic board out from the bottom component of the router.
-
You have now removed the logic board from your device.
-
-
-
-
Once you have completely removed your logic board from its casing, look for any large dust particles and/or other dirt inside the router. Gently remove these particles with your fingers.
-
-
-
Locate the blue rubber wire coverings near the main cable connections of your motherboard. Make sure that these are standing upright.
-
If they are not, gently use your wire tweezers to rearrange them in the correct upright position.
-
-
-
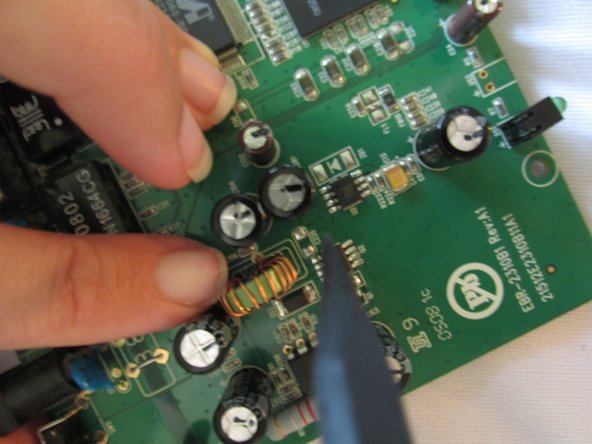
Locate the upright wire tube towards the middle left of the motherboard.
-
Make sure that the wires are evenly spaced, not directly touching one another on the tube.
-
If the wires are not evenly spaced, gently use your spudger tool to separate them.
-
-
-
Using a soft cloth, gently wipe the top side of the motherboard.
-
Be sure not to miss any small crevices.
-
-
-
Using your cloth, gently wipe the metal slates around the cable connectors.
-
-
-
Turn the motherboard on its back side and completely wipe away any small particles.
-
-
-
Wipe the cable connector compartments using the same soft cloth.
-
-
-
Using a soft bristle toothbrush, brush the insides of the cable connectors in order to remove any hard-to-reach dust.
-
-
-
Using the same toothbrush, brush the tiny crevices on the back side of the motherboard.
-
-
-
After you have thoroughly brushed the back side of the motherboard, begin to do the same with the front side.
-
You have now cleaned the inside of your router. Ventilation and performance should be excellent.
-


To reassemble your device, follow these instructions in reverse order.
To reassemble your device, follow these instructions in reverse order.
Team

USF Sarasota-Manatee, Team 1-4, Stewart Fall 2014 Mitglied von USF Sarasota-Manatee, Team 1-4, Stewart Fall 2014
USFSM-STEWART-F14S1G4
4 Mitglieder
19 Anleitungen geschrieben