Zum Hauptinhalt wechseln

DYMO LabelPOINT 100 Keypad Replacement

Was du brauchst

  1. DYMO LabelPOINT 100 Keypad Replacement, Remove Screws To The Access Panel: Schritt 2, Bild 1 von 2 DYMO LabelPOINT 100 Keypad Replacement, Remove Screws To The Access Panel: Schritt 2, Bild 2 von 2
    • Use Phillips #00 Screwdriver to remove the three screws that hold the upper portion of the access panel.

    • Remove the blade cutter assembly.

    • Use Phillips #00 Screwdriver to remove the last two screws located in the battery panel that holds the bottom portion of the access panel.

  2. DYMO LabelPOINT 100 Keypad Replacement, Remove Access Panel: Schritt 3, Bild 1 von 1
    • Gently remove the access panel from the right side of the device.

    • Some electrical wiring will be exposed and will not detach. Be careful not to damage any electrical wiring when removing access panel.

  3. DYMO LabelPOINT 100 Keypad Replacement, Removing Circuit Board: Schritt 4, Bild 1 von 2 DYMO LabelPOINT 100 Keypad Replacement, Removing Circuit Board: Schritt 4, Bild 2 von 2
    • Use Phillips #00 Screwdriver to remove three screws that hold down the circuit board.

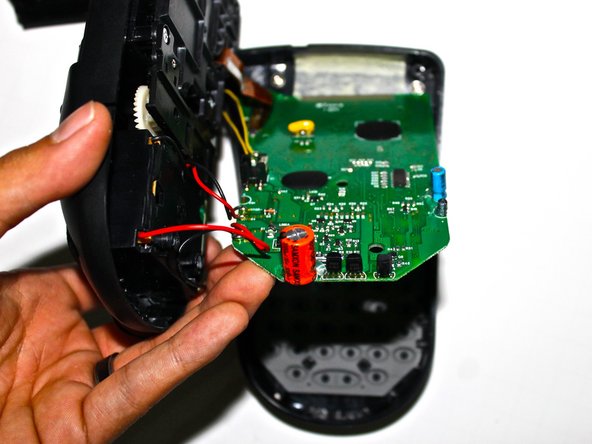
    • Gently lift the bottom of the circuit board, revealing the keypad.

    • Be careful not to damage any components on the circuit board when disassembling.

  4. DYMO LabelPOINT 100 Keypad Replacement, Remove Keypad: Schritt 5, Bild 1 von 1
    • Remove the keypad from the front facing cover

    • When installing the new keypad, make sure all buttons are correctly set in each hole so that each button can be pressed.

Abschluss

To reassemble your device, follow these instructions in reverse order.

Mike Dam

Mitglied seit: 09/25/14

201 Reputation

2 Anleitungen geschrieben

Team

USF Tampa, Team 5-2, Mcgee Fall 2014 Mitglied von USF Tampa, Team 5-2, Mcgee Fall 2014

USFT-MCGEE-F14S5G2

4 Mitglieder

6 Anleitungen geschrieben

0 Kommentare

Kommentar hinzufügen

Seitenaufrufe:

Letzte 24 Stunden: 0

Letzte 7 Tage: 3

Letzte 30 Tage: 6

Insgesamt: 1,075