Einleitung
Wenn das Netzkabel beschädigt ist muss es ausgetauscht werden.
Was du brauchst
-
-
Stelle das Gerät auf den Kopf.
-
Die Bodenplatte ist mit vier 12 mm Kreuzschlitzschrauben #2 in den Ecken befestigt. Schraube sie heraus.
-
Hebe die Bodenplatte weg oder drehe das Gerät wieder um und lasse sie herausfallen.
At least on my unit, those screws weren't Phillips, but Torx Tamperproof T20! Shame on you, De'Longhi!
I also had the Tamperproof Torx on mine - I used a Dremel tool with a small round metal bit and just carefully plunged down on the little nub in the center that makes it tamperproof. Only need to grind it down a millimeter or so, as there isn't much torque on these screws and the torx bit needs just a little depth to grab on it good enough. If you have the tools handy it saves having to buy the tamperproof bits online.
-
-
-
Stelle die Maschine auf den Kopf, die Vorderseite zeigt zu dir.
-
Auf der Unterseite des Oberteils findest du zwei 52 mm Kreuzschlitz #2 Schrauben. Drehen sie heraus.
-
-
-
Stelle das Gerät wieder aufrecht.
-
Auf der Oberseite des Oberteils findest du zwei 52 mm Kreuzschlitz #2 Schrauben. Drehen sie heraus.
-
-
-
Setze zwei Plastiköffnungswerkzeuge unter den Knopf auf der Oberseite.
-
Hebele mit beiden Werkzeugen den Knopf hoch.
-
-
-
-
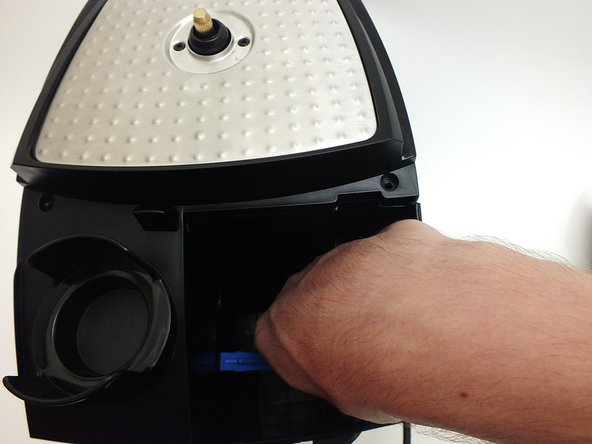
Setze ein Plastiköffnungswerkzeug in den Spalt an der hinteren Abdeckung, wenn du sie hochhebst.
-
Setze in gleicher Weise im Fach des Wassertanks das Werkzeug von innen ein.
-
-
-
Jetzt kannst du den Deckel hochheben.
-
Greife mit einer Hand auf der Rückseite, mit der anderen vorne und hebe den Deckel hoch.
-
-
-
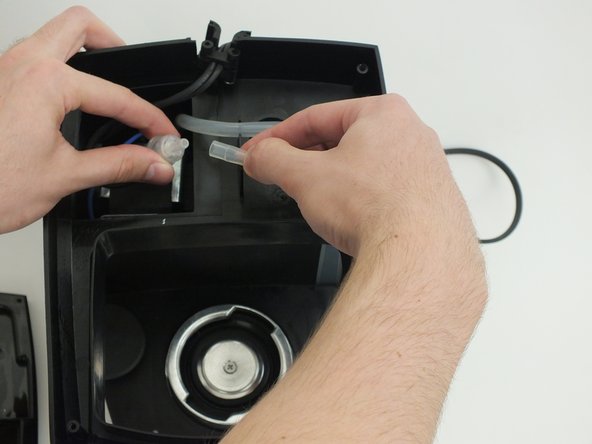
Stelle die Maschine auf den Kopf. Ziehe den Schlauch, der vom Wassertank kommt ab.
There are two tubes connected to the water reservoir hole. The one in the first pic is the one that goes to the water valve, which is the one that you pull through to the top. The one in the second pic is the short one from the bottom of the pump that can detached from the water hole and left in place, to be transferred later to the new pump. Detaching it from the from the filter as shown adds to the impression that this is the tube to the water valve to be pulled through to the top in the next step, which the user quickly finds is impossible, it’s too short.
-
-
-
Ziehe den Schlauch durch die Abteilung mit der Pumpe, so dass er oben frei wird.
-
Drehe das Ventil gegen den Uhrzeigersinn und ziehe es dabei vorsichtig ab.
-
-
-
Drehe den Aufschäumer im Uhrzeigersinn und ziehe ihn dabei vorsichtig ab.
-
-
-
Ziehe die Klammern mit einer Winkelpinzette aus den Schlauchverbindern an Erhitzer und Ventil.
My deLonghi failed by leaking from this connection (after years of operation). After a failed attempt with what I was told was an OEM o-ring, I successfully repaired it with a "Silicone O-Ring, 7mm OD, 3mm ID, 2mm Width, VMQ Seal Rings Gasket" from Amazon. (I used a dental pick to pull out the old ring.)
This is the standard o-ring, as used e.g. in Jura devices.
VauWeh -
-
-
-
Ziehe die LEDs ab.
-
Ziehe auch die Drähte zum Bedienfeld ab.
It’s better to keep the wires in place and remove the whole setter switch by prying off the knob, then removing the two screws exposed I was unable to remove the core your way because of the difficulty of getting past the setter switch, especially since at the same time you have to wrangle with getting the steamer wand out, even with the frother removed.
Also, your pic shows four wires to disconnect, there are actually five, and there’s no view of which of them go where—another reason for keeping them connected.
-
-
-
Stelle die Maschine auf den Kopf und ziehe den Schlauch am Wassertank ab.
-
Entferne den Schlauch vom Wassertank und Filter zur Pumpe.
-
-
-
Ziehe den Schlauch durch das Abteil mit der Pumpe so dass er oben herauskommt.
-
Drehe das Ventil gegen den Uhrzeigersinn und ziehe es dabei vorsichtig ab.
-
-
-
Kippe den Erhitzer zur Vorderseite hin und hebe ihn hinten heraus.
Pushing to the front is impossible at first if the settings switch is still in place (see earlier comment).
Also, it’s worth mentioning that the steaming wand *will* come out with the right twisting and turning of the core. I got stuck her trying to figure out how to detach it from its hose. But the attachment is permanent. This is what led me to buy more maneuvering room by removing the settings switch with wires still attached.
-
-
-
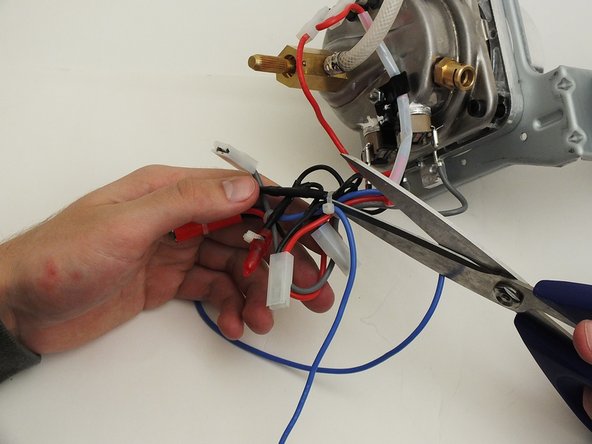
Entferne beide Kabelsätze von der schwarzen Dose der Pumpe.
-
Entferne die Kabelbinder.
-
Trenne die blauen Kabel vom Rest und entferne sie vom Erhitzer wenn nötig.
-


Um dein Gerät wieder zusammen zu setzen folge den Schritten in umgekehrter Reihenfolge.
Um dein Gerät wieder zusammen zu setzen folge den Schritten in umgekehrter Reihenfolge.
Rückgängig: Ich habe diese Anleitung nicht absolviert.
4 weitere Nutzer:innen haben diese Anleitung absolviert.
Besonderer Dank geht an diese Übersetzer:innen:
100%
VauWeh hilft uns, die Welt in Ordnung zu bringen! Wie kann ich mithelfen?
Hier starten ›
Team

Cal Poly, Team 4-2, Maness Fall 2015 Mitglied von Cal Poly, Team 4-2, Maness Fall 2015
CPSU-MANESS-F15S4G2
4 Mitglieder
25 Anleitungen geschrieben
My model EC155, serial #43222 requires a Security Torx vs. a #2 Phillips to remove the 12mm screws at each corner of the bottom panel
Mike Hines - Antwort