Zum Hauptinhalt wechseln

Diese Anleitung enthält neuere Änderungen. Wechsel zur neuesten unüberprüften Version.

Dell Alienware 18 Hard Drive Replacement

Was du brauchst

  1. Dell Alienware 18 Hard Drive Replacement, Disconnecting the Hard-Drive Cable: Schritt 1, Bild 1 von 1
    • WARNING: Before working inside your computer, read the safety information that shipped with your computer and follow the steps in Before You Begin.

    • CAUTION: To avoid data loss, do not remove the hard drive while the computer is in Sleep or On state.

    • CAUTION: Hard drives are extremely fragile. Exercise care when handling the hard drive.

    • Disconnect the hard-drive cable from its connector on the system board.

  2. Dell Alienware 18 Hard Drive Replacement, Loosen the Screws: Schritt 2, Bild 1 von 1
    • Loosen the captive screws that secure the hard-drive assembly to the computer base.

  3. Dell Alienware 18 Hard Drive Replacement, Lifting the Hard-Drive Assembly: Schritt 3, Bild 1 von 1
    • Using the pull-tab, lift the hard-drive assembly out of the computer base.

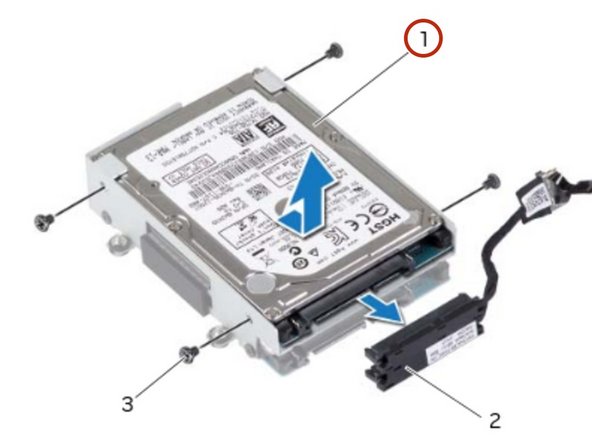
  4. Dell Alienware 18 Hard Drive Replacement, Disconnecting the Interposer: Schritt 4, Bild 1 von 2 Dell Alienware 18 Hard Drive Replacement, Disconnecting the Interposer: Schritt 4, Bild 2 von 2
    • Disconnect the interposer from the hard drives.

    • NOTE: Your computer supports up to three drives.

  5. Dell Alienware 18 Hard Drive Replacement, Remove the Screws: Schritt 5, Bild 1 von 1
    • Remove the screws that secure the hard drive(s) to the hard-drive bracket and slide the hard drive(s) out of the hard-drive bracket.

  6. Dell Alienware 18 Hard Drive Replacement, Placing the Hard-Drive: Schritt 6, Bild 1 von 1
    • Place the NEW primary hard drive in the hard-drive bracket.

  7. Dell Alienware 18 Hard Drive Replacement, Sliding the Secondary Hard-Drive: Schritt 7, Bild 1 von 1
    • If applicable, slide the secondary hard drive into the hard-drive bracket.

  8. Dell Alienware 18 Hard Drive Replacement, Secure the Screws: Schritt 8, Bild 1 von 1
    • Replace the screws that secure the primary hard drive to the hard-drive bracket.

  9. Dell Alienware 18 Hard Drive Replacement, Replace the Screws: Schritt 9, Bild 1 von 1
    • If applicable, replace the screws that secure the secondary hard drive to the hard-drive bracket.

  10. Dell Alienware 18 Hard Drive Replacement, Connecting the Interposer: Schritt 10, Bild 1 von 1
    • Connect the interposer to the hard drives.

  11. Dell Alienware 18 Hard Drive Replacement, Placing the Hard-Drive Assembly: Schritt 11, Bild 1 von 1
    • Place the hard-drive assembly in the computer base.

  12. Dell Alienware 18 Hard Drive Replacement, Tightening the Screws: Schritt 12, Bild 1 von 1
    • Tighten the captive screws that secure the hard-drive assembly to the computer base.

  13. Dell Alienware 18 Hard Drive Replacement, Connecting the Hard-Drive: Schritt 13, Bild 1 von 1
    • Connect the hard-drive cable to its connector on the system board.

Ziellinie

2 weitere Nutzer:innen haben diese Anleitung absolviert.

darrius

Mitglied seit: 03/26/18

5.213 Reputation

30 Anleitungen geschrieben

Team

RampUP America, Inc. Mitglied von RampUP America, Inc.

Community

42 Mitglieder

1.985 Anleitungen geschrieben

0 Kommentare

Kommentar hinzufügen

Seitenaufrufe:

Letzte 24 Stunden: 1

Letzte 7 Tage: 6

Letzte 30 Tage: 14

Insgesamt: 766