Diese Version enthält möglicherweise inkorrekte Änderungen. Wechsle zur letzten geprüften Version.
Was du brauchst
-
Dieser Schritt ist noch nicht übersetzt. Hilf mit, ihn zu übersetzen!
-
Place laptop upside down to observe the first set of screws on the bottom cover. With the J1 Phillips head screwdriver bit, unscrew eight (8) size 60 mm screws.
-
With a metal spudger, remove the plastic cover to unveil the final screw.
-
With the J1 Phillips head bit, remove remaining 60 mm screw.
-
-
Dieser Schritt ist noch nicht übersetzt. Hilf mit, ihn zu übersetzen!
-
With a metal spudger, pry apart the bottom cover working around the edges.
-
With tweezers, disconnect the USB/Audio circuit board cable.
-
Place the bottom cover off to the side.
-
-
Dieser Schritt ist noch nicht übersetzt. Hilf mit, ihn zu übersetzen!
-
With the J1 screwdriver bit, unscrew three (3) size 40 mm battery screws.
-
-
Dieser Schritt ist noch nicht übersetzt. Hilf mit, ihn zu übersetzen!
-
With tweezers, disconnect the battery cable.
-
Remove the battery pack.
-
-
-
Dieser Schritt ist noch nicht übersetzt. Hilf mit, ihn zu übersetzen!
-
Remove the M2 x 3mm bracket screw.
-
Remove the metal bracket.
-
With tweezers, detach the white and black antenna cables connected to the Wireless WLAN Card.
-
Remove the Wireless WLAN Card.
-
-
Dieser Schritt ist noch nicht übersetzt. Hilf mit, ihn zu übersetzen!
-
With tweezers, unplug the CMOS battery.
-
With tweezers, detach the CMOS battery.
-
-
Dieser Schritt ist noch nicht übersetzt. Hilf mit, ihn zu übersetzen!
-
With tweezers, unplug the DC Jack cable.
-
With the Philips #0 Screwdriver, loosen the M2 x 3mm screw.
-
With tweezers, detach the DC Jack.
-
-
Dieser Schritt ist noch nicht übersetzt. Hilf mit, ihn zu übersetzen!
-
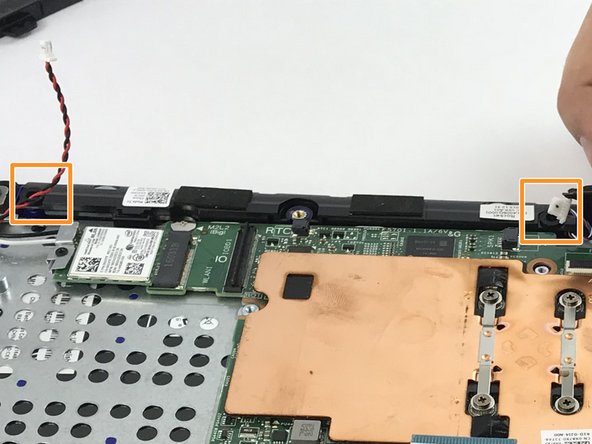
With tweezers, disconnect the speaker cable.
-
With tweezers, detach the speaker.
-
-
Dieser Schritt ist noch nicht übersetzt. Hilf mit, ihn zu übersetzen!
-
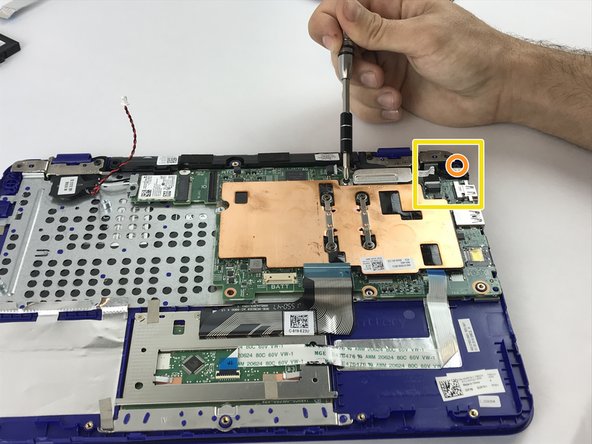
With the Philips #0 Screwdriver, unbolt the M2 x 3mm screw.
-
Remove the metal bracket.
-
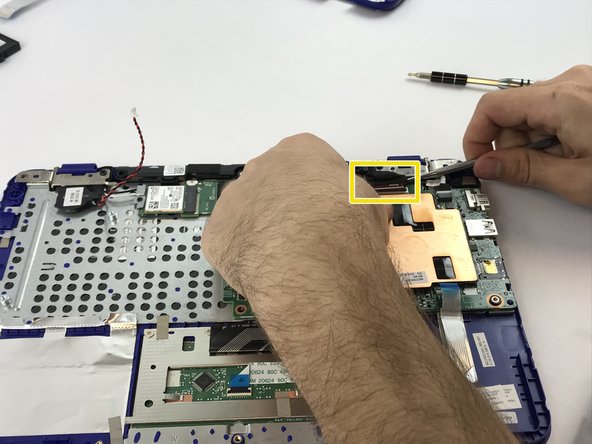
With tweezers, disconnect the display cable.
-
-
Dieser Schritt ist noch nicht übersetzt. Hilf mit, ihn zu übersetzen!
-
With the Philips #0 Screwdriver, unfasten the 2 - M2.5 x 5mm left and right hinge screws.
-
With the Philips #0 Screwdriver, unhinge the 2 - M2.5 x 5mm display cable bracket screw.
-
With tweezers, remove the LCD screen.
-
-
Dieser Schritt ist noch nicht übersetzt. Hilf mit, ihn zu übersetzen!
-
With the Philips #0 Screwdriver, loosen the 4 screws supporting the copper plate.
-
With tweezers, remove the copper plate.
-
-
Dieser Schritt ist noch nicht übersetzt. Hilf mit, ihn zu übersetzen!
-
With tweezers, disconnect the keyboard cable.
-
With tweezers, disconnect the touchpad cable.
-
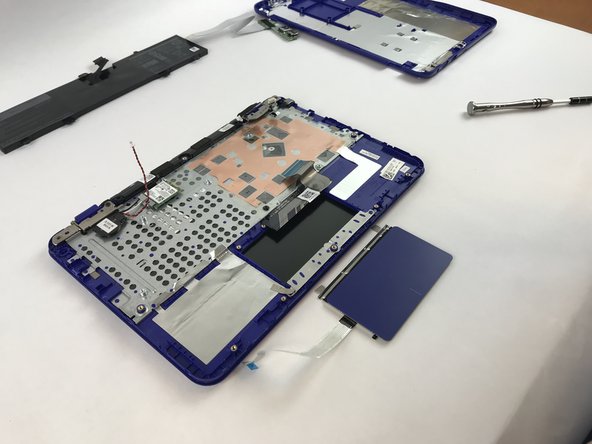
With the Philips #00 Screwdriver, loosen the four (4) M2 x 2mm screws.
-
Gently remove the mouse touchpad. The fixer is left with the palm-rest and keyboard assembly.
-


Rückgängig: Ich habe diese Anleitung nicht absolviert.
Ein:e weitere:r Nutzer:in hat diese Anleitung absolviert.
Team

USF Tampa, Team S6-G4, Eyestone Spring 2018 Mitglied von USF Tampa, Team S6-G4, Eyestone Spring 2018
USFT-EYESTONE-S18S6G4
4 Mitglieder
6 Anleitungen geschrieben