Zum Hauptinhalt wechseln

Dell Inspiron 13-5368 Webcam Replacement

Was du brauchst

  1. Dell Inspiron 13-5368 Webcam Replacement, Battery: Schritt 1, Bild 1 von 2 Dell Inspiron 13-5368 Webcam Replacement, Battery: Schritt 1, Bild 2 von 2
    • Remove the nine 6mm Phillips #0 screws that secure the back cover of the laptop.

  2. Dell Inspiron 13-5368 Webcam Replacement: Schritt 2, Bild 1 von 2 Dell Inspiron 13-5368 Webcam Replacement: Schritt 2, Bild 2 von 2
    • Use a spudger to pry up and remove the back cover.

  3. Dell Inspiron 13-5368 Webcam Replacement: Schritt 3, Bild 1 von 1
    • Remove the four 3mm Phillips #0 screws at the corners of the battery that secure it to the laptop.

  4. Dell Inspiron 13-5368 Webcam Replacement: Schritt 4, Bild 1 von 1
    • Pull the battery cable's black tab towards the battery to disconnect it from the motherboard.

    • Pull the tab parallel to the motherboard, not straight up.

  5. Dell Inspiron 13-5368 Webcam Replacement: Schritt 5, Bild 1 von 2 Dell Inspiron 13-5368 Webcam Replacement: Schritt 5, Bild 2 von 2
    • Remove the battery.

  6. Dell Inspiron 13-5368 Webcam Replacement, Screen Display: Schritt 6, Bild 1 von 3 Dell Inspiron 13-5368 Webcam Replacement, Screen Display: Schritt 6, Bild 2 von 3 Dell Inspiron 13-5368 Webcam Replacement, Screen Display: Schritt 6, Bild 3 von 3
    • Unscrew the 2mm screw that holds the WLAN card. Then carefully remove the WLAN card from the motherboard.

  7. Dell Inspiron 13-5368 Webcam Replacement: Schritt 7, Bild 1 von 1
    • Detach the black and white antenna cables from the WLAN card.

  8. Dell Inspiron 13-5368 Webcam Replacement: Schritt 8, Bild 1 von 1
    • Unplug the two display cables.

  9. Dell Inspiron 13-5368 Webcam Replacement: Schritt 9, Bild 1 von 1
    • Unscrew the screws that are securing the laptop's hinges.

  10. Dell Inspiron 13-5368 Webcam Replacement: Schritt 10, Bild 1 von 1
    • Detach the display from the base.

  11. Dell Inspiron 13-5368 Webcam Replacement, Webcam: Schritt 11, Bild 1 von 1
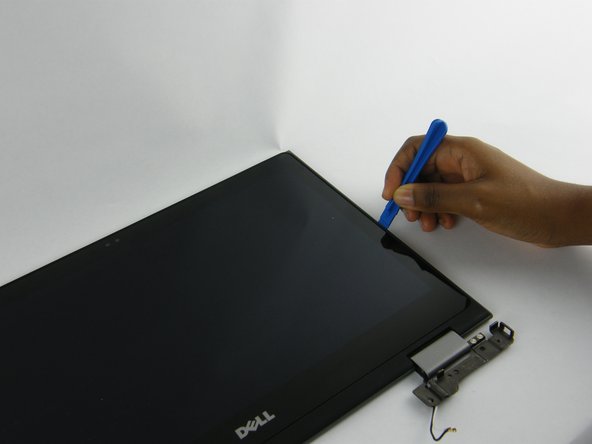
    • Use your plastic opening tool to pry the LCD back cover from the display panel.

  12. Dell Inspiron 13-5368 Webcam Replacement: Schritt 12, Bild 1 von 2 Dell Inspiron 13-5368 Webcam Replacement: Schritt 12, Bild 2 von 2
    • Carefully separate the back cover from the LCD screen.

    • Carefully remove the ribbon cable that holds the webcam to the screen, then unplug the webcam from the ribbon cable.

Abschluss

To reassemble your device, follow these instructions in reverse order.

Matt Sugrim

Mitglied seit: 09/27/17

1.042 Reputation

6 Anleitungen geschrieben

Team

USF Tampa, Team S14-G6, Boczar Fall 2017 Mitglied von USF Tampa, Team S14-G6, Boczar Fall 2017

USFT-BOCZAR-F17S14G6

4 Mitglieder

13 Anleitungen geschrieben

0 Kommentare

Kommentar hinzufügen

Seitenaufrufe:

Letzte 24 Stunden: 0

Letzte 7 Tage: 1

Letzte 30 Tage: 2

Insgesamt: 1,205