Diese Version enthält möglicherweise inkorrekte Änderungen. Wechsle zur letzten geprüften Version.
Was du brauchst
-
Dieser Schritt ist noch nicht übersetzt. Hilf mit, ihn zu übersetzen!
-
Make sure the laptop is powered down before you remove the battery.
-
-
Dieser Schritt ist noch nicht übersetzt. Hilf mit, ihn zu übersetzen!
-
Locate the battery release switch on the bottom of the laptop.
-
-
Dieser Schritt ist noch nicht übersetzt. Hilf mit, ihn zu übersetzen!
-
Slide the battery release switch away from the lock symbol towards the “unlock” position.
-
-
Dieser Schritt ist noch nicht übersetzt. Hilf mit, ihn zu übersetzen!
-
Rotate the battery outward by lifting the bottom lip that pops out.
-
Continue rotating the battery towards the top of the laptop until the battery is completely removed.
-
-
-
Dieser Schritt ist noch nicht übersetzt. Hilf mit, ihn zu übersetzen!
-
Keyboard
-
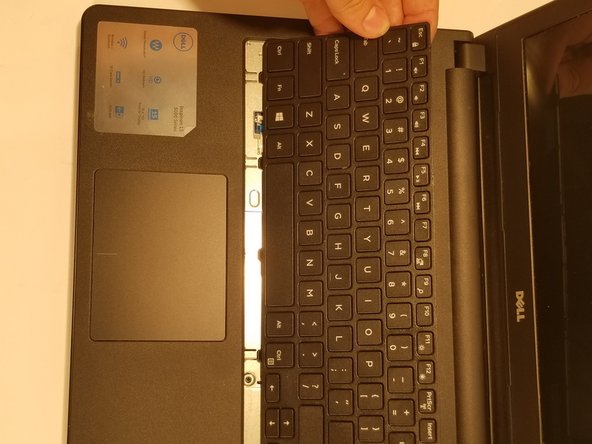
Insert a spudger next to the 5 plastic indents located at the top of the keyboard and gently pry to release the securing clips.
-
-
Dieser Schritt ist noch nicht übersetzt. Hilf mit, ihn zu übersetzen!
-
Lift the keyboard off of the computer. *Be careful not to tear the ribbon that attaches the back of the keyboard to the computer when lifting it.*
-
-
Dieser Schritt ist noch nicht übersetzt. Hilf mit, ihn zu übersetzen!
-
Flip the keyboard over onto the palm-rest assembly.
-
-
Dieser Schritt ist noch nicht übersetzt. Hilf mit, ihn zu übersetzen!
-
Flip the black securing bar near the base of the ribbon with a spudger to release the ribbon from the computer.
-
-
Dieser Schritt ist noch nicht übersetzt. Hilf mit, ihn zu übersetzen!
-
CD-Drive
-
Flip the computer over, *screen down* and unscrew the 1 screw in the middle located below the battery with a J0 bit tipped screwdriver.
-
-
Dieser Schritt ist noch nicht übersetzt. Hilf mit, ihn zu übersetzen!
-
Next using the J0 bit tipped screwdriver unscrew the 2 remaining screws shown in the picture.
-
-
Dieser Schritt ist noch nicht übersetzt. Hilf mit, ihn zu übersetzen!
-
After all 3 screws are removed take a spudger and pry the CD-Drive out of the computer.
-


Rückgängig: Ich habe diese Anleitung nicht absolviert.
Ein:e weitere:r Nutzer:in hat diese Anleitung absolviert.
Team

Western Carolina University, Team S1-G4, Virtue Spring 2018 Mitglied von Western Carolina University, Team S1-G4, Virtue Spring 2018
WCU-VIRTUE-S18S1G4
4 Mitglieder
5 Anleitungen geschrieben