Zum Hauptinhalt wechseln

Dell Inspiron 15-7537 Wireless Card Replacement

Was du brauchst

  1. Dell Inspiron 15-7537 Wireless Card Replacement, Bottom Case: Schritt 1, Bild 1 von 1
    • Make sure the display is closed. Then, flip the computer over so that you can see the bottom cover.

    • Loosen the two 5 mm Phillips #0 on the upper edge of the cover.

    • These screws will stay captive to the case.

  2. Dell Inspiron 15-7537 Wireless Card Replacement: Schritt 2, Bild 1 von 1
    • Remove the two 5 mm interior screws that connect the cover to the assembly using the same Philips head screwdriver from the previous step.

  3. Dell Inspiron 15-7537 Wireless Card Replacement: Schritt 3, Bild 1 von 1
    • Use a spudger to remove the base cover from the rest of bottom cover.

  4. Dell Inspiron 15-7537 Wireless Card Replacement, Remove the WiFi Card: Schritt 4, Bild 1 von 2 Dell Inspiron 15-7537 Wireless Card Replacement, Remove the WiFi Card: Schritt 4, Bild 2 von 2
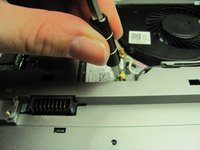
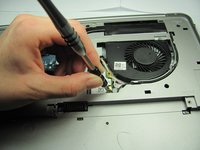
    • Completely unscrew the 2 mm screw that connects the WiFi card to the mother board using a Philips head screwdriver.

  5. Dell Inspiron 15-7537 Wireless Card Replacement: Schritt 5, Bild 1 von 1
    • Disconnect the two antennas (one black and one white) from the wireless card.

  6. Dell Inspiron 15-7537 Wireless Card Replacement: Schritt 6, Bild 1 von 1
    • Remove the WiFi card.

    • To place a new WiFi card, connect the antenna cables to the WiFi card. The white cable goes to the white triangle, and the black cable goes to the black triangle.

    • Avoid damaging the card by not placing any cables underneath the card.

Ziellinie

Ein:e weitere:r Nutzer:in hat diese Anleitung absolviert.

Team

Cal Poly, Team 18-2, Maness Winter 2015 Mitglied von Cal Poly, Team 18-2, Maness Winter 2015

CPSU-MANESS-W15S18G2

4 Mitglieder

8 Anleitungen geschrieben

0 Kommentare

Kommentar hinzufügen

Seitenaufrufe:

Letzte 24 Stunden: 2

Letzte 7 Tage: 3

Letzte 30 Tage: 13

Insgesamt: 3,614