Zum Hauptinhalt wechseln
Gemeinsam reparieren - Jetzt registrieren

Dell Inspiron 6000 Screen Replacement

Was du brauchst

  1. Dell Inspiron 6000 Screen Replacement, Battery: Schritt 1, Bild 1 von 1
    • To prevent injury, make sure the laptop is unplugged before removing the battery.

    • Flip the laptop over, bottom-side up.

    Frag FixBot

    Kommentar hinzufügen

  2. Dell Inspiron 6000 Screen Replacement: Schritt 2, Bild 1 von 1
    • Push the switch next to the battery.

    • At the same time, lift the battery away from the laptop.

    Frag FixBot

    Kommentar hinzufügen

  3. Dell Inspiron 6000 Screen Replacement, Keyboard: Schritt 3, Bild 1 von 3 Dell Inspiron 6000 Screen Replacement, Keyboard: Schritt 3, Bild 2 von 3 Dell Inspiron 6000 Screen Replacement, Keyboard: Schritt 3, Bild 3 von 3
    • Place the laptop on flat surface.

    • Carefully open the laptop at far as it will go so that the back of screen is touching the flat surface.

    • Carefully take a spudger and separate part of the cover at the red circle.

    Frag FixBot

    Kommentar hinzufügen

  4. Dell Inspiron 6000 Screen Replacement: Schritt 4, Bild 1 von 2 Dell Inspiron 6000 Screen Replacement: Schritt 4, Bild 2 von 2
    • Remove two 4 mm Philips #00 screws.

    Frag FixBot

    Kommentar hinzufügen

  5. Dell Inspiron 6000 Screen Replacement: Schritt 5, Bild 1 von 1
    • Gently lift the keyboard away from the laptop without harming the cord that is located at the bottom of the keyboard.

    Frag FixBot

    Kommentar hinzufügen

  6. Dell Inspiron 6000 Screen Replacement: Schritt 6, Bild 1 von 3 Dell Inspiron 6000 Screen Replacement: Schritt 6, Bild 2 von 3 Dell Inspiron 6000 Screen Replacement: Schritt 6, Bild 3 von 3
    • Gently pull the blue tab up until it comes away from computer.

    Frag FixBot

    Kommentar hinzufügen

  7. Dell Inspiron 6000 Screen Replacement, Screen: Schritt 7, Bild 1 von 1
    • Remove one 4mm Philips #00 screw to completely disengage blue tab.

    Frag FixBot

    Kommentar hinzufügen

  8. Dell Inspiron 6000 Screen Replacement: Schritt 8, Bild 1 von 1
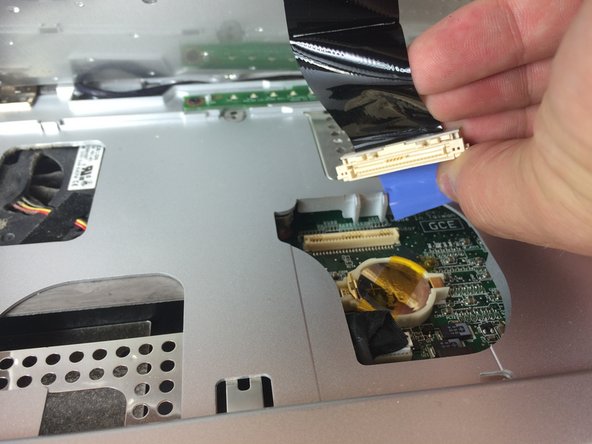
    • Pull and disconnect the blue tab.

    Frag FixBot

    Kommentar hinzufügen

  9. Dell Inspiron 6000 Screen Replacement: Schritt 9, Bild 1 von 1
    • Disconnect the black and white wires.

    Frag FixBot

    Kommentar hinzufügen

  10. Dell Inspiron 6000 Screen Replacement: Schritt 10, Bild 1 von 1
    • Remove four 4mm Philips #00 screws at the hinges for the screen.

    Frag FixBot

    Kommentar hinzufügen

  11. Dell Inspiron 6000 Screen Replacement: Schritt 11, Bild 1 von 1
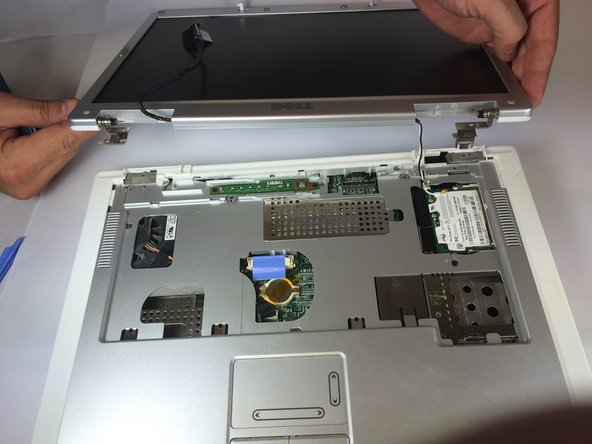
    • Separate the top panel of the laptop from the bottom panel.

    Frag FixBot

    Kommentar hinzufügen

  12. Dell Inspiron 6000 Screen Replacement: Schritt 12, Bild 1 von 2 Dell Inspiron 6000 Screen Replacement: Schritt 12, Bild 2 von 2
    • Use the plastic opening tools to remove the six rubber screw covers in the corners.

    • Remove six 4 mm #00 Philips screws located in the corners.

    Frag FixBot

    Kommentar hinzufügen

  13. Dell Inspiron 6000 Screen Replacement: Schritt 13, Bild 1 von 2 Dell Inspiron 6000 Screen Replacement: Schritt 13, Bild 2 von 2
    • Insert the plastic opening tools between the screen holders.

    • Go completely around the screen, separating the screen holders with the plastic opening tools.

    Frag FixBot

    Kommentar hinzufügen

  14. Dell Inspiron 6000 Screen Replacement: Schritt 14, Bild 1 von 2 Dell Inspiron 6000 Screen Replacement: Schritt 14, Bild 2 von 2
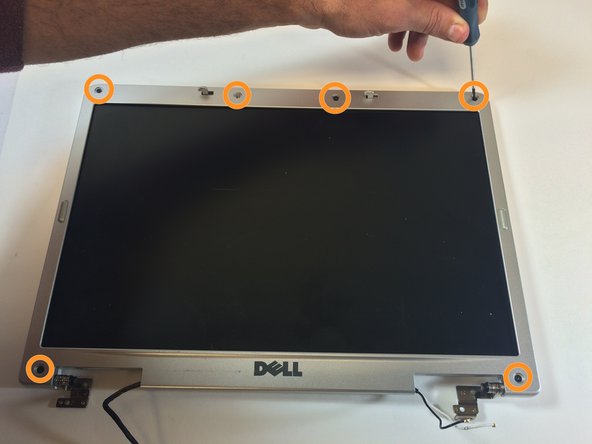
    • Remove 12 4mm #00 Philips screws at the perimeter of the screen.

    Frag FixBot

    Kommentar hinzufügen

  15. Dell Inspiron 6000 Screen Replacement: Schritt 15, Bild 1 von 2 Dell Inspiron 6000 Screen Replacement: Schritt 15, Bild 2 von 2
    • Gently lift the screen from the holder.

    • Do not touch the copper part of the bottom side of the screen.

    Frag FixBot

    Kommentar hinzufügen

Abschluss

To reassemble your device, follow these instructions in reverse order.

Rückgängig: Ich habe diese Anleitung nicht absolviert.

3 weitere Personen haben diese Anleitung absolviert.

Team

USF Tampa, Team 11-1, Blackwell Fall 2014 Mitglied von USF Tampa, Team 11-1, Blackwell Fall 2014

USFT-BLACKWELL-F14S11G1

5 Mitglieder

7 Anleitungen geschrieben

0 Kommentare zur Anleitung

Kommentar hinzufügen

Seitenaufrufe:

Letzte 24 Stunden: 1

Letzte 7 Tage: 5

Letzte 30 Tage: 32

Insgesamt: 3,071