Zum Hauptinhalt wechseln

Dell Inspiron 9100 Fan 3 Replacement

Was du brauchst

  1. Dell Inspiron 9100 Fan 3 Replacement, Battery: Schritt 1, Bild 1 von 3 Dell Inspiron 9100 Fan 3 Replacement, Battery: Schritt 1, Bild 2 von 3 Dell Inspiron 9100 Fan 3 Replacement, Battery: Schritt 1, Bild 3 von 3
    • Unplug the laptop from the power adapter and turn the power off.

    • Failure to unplug laptop before proceeding could result in risk of electric shock!

  2. Dell Inspiron 9100 Fan 3 Replacement: Schritt 2, Bild 1 von 3 Dell Inspiron 9100 Fan 3 Replacement: Schritt 2, Bild 2 von 3 Dell Inspiron 9100 Fan 3 Replacement: Schritt 2, Bild 3 von 3
    • Slide the battery-lock tab and hold.

    • Flip the battery away from the chassis to remove it.

  3. Dell Inspiron 9100 Fan 3 Replacement, Fan 3: Schritt 3, Bild 1 von 3 Dell Inspiron 9100 Fan 3 Replacement, Fan 3: Schritt 3, Bild 2 von 3 Dell Inspiron 9100 Fan 3 Replacement, Fan 3: Schritt 3, Bild 3 von 3
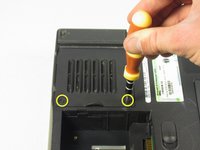
    • Undo the two screws on the fan cover plate labeled "F3", they will remain in the panel.

    • These screws will remain in the panel

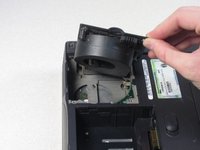
    • Lift up on the side of the fan nearest the screws to release the fan module

Abschluss

To reassemble your device, follow these instructions in reverse order.

charlierefvem

Mitglied seit: 01/11/11

854 Reputation

7 Anleitungen geschrieben

Team

Cal Poly, Team 13-2, Forte Winter 2011 Mitglied von Cal Poly, Team 13-2, Forte Winter 2011

CPSU-FORTE-W11S13G2

5 Mitglieder

8 Anleitungen geschrieben

0 Kommentare

Kommentar hinzufügen

Seitenaufrufe:

Letzte 24 Stunden: 0

Letzte 7 Tage: 0

Letzte 30 Tage: 4

Insgesamt: 1,981