Zum Hauptinhalt wechseln

Dell Inspiron E1505 GPU Replacement

Was du brauchst

  1. Dell Inspiron E1505 GPU Replacement, Battery and Optical drive: Schritt 1, Bild 1 von 3 Dell Inspiron E1505 GPU Replacement, Battery and Optical drive: Schritt 1, Bild 2 von 3 Dell Inspiron E1505 GPU Replacement, Battery and Optical drive: Schritt 1, Bild 3 von 3
    • Slide the battery disconnect right.

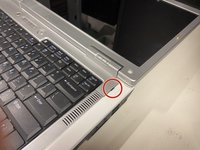
    • Remove the screw for the optical drive.

    • Use a screwdriver to push the optical drive out of the base.

    • Gently pull the drive out when it sticks out far enough.

  2. Dell Inspiron E1505 GPU Replacement, Base Screws: Schritt 2, Bild 1 von 2 Dell Inspiron E1505 GPU Replacement, Base Screws: Schritt 2, Bild 2 von 2
    • Unscrew all 12 screws on the base of the laptop

    • Remove the 2 screws at the back of the laptop.

  3. Dell Inspiron E1505 GPU Replacement, Power Button panel.: Schritt 3, Bild 1 von 3 Dell Inspiron E1505 GPU Replacement, Power Button panel.: Schritt 3, Bild 2 von 3 Dell Inspiron E1505 GPU Replacement, Power Button panel.: Schritt 3, Bild 3 von 3
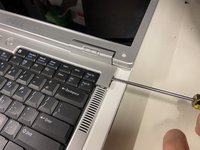
    • Rotate the screen to a 180-degree position.

    • Take a flat head screwdriver and gently pry at the indentation. It should come open semi-easily.

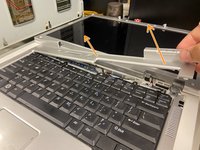
    • Grab the panel and gently pull it off

  4. Dell Inspiron E1505 GPU Replacement, Keyboard and display: Schritt 4, Bild 1 von 3 Dell Inspiron E1505 GPU Replacement, Keyboard and display: Schritt 4, Bild 2 von 3 Dell Inspiron E1505 GPU Replacement, Keyboard and display: Schritt 4, Bild 3 von 3
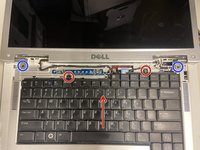
    • Remove the two screws and slide the keyboard toward the display.

    • There is a delicate ribbon cable attached to the bottom of the keyboard. Be careful when removing it.

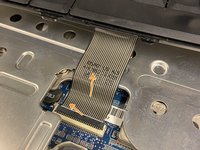
    • Rotate the latch up toward the trackpad, then carefully remove the ribbon cable.

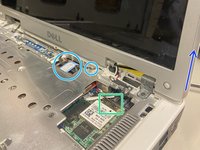
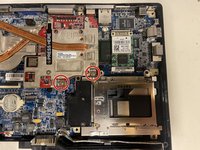
    • Remove the antenna connectors on the wifi card by pulling up at the part where the cable meets the connector.

    • Unscrew the grounding cable on the display cable. Disconnect the display cable by pulling up on the tab.

    • Remove the last two screws holding the display in. Rotate the display to an upright 90-degree position. Gently pull up to remove the display.

  5. Dell Inspiron E1505 GPU Replacement, Top Panel: Schritt 5, Bild 1 von 3 Dell Inspiron E1505 GPU Replacement, Top Panel: Schritt 5, Bild 2 von 3 Dell Inspiron E1505 GPU Replacement, Top Panel: Schritt 5, Bild 3 von 3
    • Disconnect the ribbon cable from the motherboard

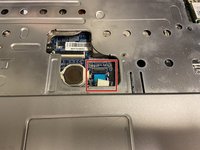
    • Disconnect the lid sensor.

    • Unscrew the last screw holding the top panel in.
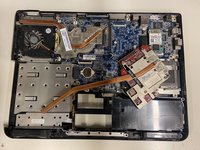
    • Lift the panel.

    • There may be clips in the back, slide your finger to pry them off.

    • If you can't lift the panel, check if there are any screws on the base holding it.

  6. Dell Inspiron E1505 GPU Replacement, GPU: Schritt 6, Bild 1 von 3 Dell Inspiron E1505 GPU Replacement, GPU: Schritt 6, Bild 2 von 3 Dell Inspiron E1505 GPU Replacement, GPU: Schritt 6, Bild 3 von 3
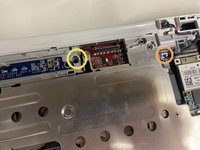
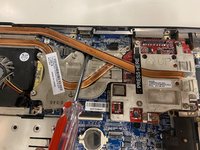
    • Remove the two screws shown.

    • Use a screwdriver to pry the GPU and cooler up.

    • Use a screwdriver with a larger diameter shank to disconnect the gpu.

    • To reconnect the gpu, align it and firmly press at the "Press here" label.

Abschluss

To reassemble your device, follow these instructions in reverse order.

Ein:e weitere:r Nutzer:in hat diese Anleitung absolviert.

TMG

Mitglied seit: 03/10/22

614 Reputation

4 Anleitungen geschrieben

0 Kommentare

Kommentar hinzufügen

Seitenaufrufe:

Letzte 24 Stunden: 0

Letzte 7 Tage: 2

Letzte 30 Tage: 5

Insgesamt: 212