Zum Hauptinhalt wechseln

Dell Inspiron M5010 Fan/Heatsink Replacement

Was du brauchst

  1. Dell Inspiron M5010 Fan/Heatsink Replacement, Remove keyboard retaining screw: Schritt 1, Bild 1 von 1
    • Remove Keyboard retaining screw from bottom of laptop.

  2. Dell Inspiron M5010 Fan/Heatsink Replacement: Schritt 2, Bild 1 von 3 Dell Inspiron M5010 Fan/Heatsink Replacement: Schritt 2, Bild 2 von 3 Dell Inspiron M5010 Fan/Heatsink Replacement: Schritt 2, Bild 3 von 3
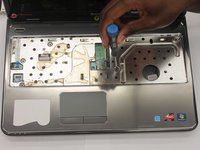
    • Insert the 6 inch metal ruler, or another flat object into the holes in the top left of the keyboard, the top middle of the keyboard, and the top right of the keyboard to release the keyboard from the computer.

    • There are a number of screws on the bottom that required to be removed prior to the keyboard being able to be lifted up.

  3. Dell Inspiron M5010 Fan/Heatsink Replacement: Schritt 3, Bild 1 von 1
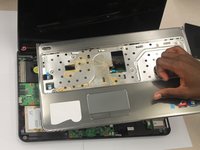
    • Lift the keyboard up slightly and push forward in order to release bottom tabs.

  4. Dell Inspiron M5010 Fan/Heatsink Replacement: Schritt 4, Bild 1 von 1
    • Pull the black tab up and then pull left on keyboard plug to release keyboard.

  5. Dell Inspiron M5010 Fan/Heatsink Replacement, Palm Rest: Schritt 5, Bild 1 von 1
    • Flip the laptop, so the bottom of the laptop is facing up.

    • Remove the seven 6.0mm Phillip #000 screws indicated using the Phillips #000 screwdriver.

  6. Dell Inspiron M5010 Fan/Heatsink Replacement: Schritt 6, Bild 1 von 2 Dell Inspiron M5010 Fan/Heatsink Replacement: Schritt 6, Bild 2 von 2
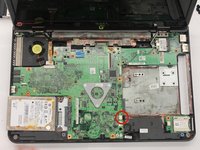
    • Flip the laptop back over, so that the top of the laptop is facing up.

    • Open the laptop.

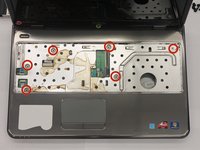
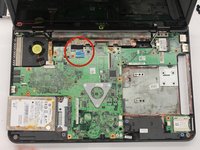
    • Remove all of the indicated 6.0 mm screws with the Phillips #000 screwdriver.

  7. Dell Inspiron M5010 Fan/Heatsink Replacement: Schritt 7, Bild 1 von 1
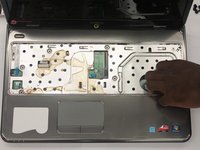
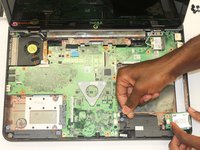
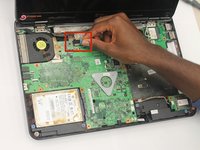
    • Unplug the palm rest cables by lifting the black tab up and then pulling on the blue tabs.

  8. Dell Inspiron M5010 Fan/Heatsink Replacement: Schritt 8, Bild 1 von 3 Dell Inspiron M5010 Fan/Heatsink Replacement: Schritt 8, Bild 2 von 3 Dell Inspiron M5010 Fan/Heatsink Replacement: Schritt 8, Bild 3 von 3
    • Carefully unsnap and remove the palm rest.

    • Place your fingers inside the large circle in the lower right corner to get a good grip.

  9. Dell Inspiron M5010 Fan/Heatsink Replacement, Fan/Heatsink: Schritt 9, Bild 1 von 1
    • Flip the laptop over so the bottom is facing up.

    • Remove the indicated 17 6mm Phillips #000 screws on the back of the laptop using the Phillips #000 screwdriver.

  10. Dell Inspiron M5010 Fan/Heatsink Replacement: Schritt 10, Bild 1 von 2 Dell Inspiron M5010 Fan/Heatsink Replacement: Schritt 10, Bild 2 von 2
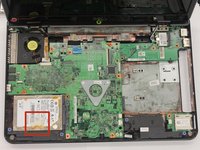
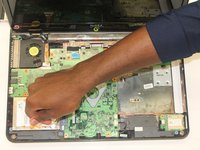
    • Pull the clear tab attached to the hard drive and gently lift up the hard drive to remove it.

  11. Dell Inspiron M5010 Fan/Heatsink Replacement: Schritt 11, Bild 1 von 2 Dell Inspiron M5010 Fan/Heatsink Replacement: Schritt 11, Bild 2 von 2
    • Flip the laptop back over and unplug the Speakers.

  12. Dell Inspiron M5010 Fan/Heatsink Replacement: Schritt 12, Bild 1 von 2 Dell Inspiron M5010 Fan/Heatsink Replacement: Schritt 12, Bild 2 von 2
    • Unplug the SD Card Slot.

    • You do not have to remove the SD Card Slot, just unplug it.

  13. Dell Inspiron M5010 Fan/Heatsink Replacement: Schritt 13, Bild 1 von 1
    • Unplug the USB/VGA cable.

  14. Dell Inspiron M5010 Fan/Heatsink Replacement: Schritt 14, Bild 1 von 1
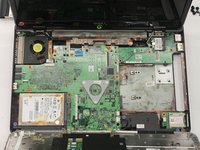
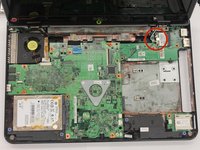
    • Remove the 4 mm Phillips #000 motherboard screws using the Phillips #000 screwdriver.

  15. Dell Inspiron M5010 Fan/Heatsink Replacement: Schritt 15, Bild 1 von 1
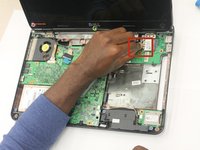
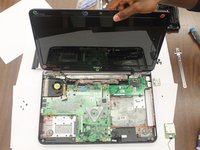
    • Remove the 4 indicated 6 mm Phillips #000 front hinge screws with the Phillips #000 screwdriver.

  16. Dell Inspiron M5010 Fan/Heatsink Replacement: Schritt 16, Bild 1 von 2 Dell Inspiron M5010 Fan/Heatsink Replacement: Schritt 16, Bild 2 von 2
    • Unplug the Wireless Antenna cables.

  17. Dell Inspiron M5010 Fan/Heatsink Replacement: Schritt 17, Bild 1 von 3 Dell Inspiron M5010 Fan/Heatsink Replacement: Schritt 17, Bild 2 von 3 Dell Inspiron M5010 Fan/Heatsink Replacement: Schritt 17, Bild 3 von 3
    • Unplug the LCD cable.

    • Lift the screen from the computer.

  18. Dell Inspiron M5010 Fan/Heatsink Replacement: Schritt 18, Bild 1 von 1
    • Remove the Middle Cover.

  19. Dell Inspiron M5010 Fan/Heatsink Replacement: Schritt 19, Bild 1 von 1
    • Remove the Motherboard.

  20. Dell Inspiron M5010 Fan/Heatsink Replacement: Schritt 20, Bild 1 von 2 Dell Inspiron M5010 Fan/Heatsink Replacement: Schritt 20, Bild 2 von 2
    • Unplug the fan.

  21. Dell Inspiron M5010 Fan/Heatsink Replacement: Schritt 21, Bild 1 von 2 Dell Inspiron M5010 Fan/Heatsink Replacement: Schritt 21, Bild 2 von 2
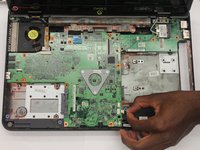
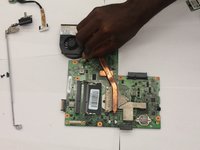
    • Remove all 4 of the 6 mm Phillips #000 Heatsink screws with the Phillips #000 screwdriver.

  22. Dell Inspiron M5010 Fan/Heatsink Replacement: Schritt 22, Bild 1 von 1
    • Lift the Heatsink from the Motherboard.

Abschluss

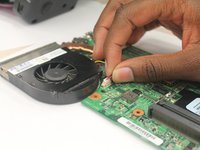
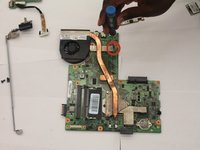
To reassemble your device, follow these instructions in reverse order.

Ein:e weitere:r Nutzer:in hat diese Anleitung absolviert.

April Poucher

Mitglied seit: 10/13/14

1.164 Reputation

10 Anleitungen geschrieben

Team

Clemson, Team 1-5, Benson Fall 2014 Mitglied von Clemson, Team 1-5, Benson Fall 2014

CLEM-BENSON-F14S1G5

4 Mitglieder

11 Anleitungen geschrieben

0 Kommentare

Kommentar hinzufügen

Seitenaufrufe:

Letzte 24 Stunden: 0

Letzte 7 Tage: 0

Letzte 30 Tage: 2

Insgesamt: 963