Einleitung
This guide will show you how to remove and replace the wireless card for the Dell Inspiron i3558-5500BLK Laptop.
WARNING: Static electricity can damage the electronic components of this model. Before
beginning these procedures, discharge any built up static electricity by briefly touching a grounded
metal object. For example, you can touch the metal frame inside the case of most desktop computers, or wear an anti-static wristband.
Was du brauchst
-
-
With the laptop open and facing upright, use the Spudger to pull at the notches shown in the image.
-
-
-
Gently turn the keyboard over to reveal the ribbon cable underneath. Remove the cable from the motherboard by lifting the white release tab and gently pulling the cable away from the socket.
-
Lift the keyboard away from the baseboard to remove.
-
-
-
With the back of the laptop facing upright, press the switch shown to loosen the battery and remove it.
-
-
-
With the laptop facing upright - remove the ribbon cable from the optical drive by lifting the white release tab and gently pulling the cable away from the socket.
-
-
-
-
With the back of the laptop facing upright, remove the following screws:
-
Ten 0.5 mm Phillips screws from the backboard
-
One 0.2 mm Phillips screw from the battery port
-
Three 0.1 mm Phillips screws from the optical drive slot.
-
-
-
Gently pry the back cover from the opposite side of the battery to reveal the internal components.
-
-
-
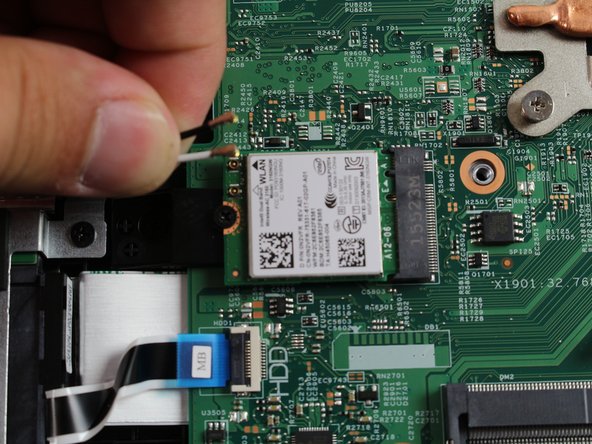
Identify the Wireless Card as shown in the image.
-
Remove the power couplings by gently pulling them away from the assembly.
-
-
-
Gently pry the wireless card upward from the screw-side and pull outward toward the edge of the laptop to remove.
-


To reassemble your device, follow these instructions in reverse order.
To reassemble your device, follow these instructions in reverse order.
Team

Cal Poly, Team S9-G5, Banghart Fall 2017 Mitglied von Cal Poly, Team S9-G5, Banghart Fall 2017
CPSU-BANGHART-F17S9G5
4 Mitglieder
13 Anleitungen geschrieben