Was du brauchst
-
-
Flip the device so that the base plate is facing you.
-
Use a Phillips #0 screwdriver to remove the nine 5.5 mm screws securing the base plate.
-
-
-
Wedge a spudger between the base plate and the chassis, then gently pry around the entire perimeter to release the base plate.
-
Remove the base plate.
-
-
-
Use a Phillips #0 screwdriver to remove the four 2 mm screws from the speakers.
-
-
-
Use a spudger to gently lever the speaker connector out of its port.
-
Lift the speakers up and out.
-
-
-
Use a Phillips #0 screwdriver to remove the two 3 mm screws securing the fan.
-
-
-
-
Place your fingernails behind the plastic tabs on the speaker's motherboard connector, then pull directly backwards, toward the wires, until the connector releases from its port.
-
Lift the fan up and out.
-
-
-
Use a Phillips #0 screwdriver to remove the four 3.5 mm screws.
-
-
-
Place your fingernails behind each of the plastic tabs on the plug, and pull directly backward until the connector releases.
-
-
-
Flip up the locking bars on the two ZIF connectors so they stand vertically, then gently remove the two ribbon cables connected to the IO daughterboard.
-
Lift the IO daughterboard up and out.
-
-
-
Use a Phillips #0 screwdriver to remove the eight screws securing the battery.
-
-
-
Place a spudger behind a plastic tab on either side of the plug, then "walk" the connector out of its socket by gently pushing the plug toward the cables, alternating sides, until the connector releases.
-
Lift the battery up and out.
-
-
-
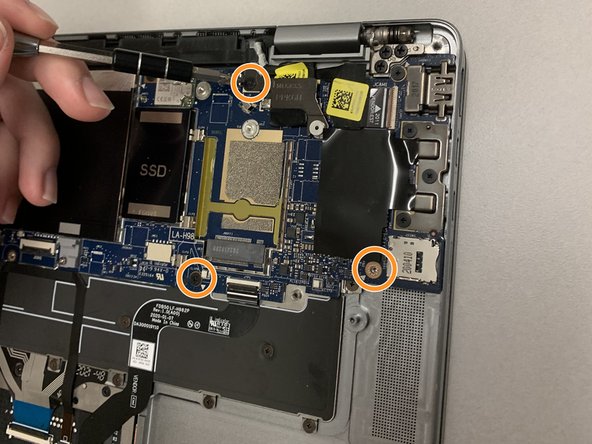
Use a Phillips #00 screwdriver to remove the four screws.
-
Use a Phillips #00 screwdriver to remove the three screws.
-
-
-
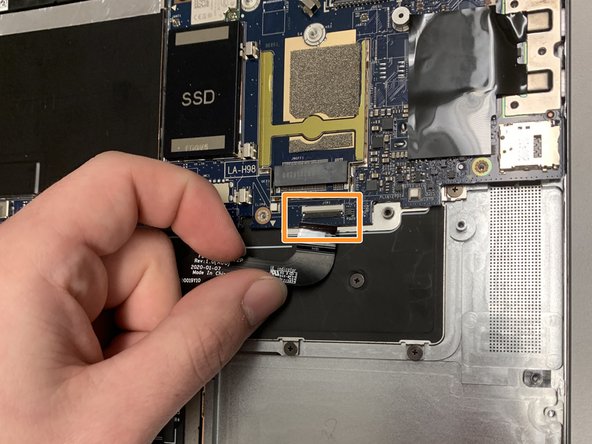
Flip up the small metal display cable clip, until the clip is parallel to the ribbon cable, then pull it directly backwards until it releases.
-
Flip up the lock-bar on the ZIF connector, then gently pull the ribbon cable until it releases.
-
-
-
Use a Phillips #00 screwdriver to remove the seven 4.0 mm screws.
-
Use a Phillips #00 screwdriver to remove the two 4.5mm screws.
-


To reassemble your device, follow these instructions in reverse order.
To reassemble your device, follow these instructions in reverse order.
Team

Western Carolina University, Team 1-5, Virtue Spring 2022 Mitglied von Western Carolina University, Team 1-5, Virtue Spring 2022
WCU-VIRTUE-S22S1G5
4 Mitglieder
4 Anleitungen geschrieben