Zum Hauptinhalt wechseln

Dell Latitude D530 Screen Replacement

Was du brauchst

  1. Dell Latitude D530 Screen Replacement, Screen: Schritt 1, Bild 1 von 3 Dell Latitude D530 Screen Replacement, Screen: Schritt 1, Bild 2 von 3 Dell Latitude D530 Screen Replacement, Screen: Schritt 1, Bild 3 von 3
    • Remove the 4 small circle dots from the borders of the laptop screen. Simply pull the dots out of their sockets.

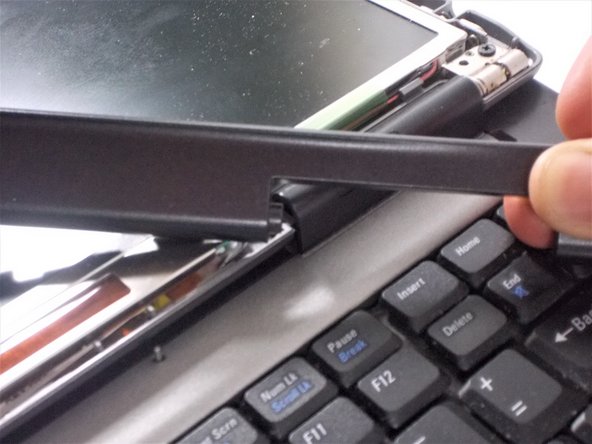
    • Also remove the one longer rubber piece from the top of the screen. Simply peel the rubber piece from its place.

  2. Dell Latitude D530 Screen Replacement: Schritt 2, Bild 1 von 3 Dell Latitude D530 Screen Replacement: Schritt 2, Bild 2 von 3 Dell Latitude D530 Screen Replacement: Schritt 2, Bild 3 von 3
    • Unscrew and remove the 6 6mm screws that were under the rubber pieces using a Phillips #1.

    • If the screws will not come out easily, use the magnetic bit to remove the screws all illustrated.

  3. Dell Latitude D530 Screen Replacement: Schritt 3, Bild 1 von 3 Dell Latitude D530 Screen Replacement: Schritt 3, Bild 2 von 3 Dell Latitude D530 Screen Replacement: Schritt 3, Bild 3 von 3
    • Use the spudger to pry the plastic border off.

    • Be sure that the plastic notch at the bottom of the screen is pulled out correctly. Pull the border to the left of the screen and out.

  4. Dell Latitude D530 Screen Replacement: Schritt 4, Bild 1 von 1
    • Unscrew the 8 6mm screws located on the outer border of the screen using a Phillips #1.

    • There are 4 screws on each side.

  5. Dell Latitude D530 Screen Replacement: Schritt 5, Bild 1 von 1
    • Use the spudger to pry the screen up.

  6. Dell Latitude D530 Screen Replacement: Schritt 6, Bild 1 von 3 Dell Latitude D530 Screen Replacement: Schritt 6, Bild 2 von 3 Dell Latitude D530 Screen Replacement: Schritt 6, Bild 3 von 3
    • Lift the screen up and fold over gently.

  7. Dell Latitude D530 Screen Replacement: Schritt 7, Bild 1 von 2 Dell Latitude D530 Screen Replacement: Schritt 7, Bild 2 von 2
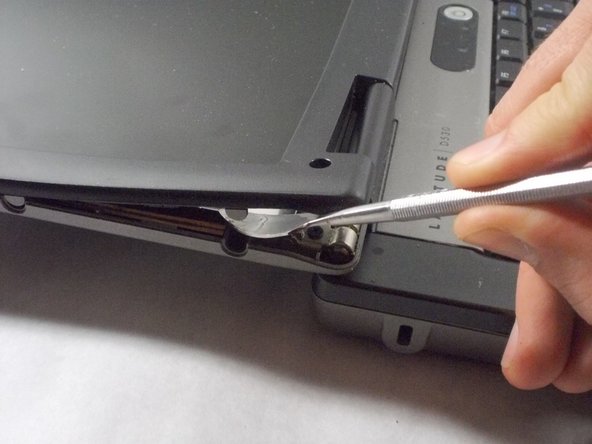
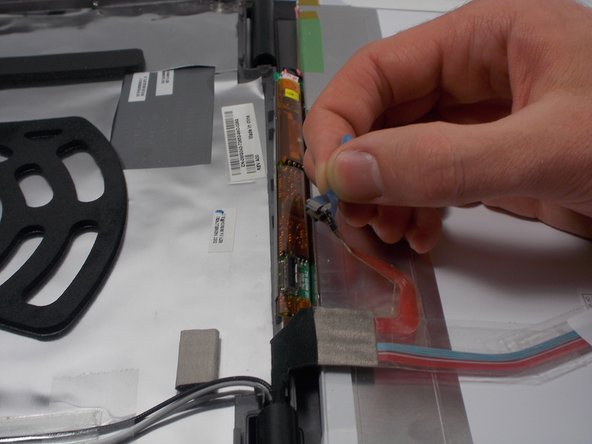
    • Pull on the blue tag sticking out at the bottom of the screen and disconnect the wire.

  8. Dell Latitude D530 Screen Replacement: Schritt 8, Bild 1 von 3 Dell Latitude D530 Screen Replacement: Schritt 8, Bild 2 von 3 Dell Latitude D530 Screen Replacement: Schritt 8, Bild 3 von 3
    • Towards the top of the screen on the back, unplug the “this side up” wire.

    • This can be done by squeezing the 2 metal side clips of the wire.

    • This could be difficult so wiggling the wire a little bit may be necessary.

Abschluss

To reassemble your device, follow these instructions in reverse order.

Kyle Cabral

Mitglied seit: 03/19/18

604 Reputation

4 Anleitungen geschrieben

Team

UMass Dartmouth, Team S2-G6, Bernier Spring 2018 Mitglied von UMass Dartmouth, Team S2-G6, Bernier Spring 2018

UMASSD-BERNIER-S18S2G6

3 Mitglieder

4 Anleitungen geschrieben

0 Kommentare

Kommentar hinzufügen

Seitenaufrufe:

Letzte 24 Stunden: 0

Letzte 7 Tage: 4

Letzte 30 Tage: 9

Insgesamt: 815