Zum Hauptinhalt wechseln

Diese Anleitung enthält neuere Änderungen. Wechsel zur neuesten unüberprüften Version.

Dell Latitude D600 RAM (Main Memory) Replacement

Was du brauchst

  1. Dell Latitude D600 RAM (Main Memory) Replacement, Battery: Schritt 1, Bild 1 von 1
    • Find the battery

  2. Dell Latitude D600 RAM (Main Memory) Replacement: Schritt 2, Bild 1 von 2 Dell Latitude D600 RAM (Main Memory) Replacement: Schritt 2, Bild 2 von 2
    • Pull the tab to release the battery

  3. Dell Latitude D600 RAM (Main Memory) Replacement: Schritt 3, Bild 1 von 1
    • Pull the battery out

  4. Dell Latitude D600 RAM (Main Memory) Replacement, RAM (Main Memory): Schritt 4, Bild 1 von 2 Dell Latitude D600 RAM (Main Memory) Replacement, RAM (Main Memory): Schritt 4, Bild 2 von 2
    • Find the panel underneath the microsoft product key sticker, the panel is labeled with an M

    • Unscrew the single screw above the M

  5. Dell Latitude D600 RAM (Main Memory) Replacement: Schritt 5, Bild 1 von 3 Dell Latitude D600 RAM (Main Memory) Replacement: Schritt 5, Bild 2 von 3 Dell Latitude D600 RAM (Main Memory) Replacement: Schritt 5, Bild 3 von 3
    • Pull off the panel to reveal the RAM

    • RAM is held in by two tabs, pull each tab to the side and the RAM will pop up

  6. Dell Latitude D600 RAM (Main Memory) Replacement: Schritt 6, Bild 1 von 1
    • Once the RAM is popped up, slowly pull it out of the slot

  7. Dell Latitude D600 RAM (Main Memory) Replacement: Schritt 7, Bild 1 von 3 Dell Latitude D600 RAM (Main Memory) Replacement: Schritt 7, Bild 2 von 3 Dell Latitude D600 RAM (Main Memory) Replacement: Schritt 7, Bild 3 von 3
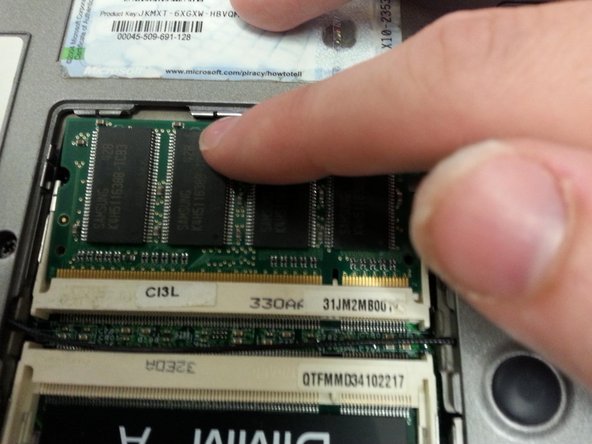
    • To add or replace RAM, place the memory into the slot at an angle

    • Make sure you line it up correctly

    • If it is in correctly it should stay up at an angle by itself

    • Then push down in the middle until it clicks into place

  8. Dell Latitude D600 RAM (Main Memory) Replacement: Schritt 8, Bild 1 von 1
    • The RAM should be secured by the tabs where the two semi circles are on the RAM

    • If it is not secure, just gently pull it out and try again, use the images to help you out

Abschluss

To reassemble your device, follow these instructions in reverse order.

6 weitere Nutzer:innen haben diese Anleitung absolviert.

Joseph

Mitglied seit: 07/16/14

1.497 Reputation

5 Anleitungen geschrieben

Ein Kommentar

Almost perfect: easy; clear;

Herman - Antwort

Kommentar hinzufügen

Seitenaufrufe:

Letzte 24 Stunden: 0

Letzte 7 Tage: 2

Letzte 30 Tage: 9

Insgesamt: 2,828