Einleitung
Remove the Motherboard from the computer.
Was du brauchst
-
-
Lay the computer on its side; you will see a blue knob.
-
Turn this knob 90 deg clockwise.
-
-
-
Slide the panel case forward about 1/2 inch while knob is turned.
-
Lift panel case off computer.
-
-
-
Remove the large blue cover from the computer, there are no screws or tabs keeping it in place.
-
-
-
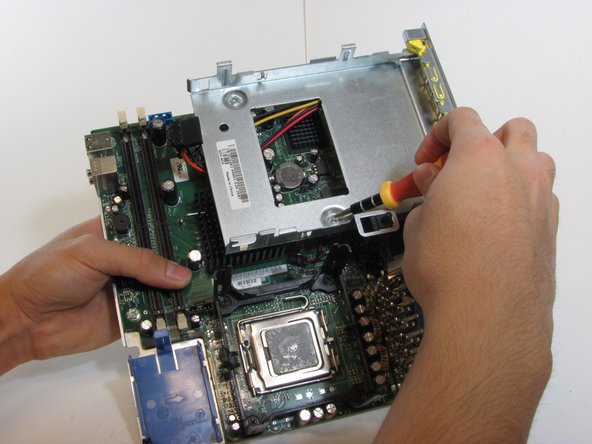
Remove the power supply that connects the upper fan to the motherboard. The power supply has black, red, green and yellow wires.
-
-
-
Remove the power supply that connects the lower fan to the motherboard, distinguished by it's black, red, green and yellow wires.
-
-
-
-
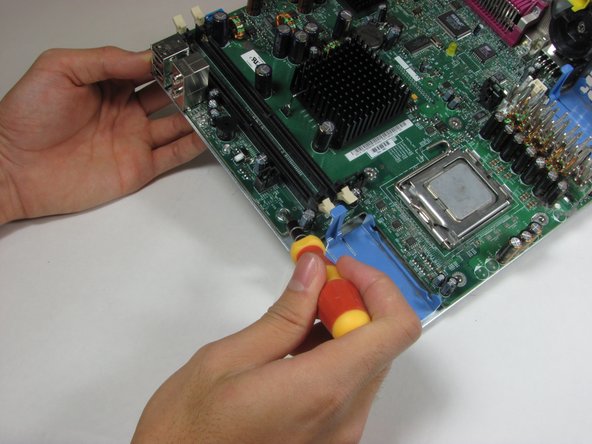
The RAM are the two green cards in the corner of the computer.
-
At each end of the card, there are two white clips securing the RAM to the Motherboard.
-
-
-
Push down both white clips with your thumbs until you hear a click.
-
The RAM cards can now be removed.
-
-
-
Unplug the blue cable that connects the hard drive to the motherboard.
-
-
-
Squeeze the release tabs on either side of the hard drive.
-
Then slide the hard drive out of the computer while squeezing the tabs.
-
-
-
Press on the release tab and remove the motherboard speaker which is attached to the side of the tower.
-
-
-
Lift the motherboard from the rest of the computer case.
Thanks a lot :)
Hi,
Excellent guide.
I have one of these, and i was thinking of opening it up.
Its sound output disappeared one day. Quite unexpectedly.
No reason that i could see. Couldn't find anything in the
settings to make it go again.
Finally i thought that maybe its 'sound card' had gotten
jogged, or maybe loose, and needed 're-seating'.
After reading through your article on the SX-280,
i now see that it has no 'sound card'.
It has 'on-board' sound facilities.
So for me that has pros and cons.
Pros, i dont need to look for a sound card to re-seat it.
Cons, i dont know what to do about my lost sound now.
As to updating the images, i think they are appropriately
dated to suit this model of PC.
Pre-Requisites ... Not quite sure what this refers to.
Maybe a phillips screwdriver is a prerequisite.
Maybe i missed something, but i dont see that newer pics
would help at all, but the poster is quite correct about
this guide, it is very good.
Regards, John :)
REal nice writeup, saved me a lot of guesswork. Thanks a lot.
JA Reyes, MArch 30, 2015.
Fan closer to heat sink
No need to remove rubber grommets. After pressing blue tap, fan can be moved sideways, towards housing, after about 2 to 3 mmm travel the slots that hold it become wider, and fan, plus blue plastic bracket can be lifted out.
Same is true for other fan, but more difficult to slide. This fan does not have
to be removed to get motherboard out.
-
-
-
Unplug the cable that powers the hard drive, which has orange, red and yellow wires.
-
-
-
Unplug the cable that powers the emergency shut off, distinguished by its red wires.
-
-
-
Slide the Hard Drive Stand to left side.
-
Remove the stand from the rest of the rear panel.
-
-
-
Remove the four screws located on heat sink stand.
-
The heat sink stand can now be lifted from the motherboard.
-


To reassemble your device, follow these instructions in reverse order.
To reassemble your device, follow these instructions in reverse order.
Rückgängig: Ich habe diese Anleitung nicht absolviert.
11 weitere Nutzer:innen haben diese Anleitung absolviert.
Team

Cal Poly, Team 22-4, Maness Fall 2010 Mitglied von Cal Poly, Team 22-4, Maness Fall 2010
CPSU-MANESS-F10S22G4
4 Mitglieder
26 Anleitungen geschrieben
2 Kommentare
Good job. Thanks for sharing, friend.
Great guide! I got stuck at the Mobo tray, I knew the black screws were involved but couldn't get it with out help. Thanks!
Fans can be removed with board tray, otherwise they're getting pulled off their rubber isolating feet. Once out with the mobo, the fans slide off the board tray with their plastic shoes attached.