Zum Hauptinhalt wechseln

Dexter Wired Vibrating Sander 330W - 330SHS2.5 Engine Replacement

Was du brauchst

  1. Dexter Wired Vibrating Sander 330W - 330SHS2.5 Engine Replacement, Unplug: Schritt 1, Bild 1 von 1
    • Before you start, remember to disconnect the outlet from the mains.

  2. Dexter Wired Vibrating Sander 330W - 330SHS2.5 Engine Replacement: Schritt 2, Bild 1 von 2 Dexter Wired Vibrating Sander 330W - 330SHS2.5 Engine Replacement: Schritt 2, Bild 2 von 2
    • Remove the dust box and the seal on the back of the device.

  3. Dexter Wired Vibrating Sander 330W - 330SHS2.5 Engine Replacement: Schritt 3, Bild 1 von 3 Dexter Wired Vibrating Sander 330W - 330SHS2.5 Engine Replacement: Schritt 3, Bild 2 von 3 Dexter Wired Vibrating Sander 330W - 330SHS2.5 Engine Replacement: Schritt 3, Bild 3 von 3
    • Unscrew the six screws of the pad.

    • Lock the motor with a screwdriver to be able to unscrew the centre screw, you will not be able to get there without blocking the gear.

  4. Dexter Wired Vibrating Sander 330W - 330SHS2.5 Engine Replacement: Schritt 4, Bild 1 von 2 Dexter Wired Vibrating Sander 330W - 330SHS2.5 Engine Replacement: Schritt 4, Bild 2 von 2
    • Using a screwdriver or screwdriver, unscrew and open the device.

    • Lift the two carbons with a screwdriver to get them out of their homes.

    • Remove the rotor from its housing.

    • Press the tab to disconnect the coal from the engine.

    • Unscrew the domino screws to disconnect the cables.

    • Use a clamp to extract the cables.

  5. Dexter Wired Vibrating Sander 330W - 330SHS2.5 Engine Replacement: Schritt 9, Bild 1 von 1
    • Separate the wire connected to the motor.

    • Cut the rat cable with a cutting pliers.

  6. Dexter Wired Vibrating Sander 330W - 330SHS2.5 Engine Replacement: Schritt 11, Bild 1 von 2 Dexter Wired Vibrating Sander 330W - 330SHS2.5 Engine Replacement: Schritt 11, Bild 2 von 2
    • Unsolder the cable connected to the speed dimmer.

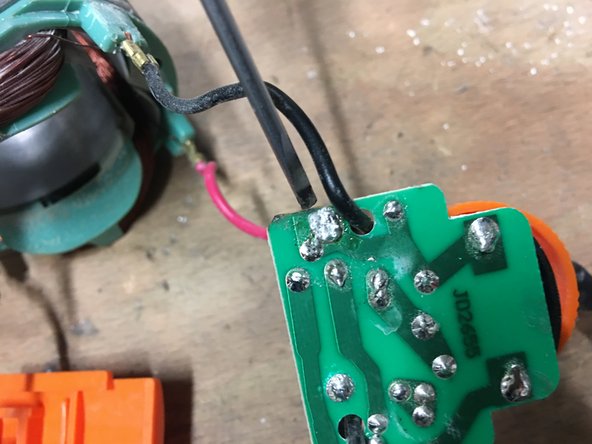
    • Approach the soldering iron to heat the tin and make it soft. Using the pump, remove the residues.

  7. Dexter Wired Vibrating Sander 330W - 330SHS2.5 Engine Replacement: Schritt 13, Bild 1 von 1
    • Take out the old engine to replace it with the new one.

  8. Dexter Wired Vibrating Sander 330W - 330SHS2.5 Engine Replacement: Schritt 14, Bild 1 von 3 Dexter Wired Vibrating Sander 330W - 330SHS2.5 Engine Replacement: Schritt 14, Bild 2 von 3 Dexter Wired Vibrating Sander 330W - 330SHS2.5 Engine Replacement: Schritt 14, Bild 3 von 3
    • Replace the cable of the new motor on the speed dimmer.

    • You must take the shortest cable.

    • With tin, unsolder the wire on the frame to hold it.

    • Replace the speed dimmer in its housing.

  9. Dexter Wired Vibrating Sander 330W - 330SHS2.5 Engine Replacement: Schritt 17, Bild 1 von 3 Dexter Wired Vibrating Sander 330W - 330SHS2.5 Engine Replacement: Schritt 17, Bild 2 von 3 Dexter Wired Vibrating Sander 330W - 330SHS2.5 Engine Replacement: Schritt 17, Bild 3 von 3
    • Replace the most black thread in the domino.

  10. Dexter Wired Vibrating Sander 330W - 330SHS2.5 Engine Replacement: Schritt 18, Bild 1 von 1
    • Replace each room in its housing.

    • Reconnect the carbons.

  11. Dexter Wired Vibrating Sander 330W - 330SHS2.5 Engine Replacement: Schritt 20, Bild 1 von 2 Dexter Wired Vibrating Sander 330W - 330SHS2.5 Engine Replacement: Schritt 20, Bild 2 von 2
    • Replace the new engine.

    • Remember to recover the small washer at the end of the old piece.

  12. Dexter Wired Vibrating Sander 330W - 330SHS2.5 Engine Replacement: Schritt 21, Bild 1 von 1
    • Replace the engine at its location.

  13. Dexter Wired Vibrating Sander 330W - 330SHS2.5 Engine Replacement: Schritt 22, Bild 1 von 3 Dexter Wired Vibrating Sander 330W - 330SHS2.5 Engine Replacement: Schritt 22, Bild 2 von 3 Dexter Wired Vibrating Sander 330W - 330SHS2.5 Engine Replacement: Schritt 22, Bild 3 von 3
    • Be careful to put the black cable back into its housing so as not to block during the reassembly of the machine.

    • Put the carbons back in their place.

  14. Dexter Wired Vibrating Sander 330W - 330SHS2.5 Engine Replacement: Schritt 24, Bild 1 von 3 Dexter Wired Vibrating Sander 330W - 330SHS2.5 Engine Replacement: Schritt 24, Bild 2 von 3 Dexter Wired Vibrating Sander 330W - 330SHS2.5 Engine Replacement: Schritt 24, Bild 3 von 3
    • Replace the shell, then screw it back on.

    • Remember to put the joint back in its place.

  15. Dexter Wired Vibrating Sander 330W - 330SHS2.5 Engine Replacement: Schritt 25, Bild 1 von 2 Dexter Wired Vibrating Sander 330W - 330SHS2.5 Engine Replacement: Schritt 25, Bild 2 von 2
    • Reposition the part, then lock the engine with a screwdriver to screw.

    • Put the tray back on and screw the screws.

  16. Dexter Wired Vibrating Sander 330W - 330SHS2.5 Engine Replacement: Schritt 26, Bild 1 von 1
    • Finally, reposition the vacuum bag.

Ziellinie

Besonderer Dank geht an diese Übersetzer:innen:

fr en

100%

HelloMacOS hilft uns, die Welt in Ordnung zu bringen! Wie kann ich mithelfen?
Hier starten ›

Céline Chemineau

Mitglied seit: 01/29/20

16.581 Reputation

95 Anleitungen geschrieben

Team

Leroy Merlin Mitglied von Leroy Merlin

Community

36 Mitglieder

239 Anleitungen geschrieben

0 Kommentare

Kommentar hinzufügen

Seitenaufrufe:

Letzte 24 Stunden: 0

Letzte 7 Tage: 0

Letzte 30 Tage: 3

Insgesamt: 146