Zum Hauptinhalt wechseln

Disassembling Asus W2W-A1 Protective Cover

Was du brauchst

  1. Disassembling Asus W2W-A1 Protective Cover, Keyboard: Schritt 1, Bild 1 von 3 Disassembling Asus W2W-A1 Protective Cover, Keyboard: Schritt 1, Bild 2 von 3 Disassembling Asus W2W-A1 Protective Cover, Keyboard: Schritt 1, Bild 3 von 3
    • Remove the battery, then unscrew the 7 3 mm Phillips screws behind the battery. Make sure they go in separate, organized piles.

    • Unscrew the 2 4 mm Phillips head screws by the battery.

  2. Disassembling Asus W2W-A1 Protective Cover: Schritt 2, Bild 1 von 1
    • Remove the panel above the keyboard with a plastic spudger.

  3. Disassembling Asus W2W-A1 Protective Cover: Schritt 3, Bild 1 von 1
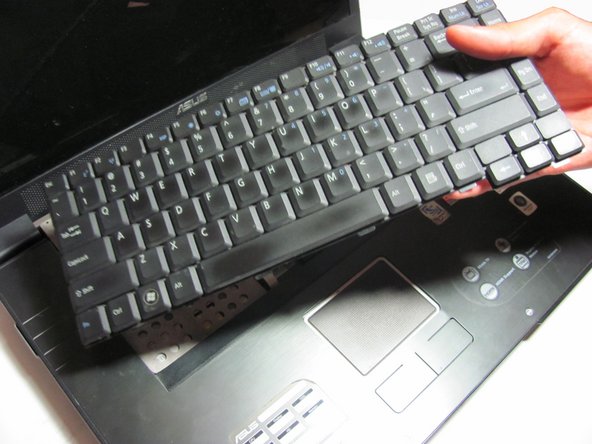
    • Once the panel is removed, use the spudger to pry out the keyboard.

    • Do not fully remove, for the keyboard is still attached to the ribbon cable.

  4. Disassembling Asus W2W-A1 Protective Cover: Schritt 4, Bild 1 von 2 Disassembling Asus W2W-A1 Protective Cover: Schritt 4, Bild 2 von 2
    • Detach the ribbon cable from the keyboard by pulling the end of the ribbon cable that is attached inside of the laptop.

    • Be sure to detach from the root rather than from near the middle. It should slide out with ease.

    • Now you can fully remove the keyboard from the laptop.

  5. Disassembling Asus W2W-A1 Protective Cover, Front Panel: Schritt 5, Bild 1 von 1
    • Place your fingers or a spudger between the front panel and the rest of the laptop.

    • Pull upwards gently to detach the side you are grabbing.

    • Repeat on the other side until the panel easily peels off the laptop.

  6. Disassembling Asus W2W-A1 Protective Cover, Touchpad: Schritt 6, Bild 1 von 2 Disassembling Asus W2W-A1 Protective Cover, Touchpad: Schritt 6, Bild 2 von 2
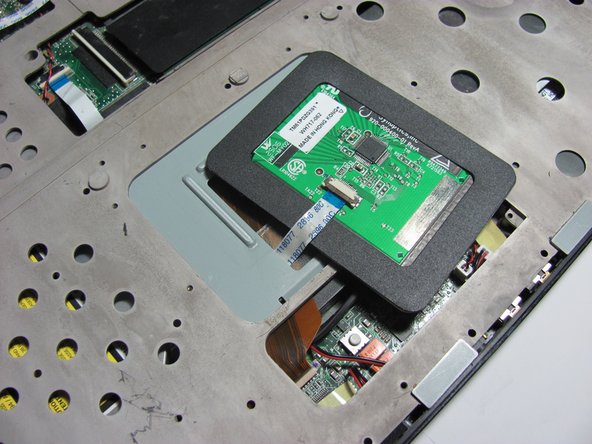
    • The touchpad should be loosely attached to the rest of the laptop by a ribbon cable.

  7. Disassembling Asus W2W-A1 Protective Cover: Schritt 7, Bild 1 von 1
    • Gently pull the ribbon cable out of its socket attached to the touchpad.

    • You are now able to remove the touchpad.

  8. Disassembling Asus W2W-A1 Protective Cover, Protective Cover: Schritt 8, Bild 1 von 1
    • Unscrew the 3 13 mm Phillips screws on the surface of the panel.

    • Unscrew the 4 mm Phillips screw beneath the panel.

  9. Disassembling Asus W2W-A1 Protective Cover: Schritt 9, Bild 1 von 3 Disassembling Asus W2W-A1 Protective Cover: Schritt 9, Bild 2 von 3 Disassembling Asus W2W-A1 Protective Cover: Schritt 9, Bild 3 von 3
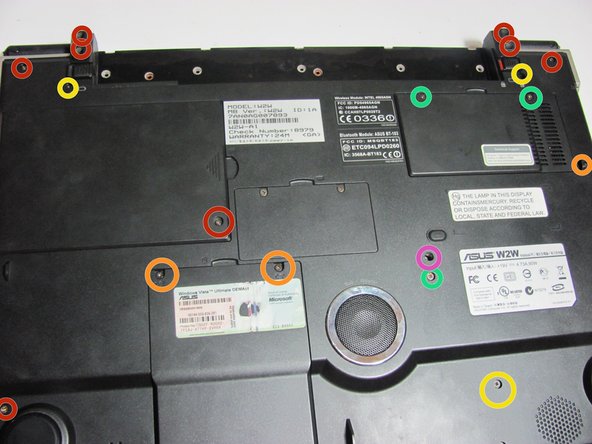
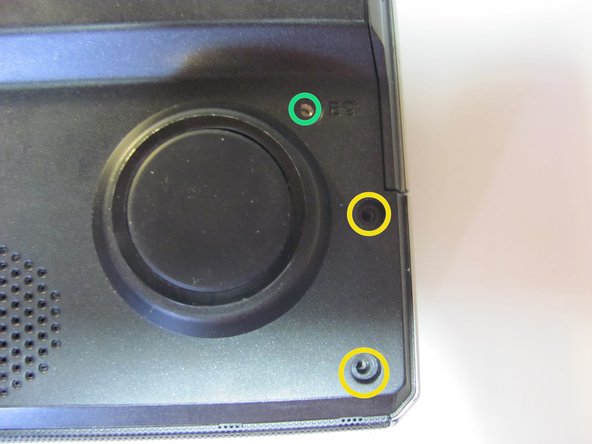
    • There are many different types of screws in this step so make sure to arrange the screws by their different sizes.

    • Unscrew the six 17 mm Phillips head screws on the stands on the back and the 2 "A" screws of the same size adjacent to the stands.

    • Unscrew the two C Phillips head screws on the hard drive panel. There is also one more C screw in the upper right corner of the laptop as shown.

    • Unscrew the eight 8mm lock phillips screws and the screws along the outside of the laptop.

    • Unscrew the three 3mm E Phillips screw and the one 3mm D Phillips screw.

    • Unscrew the 5mm Phillips head screw that lies just above the D screw.

  10. Disassembling Asus W2W-A1 Protective Cover: Schritt 10, Bild 1 von 1
    • Unscrew the two 8 mm Phillips screws beneath the hard drive panel.

    • After finishing this step, flip the laptop over.

  11. Disassembling Asus W2W-A1 Protective Cover: Schritt 11, Bild 1 von 1
    • Everything should now be loose enough for you to start removing the panel.

    • Do not fully remove the panel, for there are still ribbons attached on the inside.

  12. Disassembling Asus W2W-A1 Protective Cover: Schritt 12, Bild 1 von 1
    • Carefully remove the ribbons from the base.

    • Then you can lift the panel to access the components beneath.

Abschluss

To reassemble your device, follow these instructions in reverse order.

Nolan Schock

Mitglied seit: 04/14/14

501 Reputation

5 Anleitungen geschrieben

Team

Cal Poly, Team 13-29, Maness Spring 2014 Mitglied von Cal Poly, Team 13-29, Maness Spring 2014

CPSU-MANESS-S14S13G29

4 Mitglieder

8 Anleitungen geschrieben

0 Kommentare

Kommentar hinzufügen

Seitenaufrufe:

Letzte 24 Stunden: 0

Letzte 7 Tage: 1

Letzte 30 Tage: 1

Insgesamt: 393