Zum Hauptinhalt wechseln

Disassembling Flip Video USB Port

Was du brauchst

  1. Disassembling Flip Video USB Port, Outer Shell: Schritt 1, Bild 1 von 2 Disassembling Flip Video USB Port, Outer Shell: Schritt 1, Bild 2 von 2
    • Turn off the device and take the batteries out.

    • Remove metal sticker under the LCD screen with a spudger.

    • This may require a large force to pry off the glued sticker.

  2. Disassembling Flip Video USB Port: Schritt 2, Bild 1 von 1
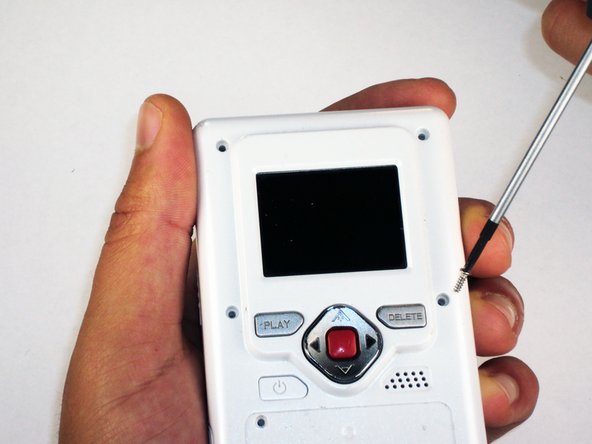
    • Remove the 4 gray screw caps with the spudger. These cover the screw heads and protect from dirt or grime.

  3. Disassembling Flip Video USB Port: Schritt 3, Bild 1 von 2 Disassembling Flip Video USB Port: Schritt 3, Bild 2 von 2
    • Remove the 5 10mm screws with the #00 Phillips screwdriver. These connect the back of the outer shell to the front of the outer shell.

  4. Disassembling Flip Video USB Port: Schritt 4, Bild 1 von 1
    • Open battery door. This can be done by gently depressing and sliding the battery down downward.

  5. Disassembling Flip Video USB Port: Schritt 5, Bild 1 von 1
    • Use the spudger to separate outer shells.

    • The spudger must be inserted between the shell halves to pry the edges apart.

    • Slowly work around the outside to separate the halves.

  6. Disassembling Flip Video USB Port, Circuit Board: Schritt 6, Bild 1 von 1
    • Remove the 3 5mm screws securing the circuit board to the front shell with the #00 Phillips screwdriver.

  7. Disassembling Flip Video USB Port: Schritt 7, Bild 1 von 1
    • Slowly lift the left side of the circuit board.

    • Do not attempt to remove the circuit board completely yet. It is still connected to the device.

  8. Disassembling Flip Video USB Port: Schritt 8, Bild 1 von 1
    • Disconnect the USB port cable from the back side of the circuit board.

  9. Disassembling Flip Video USB Port: Schritt 9, Bild 1 von 1
    • Slide out the battery contacts.

    • Battery contacts

    • Slot where battery contacts were located

  10. Disassembling Flip Video USB Port, USB Port: Schritt 10, Bild 1 von 1
    • Remove black 3mm screw that secures wire to outer shell with #00 Phillips screwdriver.

  11. Disassembling Flip Video USB Port: Schritt 11, Bild 1 von 1
    • Lift wire out of the outer shell slot.

    • The wire mount should stay attached to the wire.

  12. Disassembling Flip Video USB Port: Schritt 12, Bild 1 von 1
    • Use tweezers to remove the spring that holds the port door shut.

    • Make sure the spring is firmly grasped by the tweezers so that it does not shoot off of the case.

  13. Disassembling Flip Video USB Port: Schritt 13, Bild 1 von 1
    • Remove the 3 screws securing USB port cover to the outer case with the #00 Phillips screwdriver.

  14. Disassembling Flip Video USB Port: Schritt 14, Bild 1 von 1
    • Remove the USB port cover.

  15. Disassembling Flip Video USB Port: Schritt 15, Bild 1 von 1
    • Remove the USB slider.

  16. Disassembling Flip Video USB Port: Schritt 16, Bild 1 von 1
    • Lift out the USB port slowly.

    • Since the hinge is spring loaded, be careful that no pieces fall out when the port is lifted.

Abschluss

To reassemble your device, follow these instructions in reverse order.

Ein:e weitere:r Nutzer:in hat diese Anleitung absolviert.

Elizabeth

Mitglied seit: 04/15/10

100 Reputation

6 Anleitungen geschrieben

Team

Cal Poly, Team 26-21, Regan Spring 2010 Mitglied von Cal Poly, Team 26-21, Regan Spring 2010

CPSU-REGAN-S10S26G21

4 Mitglieder

12 Anleitungen geschrieben

0 Kommentare

Kommentar hinzufügen

Seitenaufrufe:

Letzte 24 Stunden: 0

Letzte 7 Tage: 0

Letzte 30 Tage: 0

Insgesamt: 4,124