Zum Hauptinhalt wechseln

Disassembling HP Envy TouchSmart 15 Back Plate

Grundständige Anleitung
Dies ist eine grundständige Anleitung, die nur als Teil einer anderen Anleitung verwendet werden sollte.

Was du brauchst

  1. Disassembling HP Envy TouchSmart 15 Back Plate, Battery: Schritt 1, Bild 1 von 1
    • Press the battery release tab and the battery will pop up.

  2. Disassembling HP Envy TouchSmart 15 Back Plate: Schritt 2, Bild 1 von 1
    • Remove the battery from the laptop, it will come out easily.

  3. Disassembling HP Envy TouchSmart 15 Back Plate, Accessory Plate: Schritt 3, Bild 1 von 2 Disassembling HP Envy TouchSmart 15 Back Plate, Accessory Plate: Schritt 3, Bild 2 von 2
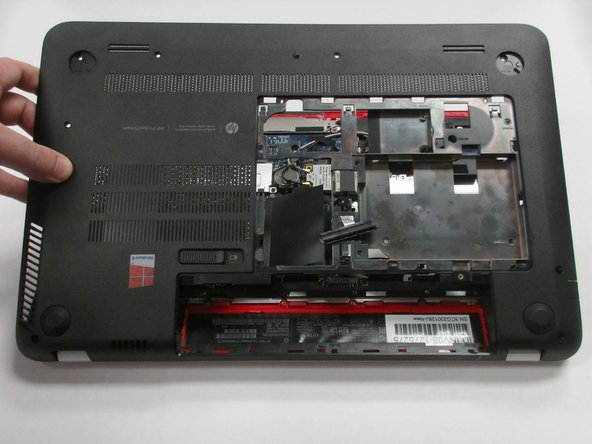
    • Remove the single screw holding the accessory plate. This is a PH0 2.0x2.5 screw.

  4. Disassembling HP Envy TouchSmart 15 Back Plate: Schritt 4, Bild 1 von 3 Disassembling HP Envy TouchSmart 15 Back Plate: Schritt 4, Bild 2 von 3 Disassembling HP Envy TouchSmart 15 Back Plate: Schritt 4, Bild 3 von 3
    • Pry the accessory plate up from the back of the laptop by applying force upwards where the screw was removed.

  5. Disassembling HP Envy TouchSmart 15 Back Plate, Solid State Drive: Schritt 5, Bild 1 von 2 Disassembling HP Envy TouchSmart 15 Back Plate, Solid State Drive: Schritt 5, Bild 2 von 2
    • Remove the PM 2.0x2.5 screw with the PH#0 Screwdriver attachment that is shown at the corner of the Solid State Drive.

    • After you have removed the screw, the Solid State Drive should lift up.

  6. Disassembling HP Envy TouchSmart 15 Back Plate: Schritt 6, Bild 1 von 2 Disassembling HP Envy TouchSmart 15 Back Plate: Schritt 6, Bild 2 von 2
    • Very carefully, remove the SSD by gently pulling away from the SSD socket.

  7. Disassembling HP Envy TouchSmart 15 Back Plate, Hard Drive: Schritt 7, Bild 1 von 2 Disassembling HP Envy TouchSmart 15 Back Plate, Hard Drive: Schritt 7, Bild 2 von 2
    • Use the plastic opening tool to pry the hard drive away from the board. Notice that there is a slit centered at the back of where the hard drive is sitting. This is where you'll insert the plastic opening tool as shown in the photo. Finally, pry with the plastic opening tool to remove the hard drive.

  8. Disassembling HP Envy TouchSmart 15 Back Plate: Schritt 8, Bild 1 von 2 Disassembling HP Envy TouchSmart 15 Back Plate: Schritt 8, Bild 2 von 2
    • Firmly grasp the connector's base as shown and pull to remove from the hard drive.

  9. Disassembling HP Envy TouchSmart 15 Back Plate, Back Plate: Schritt 9, Bild 1 von 3 Disassembling HP Envy TouchSmart 15 Back Plate, Back Plate: Schritt 9, Bild 2 von 3 Disassembling HP Envy TouchSmart 15 Back Plate, Back Plate: Schritt 9, Bild 3 von 3
    • Remove the highlighted rubber stoppers with a metal spudger as pictured. They should expose a screw that you will need to remove in a later step.

  10. Disassembling HP Envy TouchSmart 15 Back Plate: Schritt 10, Bild 1 von 3 Disassembling HP Envy TouchSmart 15 Back Plate: Schritt 10, Bild 2 von 3 Disassembling HP Envy TouchSmart 15 Back Plate: Schritt 10, Bild 3 von 3
    • Remove plastic cover highlighted. It should expose a screw that you will need in a later step.

  11. Disassembling HP Envy TouchSmart 15 Back Plate: Schritt 11, Bild 1 von 1
    • Remove all highlighted screws with PH 1 screwdriver. These screws are PM 2.0x2.5.

  12. Disassembling HP Envy TouchSmart 15 Back Plate: Schritt 12, Bild 1 von 2 Disassembling HP Envy TouchSmart 15 Back Plate: Schritt 12, Bild 2 von 2
    • Remove all highlighted screws from the battery access area. These are PM 1.5x2.0 screws

    These were very tricky for me, I ended up with one nonfunctional screw, it seemed as if the 00 was a bit too large for the screw.

    Yonatan Abrego - Antwort

    Use the PH0 bit for this step.

    kevinbush85 - Antwort

  13. Disassembling HP Envy TouchSmart 15 Back Plate: Schritt 13, Bild 1 von 1
    • Remove screws highlighted with PH1 screwdriver from accessory plate area.These are PM 2.5x3.0 screws

    • Remove screws highlighted with PH1 screwdriver from accessory plate area. These are PM 2.5x4.5 screws

  14. Disassembling HP Envy TouchSmart 15 Back Plate: Schritt 14, Bild 1 von 3 Disassembling HP Envy TouchSmart 15 Back Plate: Schritt 14, Bild 2 von 3 Disassembling HP Envy TouchSmart 15 Back Plate: Schritt 14, Bild 3 von 3
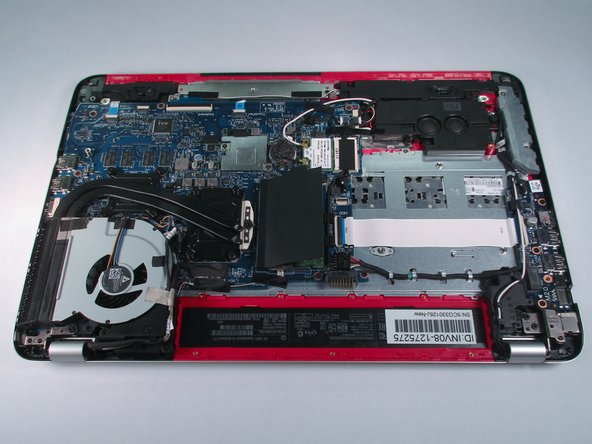
    • Pry open back plate area with plastic opening tool. The back plate should pry open with relative ease. If you feel some resistance at any point please refer to steps 2-5 because a screw has probably been missed.

Abschluss

To reassemble your device, follow these instructions in reverse order.

Team

USF Tampa, Team 2-6, Sullivan Fall 2015 Mitglied von USF Tampa, Team 2-6, Sullivan Fall 2015

USFT-SULLIVAN-F15S2G6

4 Mitglieder

10 Anleitungen geschrieben

0 Kommentare

Kommentar hinzufügen

Seitenaufrufe:

Letzte 24 Stunden: 0

Letzte 7 Tage: 0

Letzte 30 Tage: 0

Insgesamt: 53